Laying floor tiles properly comes down to six jobs: check and clean the base, snap layout lines from the centre of the room, choose tile adhesive or mortar to suit the job, comb the adhesive with the right notched trowel, set the tiles with levelling clips, and tap-test for hollow tiles before grouting. Floor tiles that sound hollow, have lipped edges or hold puddles almost always come from skipping one of those jobs, not from bad tiles. This lesson is written the way a lead tiler coaches an apprentice, with a worked example of a 4 × 5 m bedroom in 60 × 60 cm tiles, from material take-off to sign-off.
By the end of this lesson, you will be able to:
- Check a base before tiling: flatness with a 2 m straightedge, fall to the drain, soundness and moisture.
- Snap layout lines from the centre so cut tiles land in hidden places and no visible cut is smaller than about half a tile.
- Choose between tile adhesive and sand-cement mortar, pick the trowel notch for the tile size, and reach 80% (dry areas) to 95% (wet areas) adhesive coverage.
- Use levelling clips on large tiles, tap-test for hollow tiles and fix them before grouting.
- Work out materials and labour for a 20 m² room with figures that add up.
Learning tiling properly? Floor tiling is step 4 of the roadmap, after materials and cutter safety, reading plans and setting out, and substrate prep and screeding. See the 8-step tiler roadmap to learn in the right order.
What layers make up a tiled floor, and why do tiles go hollow?
A tiled floor has three layers: the base (concrete or a flat cement screed), the bedding layer (tile adhesive or mortar) and the tile. A tile is only secure when the bedding is in full contact with both the back of the tile and the base. Wherever there is a void, tapping gives a hollow "thud", and over time that tile tends to crack at the corner under a heavy wardrobe or lift when the temperature changes.
The three main causes of hollow tiles
- Poor coverage: a notch too small for the tile size, or the old habit of five dabs of adhesive at the corners and centre.
- Skinned-over adhesive: adhesive spread over too large an area, so tiles go down after the open time (usually 20–30 minutes) and no longer bond.
- Weak or dirty base: a crumbly screed, dust, oil or leftover mortar, or a base so dry it sucks the water out of the bedding.
Why large tiles are harder
Tiles of 60 × 60 cm and up are usually slightly bowed from firing, so two neighbouring tiles can easily sit a few tenths of a millimetre apart at the edge. That is why large tiles need tile adhesive, back-buttering and levelling clips. The bigger the tile, the flatter the base must be.
Prepare the base and tools before you tile
Preparation takes about a third of the time but decides most of the quality. A lead tiler usually will not let an apprentice mix adhesive until the base has been checked.
Check flatness, fall and soundness
- Flatness: lay a 2 m aluminium straightedge in several directions; for large tiles the gap under it should be no more than about 3 mm. Fill deep hollows first with repair mortar and let it cure, rather than building up the adhesive.
- Fall: bathroom, balcony and loggia floors must fall about 1–2% to the drain. The fall is formed in the screed (step 3 of the roadmap); the adhesive layer simply follows it.
- Soundness: scratch with a nail; a good base does not score deeply. Tap with a hammer: it should sound solid, not hollow.
- Cleanliness and moisture: sweep, vacuum and scrape off mortar lumps; a fresh screed needs the curing time stated by the adhesive maker (typically a few days to 1–2 weeks depending on thickness).
Tools and materials
Basic kit: notched trowels in several sizes (Figure 1), a flat trowel, a drill with a mixing paddle, a mixing bucket, a 2 m straightedge, a spirit level or laser, a chalk line, a rubber mallet, levelling clips and pliers, a tile cutter or angle grinder, a sponge and a bucket of clean water. Protective gear: knee pads, rubber gloves, safety glasses and a dust mask for cutting.
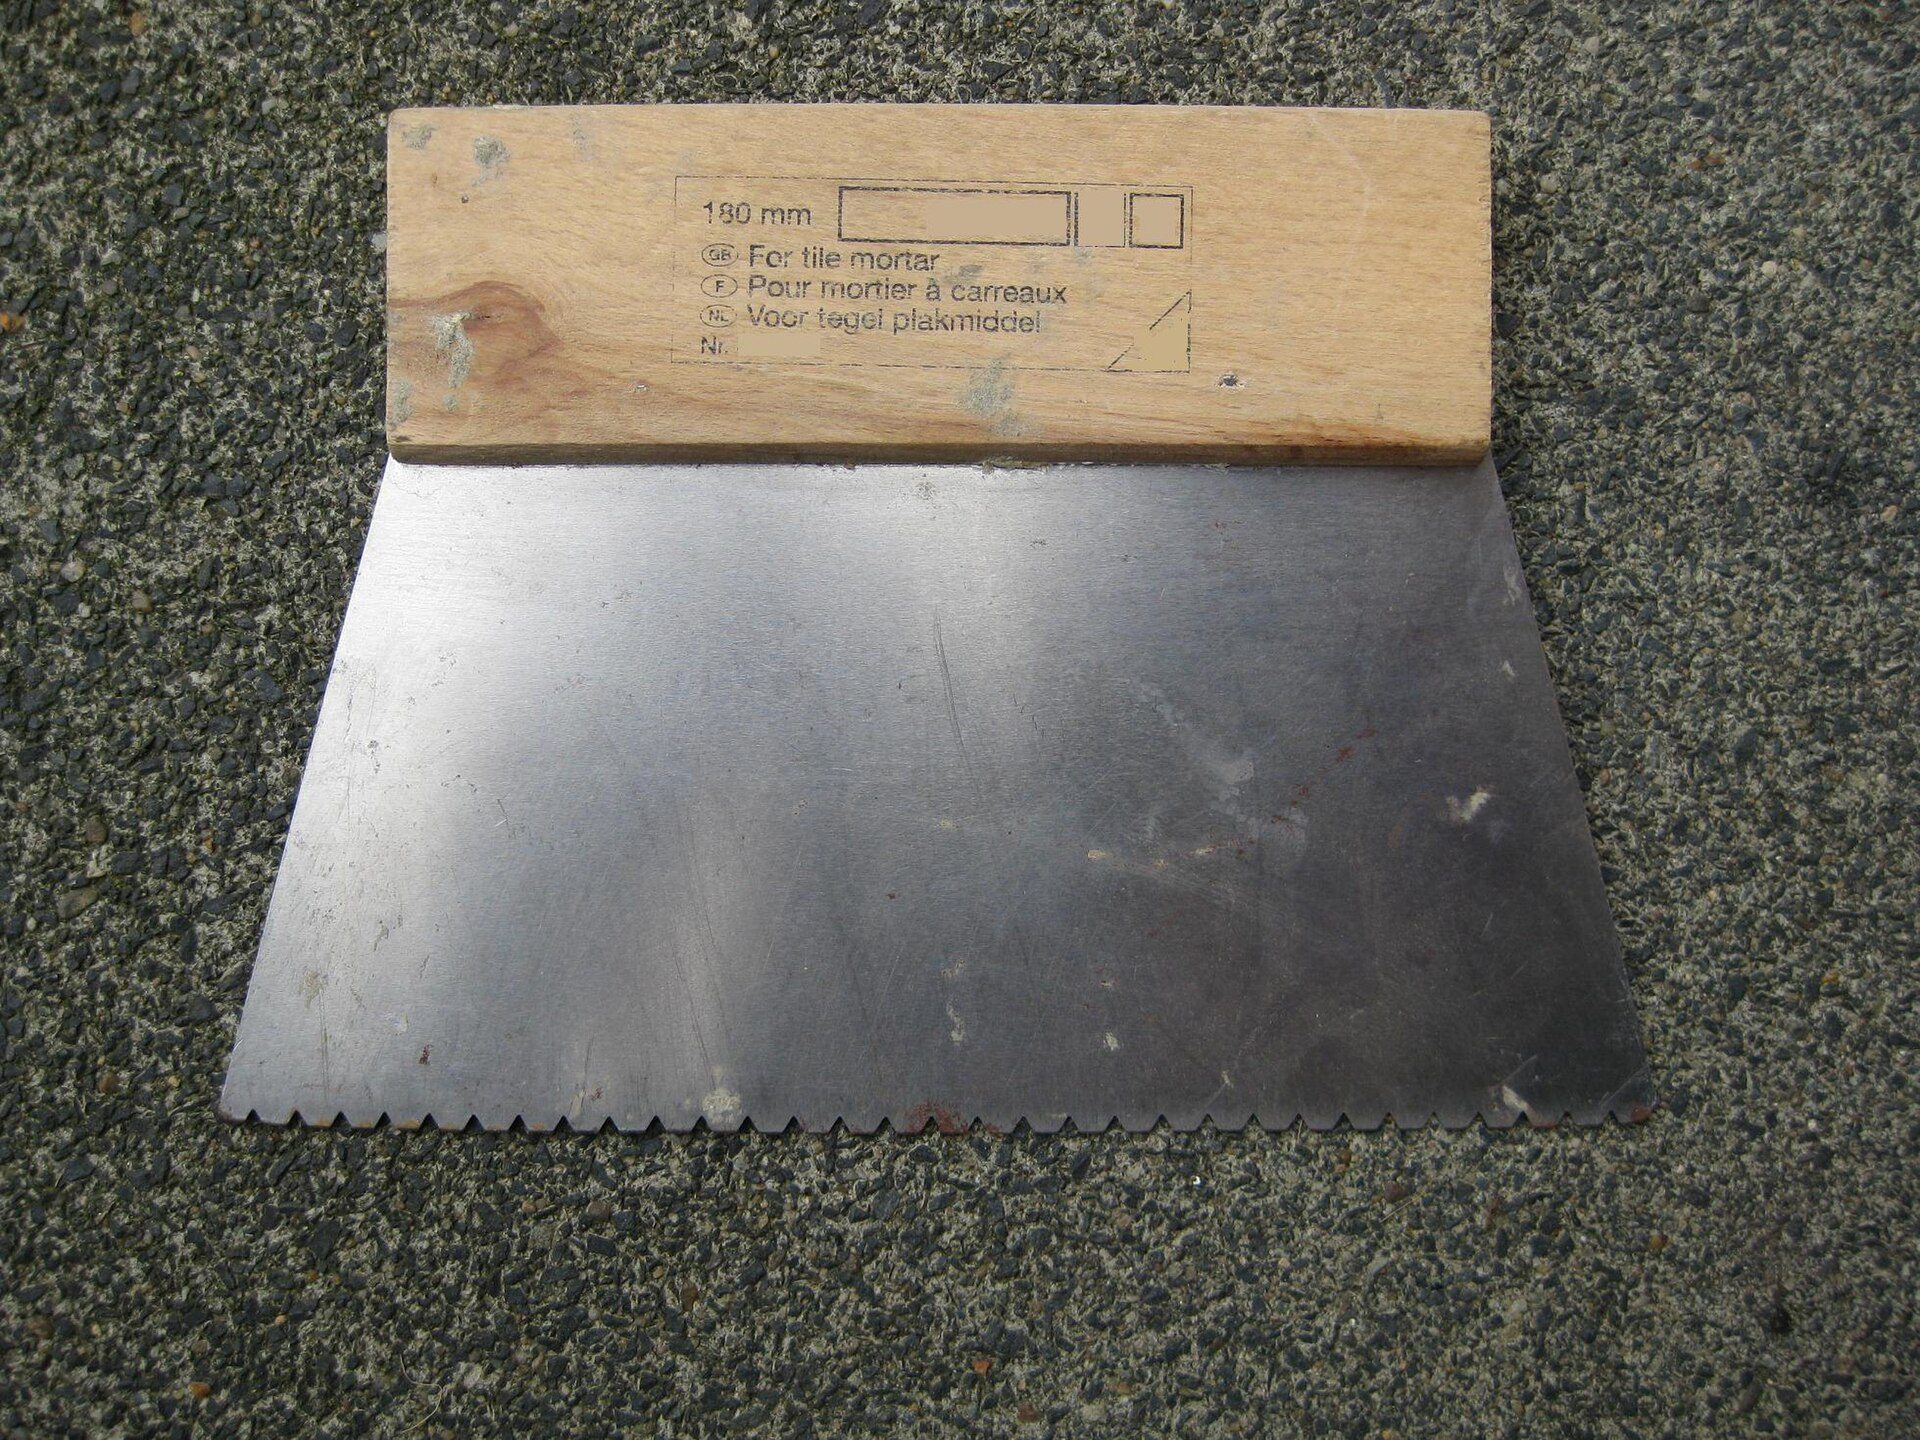
Photo: Romate / Wikimedia Commons, CC BY-SA 3.0

Prime when needed
Very absorbent bases (dry screed, lightweight concrete) or an existing glazed tile floor often need a bonding primer as specified by the adhesive maker. The primer stops the adhesive losing water too fast and improves the bond. Do not substitute a thin cement slurry for the primer when using adhesive.
Snap lines and set out from the centre
Setting out decides how the floor looks. The aim: courses run straight with the doorway and the most visible wall, cut tiles fall in hidden places (under cabinets, behind the door), and no exposed cut is smaller than about half a tile.
Find the centre lines and check they are square
- Measure two opposite walls, mark the midpoints and snap the first centre line.
- Snap the second centre line at right angles and check it with the 3–4–5 rule: 3 m along one line, 4 m along the other, and a diagonal of exactly 5 m means square.
- Dry-lay one row of tiles from the centre out to both walls (with spacers) to see how big the edge cuts will be.
Shift the centre line when cuts are too small
If a tile edge sits on the centre line and the cut against the wall is only 10–20 cm, shift by half a tile so the centre of the room falls in the middle of a tile. The cuts on both sides become bigger and equal. The worked example below does this for a 4 m room.
Set the finished floor level
Shoot a 1 m datum on the walls with a laser or water level and measure down to the finished tile level. Bedroom floors usually sit a few centimetres higher than the bathroom floor so water cannot run out. Write the levels on the wall so the whole crew works to the same mark.
Tile adhesive or sand-cement mortar?
Two methods are still common in Vietnam. The traditional mortar bed spreads a thick sand-cement layer and lays the tiles on it, usually with a cement slurry poured over the mortar. The adhesive method is a thin-bed system: the base is already screeded flat and the adhesive is only about 3–10 mm thick. Prices below are 2026 references for Vietnam (1,000,000 VND is roughly 40 USD), and vary by region and brand.
| Criterion | Tile adhesive (thin bed) | Sand-cement mortar (thick bed) |
|---|---|---|
| Bed thickness | About 3–10 mm | About 3–5 cm |
| Base requirement | Must already be flat (small gap under a 2 m straightedge) | Can tile an uneven base; the mortar levels it |
| Suitable tiles | All types; essential for large-format and low-absorption porcelain | Small, absorbent tiles; poor with large porcelain |
| Risk of hollow tiles | Low if the notch is right and tiles go down within the open time | Higher, as mortar shrinks and the slurry dries before the tile is set |
| Material cost per m² | Adhesive about 50,000–120,000 VND | Sand and cement about 40,000–80,000 VND |
| Speed | Fast once the base is ready, less mess | Slower; you must wait for the mortar to harden before walking on it |
When mortar still makes sense
If the base is not screeded, needs building up by several centimetres, or the job uses terracotta or small 30 × 30 cm tiles on a tight budget, a mortar bed is still reasonable. Then pour the slurry just in time, tap every tile evenly and never let the slurry skin over.
Choosing the adhesive
Adhesive bags carry a class code under the standard (for example C1, C2, plus T for slip resistance, E for extended open time, S for deformability). For large porcelain, wet floors and outdoor areas choose a higher class such as C2, as recommended on the bag. Mix with exactly the water stated on the bag, using a low-speed drill, let it stand a few minutes, then mix again.
A 7-step method for laying floor tiles with adhesive
This method is for 60 × 60 cm tiles indoors. Smaller tiles follow the same steps, but you may skip the clips and back-buttering.
Steps 1–3: mix, comb, back-butter
- Mix the adhesive with the water ratio on the bag, and only mix what you can use within the pot life printed on it. Never add water to revive adhesive that has started to stiffen in the bucket.
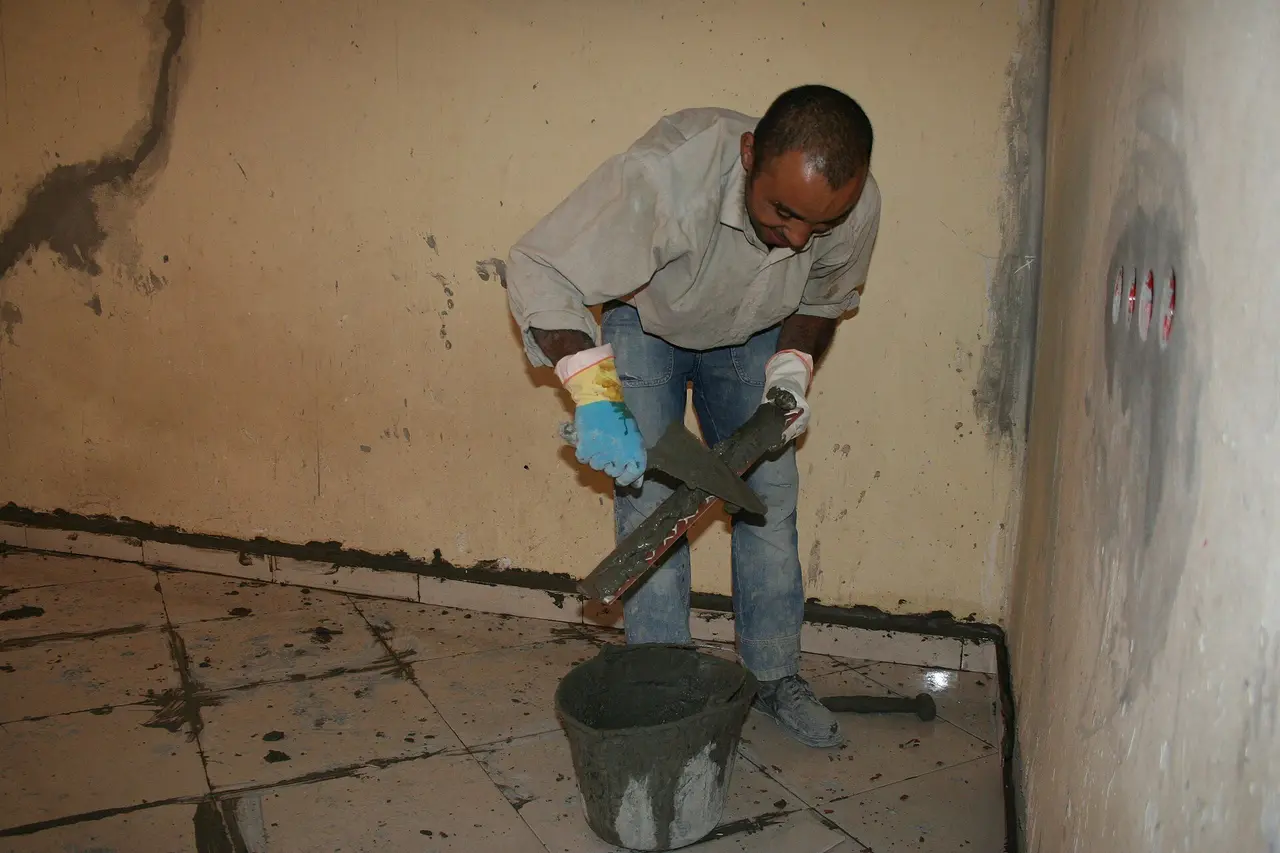
- Comb the adhesive onto the base: use the flat side of the trowel to press a thin key coat into the base, then hold the notched edge at about 45–60 degrees and comb straight, parallel ridges. Only spread what you can tile in 10–15 minutes, about 1–2 m².
- Back-butter (tiles from 60 cm): skim a thin, flat coat of adhesive on the back of the tile. It fills the ribs on the back and helps reach the required coverage.
Steps 4–5: set the tile and fit levelling clips
- Set the tile: lower it a few centimetres off position and slide it into place, across the direction of the ridges, so the ridges collapse and close the gaps. Tap gently with a rubber mallet from the centre outwards (Figure 3).
- Fit levelling clips: slide the clip base under the edges of two neighbouring tiles, about 15–20 cm in from each corner. Push in the wedge or turn the cap until the two edges are level, without overtightening and pulling the tile off its bed.
Steps 6–7: check coverage and clean up
- Lift a tile: lift the first tile and about one in every ten straight after setting, and look at the back. Coverage should be at least about 80% on dry floors and 95% on wet or outdoor floors, with adhesive at every edge and corner.
- Clean up: wipe adhesive off the tile face and out of the joints with a damp sponge while it is still soft. The row against the wall goes down last, with cut tiles (see Figure 2). Keep off the floor for about 24 hours, then remove the clips and grout.
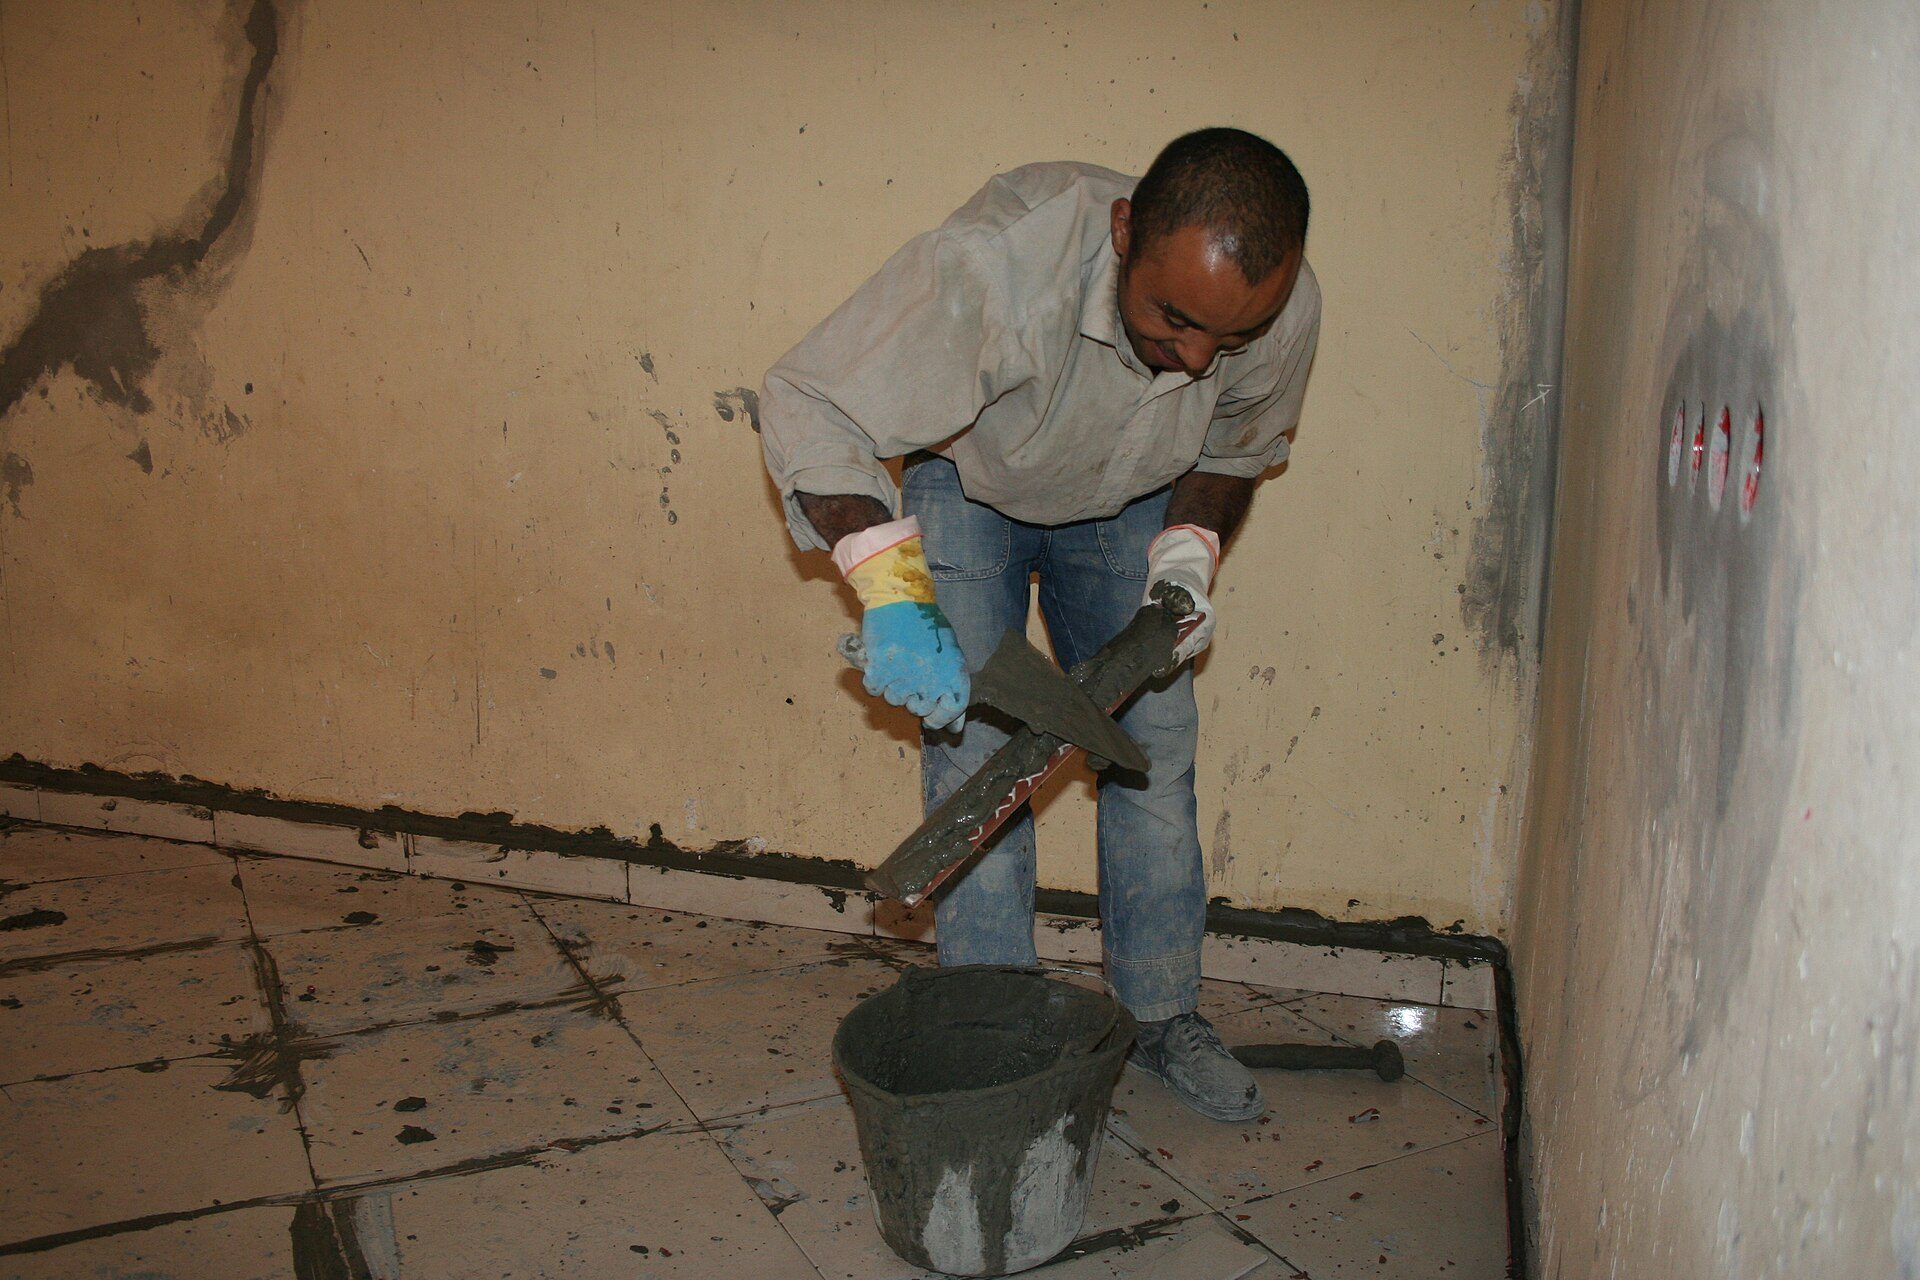
Photo: Lahoucine Boukhanchouch / Wikimedia Commons, CC BY-SA 4.0

Choosing the notch size by tile size
| Tile size | Suggested notch | Back-butter | Adhesive use, approx. (kg/m²) |
|---|---|---|---|
| Up to 30 × 30 cm | 6 mm | Not needed | 3–4 |
| 40 × 40 to 50 × 50 cm | 8 mm | Advisable on wet floors | 4–5 |
| 60 × 60 cm | 10 mm | Yes | 5–6 |
| 80 × 80 cm, 60 × 120 cm and up | 12 mm | Mandatory | 6–8 |
These are common starting points; always check the coverage table on the bag and lift tiles to adjust the notch.
Safety when tiling
Tiling has no high voltage or open flame, but three risks are often underrated: stone dust when cutting, the alkali in cement and adhesive, and knee and back strain from kneeling for hours.
Safety warning: Cutting and grinding porcelain and stone creates silica dust, and long-term exposure causes irreversible lung disease: cut outdoors or in a ventilated space, prefer wet cutting, and wear a fine-dust mask and safety glasses. Angle grinders must have the guard fitted; unplug before changing blades, never run the cable through standing water, and plug in through an RCD (residual current device). Tile adhesive and cement are alkaline and cause burns on prolonged skin contact: wear rubber gloves and wash off at once with clean water; if it gets in your eyes, rinse continuously for at least 15 minutes and see a doctor immediately. Wear knee pads and stand up every 30–45 minutes of kneeling; lift 25 kg bags with your legs, not by bending your back.
Keep the household safe
Barrier off newly tiled areas and put a "do not walk" sign on the door. Small children and pets stepping on fresh tiles are both a hazard and a way to knock tiles out of line.
Cutters and flying fragments
Clamp the tile firmly before cutting, and never hold a small piece in your hand while cutting it with a grinder. Replace chipped or cracked blades immediately.
Worked example: tiling a 4 × 5 m bedroom with 60 × 60 cm tiles
A second-floor bedroom in a Vietnamese tube house measures 4.0 × 5.0 m clear = 20 m², with the door in the middle of the 4 m wall. The screed was laid 10 days ago and the largest gap under the 2 m straightedge is 2 mm. The owner chose 60 × 60 cm porcelain tiles with 2 mm joints, laid on adhesive.
Setting out
- Width 4.0 m: with a tile edge on the centre line, each side is 2.0 m = 3 tiles (1.8 m) plus a 20 cm cut, too small on both sides of the door.
- Shift by half a tile so the centre of the room sits in the middle of a tile: centre tile 0.6 m, leaving (4.0 − 0.6) ÷ 2 = 1.7 m each side = 2 tiles (1.2 m) plus a cut of about 50 cm (about 49 cm after joints). Both edges are symmetrical and the cuts are nearly full tiles.
- Length 5.0 m: start with a full tile at the door; 8 tiles = 4.8 m, leaving a last cut of about 20 cm (about 18 cm after 8 joints × 2 mm), under the bed and wardrobe, which is acceptable.
Material take-off
- Tiles: 20 m² + 7% waste = 21.4 m². Each box of 4 tiles = 4 × 0.36 = 1.44 m². 21.4 ÷ 1.44 ≈ 14.9, so buy 15 boxes = 21.6 m².
- Adhesive: 10 mm notch plus back-buttering, about 5.5 kg/m². 20 × 5.5 = 110 kg; with 25 kg bags that is 4.4 bags, so buy 5.
- Levelling clips: about 10 bases per m² × 20 m² = 200 bases (bases are snapped off and thrown away, caps are reused).
- Grout: 2 mm joints on 60 cm tiles use little, about 0.1 kg/m², so 2 kg.
Cost table (2026 reference, varies by region; tiles supplied by the owner)
| Item | Quantity × unit price | Amount |
|---|---|---|
| C2 tile adhesive, 25 kg bag | 5 bags × 220,000 VND | 1,100,000 VND |
| Levelling clip bases | 200 × 1,000 VND | 200,000 VND |
| Grout | 2 kg × 60,000 VND | 120,000 VND |
| Labour, 60 × 60 tiles on adhesive | 20 m² × 150,000 VND | 3,000,000 VND |
| Total | 4,420,000 VND | |
Check: 1,100,000 + 200,000 + 120,000 + 3,000,000 = 4,420,000 VND (about 175 USD), or 4,420,000 ÷ 20 = 221,000 VND per m² excluding tiles. Two tilers lay this room in about one day; the next day they remove the clips, grout and clean.
Checking for hollow tiles and signing off
Do not wait until after grouting to check. A hollow tile found in the first 24 hours is easy to lift and re-lay; after grouting you have to cut out the joints and break the tile, which costs many times more.
Tap-test with a rubber mallet or tapping rod
After about 24 hours, tap each tile lightly at the four corners and the centre with a rubber mallet (Figure 3) or a small metal rod. A solid, even sound is a pass; a hollow "thud" at a corner or across the tile means missing adhesive. Mark hollow tiles with tape and note how many and where.
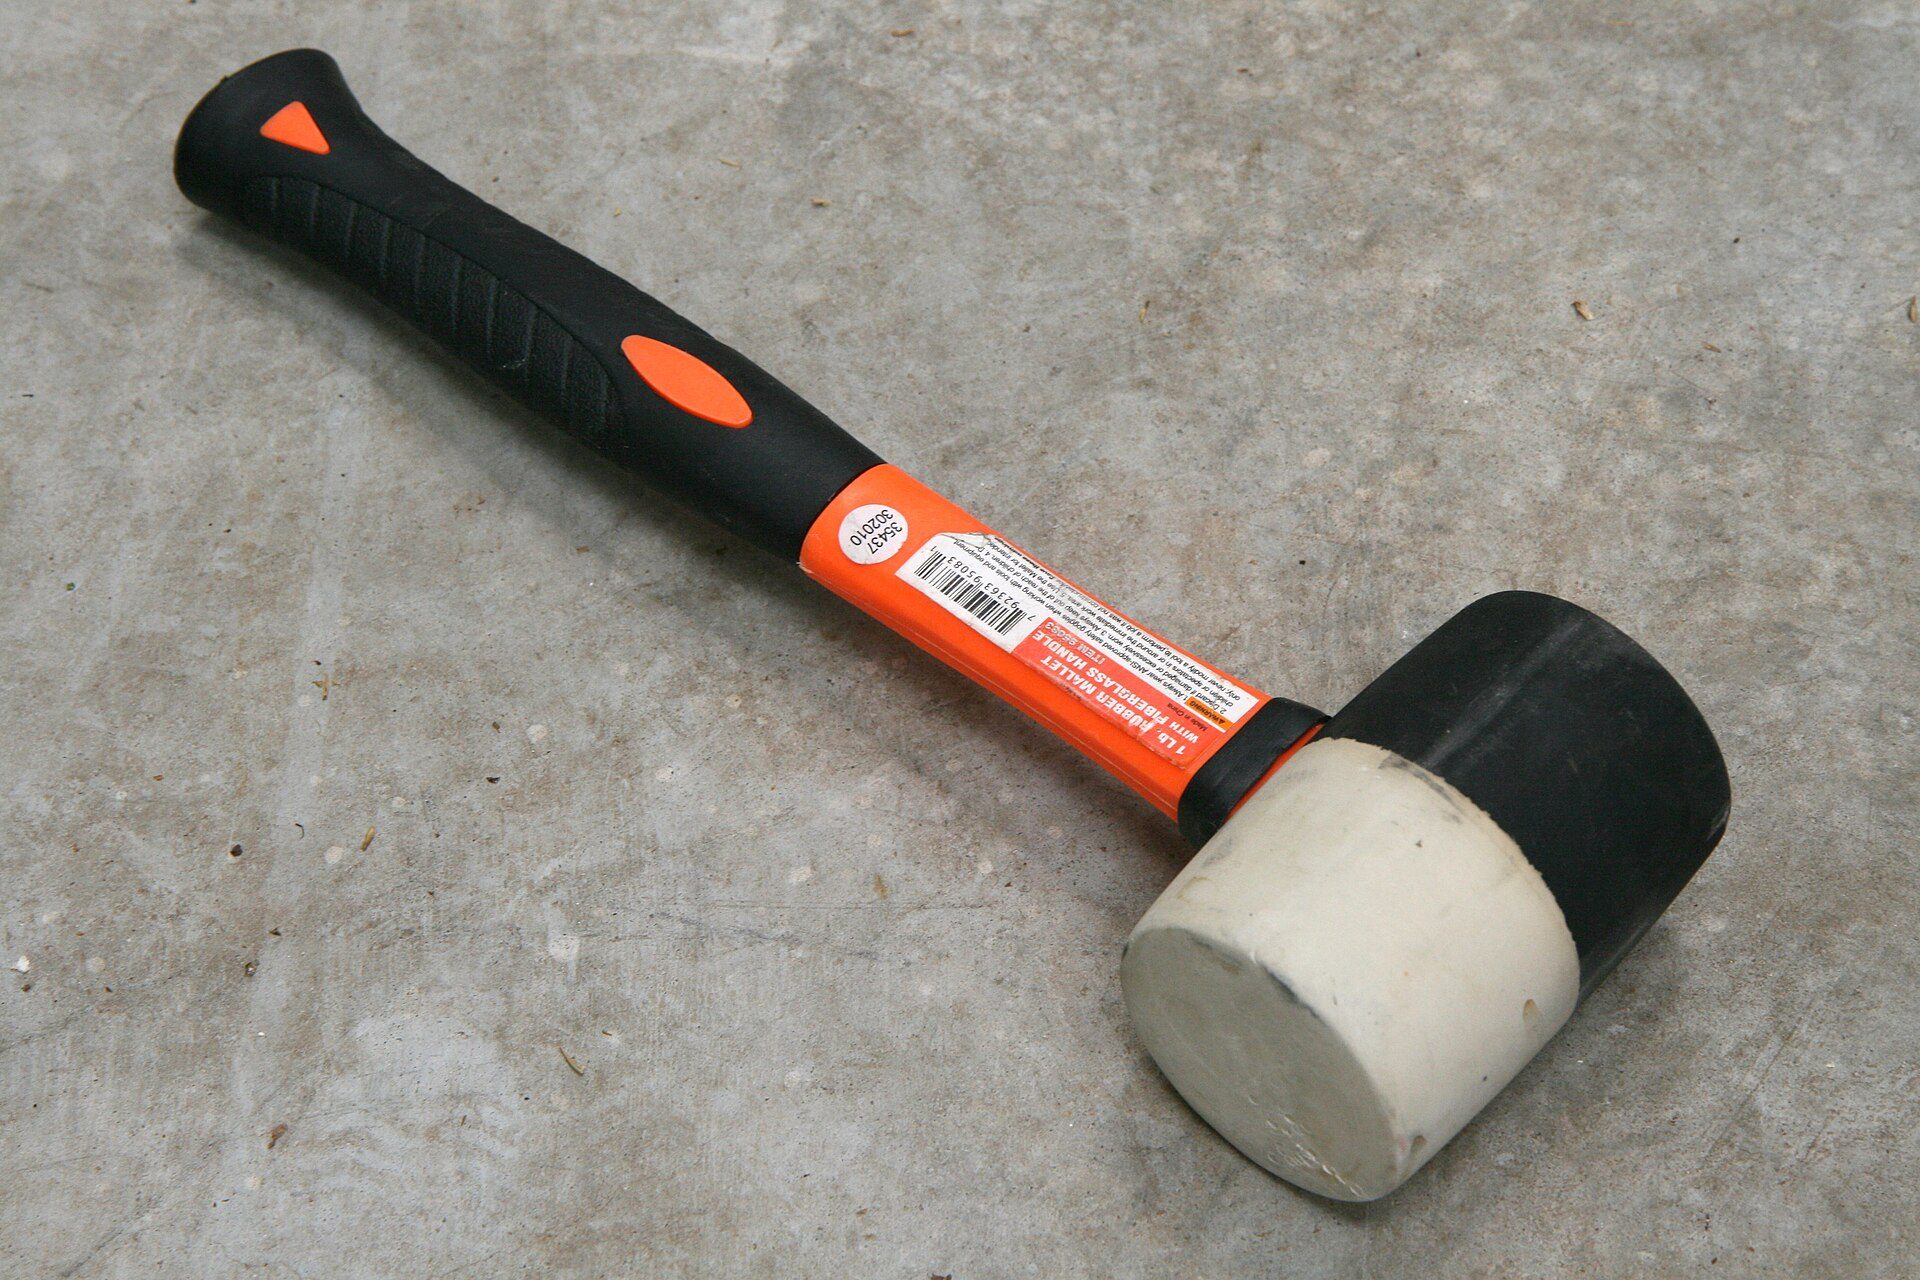
Photo: Ildar Sagdejev ( Specious ) / Wikimedia Commons, CC BY-SA 4.0

Measure flatness and lippage
- A 2 m straightedge laid on the tiles in several directions: small, even gaps, and the straightedge does not rock.
- Run your hand across the joints: no step you can feel between neighbouring tiles (usually under about 1 mm).
- Wet floors: pour a bucket of water; it should all run to the drain with no puddles.
Record and hand over
Photograph the whole room and note how many hollow tiles were fixed and the grouting date. Tell the owner not to place heavy furniture for about 3–7 days, depending on the adhesive.
Common floor tiling mistakes and how to avoid them
Hollow corners
Sign: the corner sounds hollow while the centre sounds solid. Cause: spot-bedding, too small a notch, or a dip in the base at the corner. Prevention: comb straight ridges, back-butter, lift the first tile and adjust the notch.
Lipped edges that show under light
Sign: low-angle light throws shadows at the joints. Cause: large tiles laid without clips, or long tiles laid at a 50% offset so their bowed edges clash. Prevention: use levelling clips; for tiles 60 cm long or more, offset by about one third rather than half.
Puddles, or water running back to the door
Sign: after mopping, water pools in a corner. Cause: the screed has no fall and the tiler tried to create one with uneven adhesive thickness. Prevention: check the fall before tiling, fix the screed if needed, and never use the adhesive to make the fall.
Tiles cracking or tenting after a few months
Sign: a row in the middle of the room lifts or cracks diagonally. Cause: no movement gap at the walls, tiles butted tight to the wall, or a shrinking base. Prevention: leave a 5–8 mm gap at the walls (hidden by the skirting), and in large rooms add movement joints as the adhesive maker recommends.
Frequently asked questions
Do I need to wet the base before tiling with adhesive?
A clean, surface-dry base is enough. If the base is very dry and absorbent, dampen it lightly or prime it as the maker instructs, but never leave standing water when you spread the adhesive.
Can I tile over old tiles?
Yes, if the old tiles are sound, not hollow, flat, and the new height does not foul the doors. Degrease thoroughly and use an adhesive and primer suited to a glazed tile base; break out any hollow old tiles first.
How soon can I walk on it and grout?
Usually after about 24 hours for light foot traffic and grouting; rapid-set adhesive may allow sooner. Always follow the time printed on the bag, and wait longer in cold, damp weather.
Are levelling clips mandatory?
Not for small tiles, but strongly advised for 60 × 60 cm and larger and for plank tiles. Clips keep edges level and limit tiles sinking as the adhesive shrinks, but they cannot replace a flat base.
Practice tasks and self-assessment
- Set out a real room or draw one on paper: 3.6 × 4.2 m with 60 × 60 cm tiles, and write down the cut size on each side.
- Lay a 1 m² trial area of 60 × 60 cm tiles on a practice board with levelling clips; after 15 minutes lift one tile and photograph the back.
- Work out materials and cost for a 16 m² room using the table above with prices from your area.
Self-assessment criteria
- Pass: no visible cut is smaller than about half a tile, and both sides are symmetrical.
- Pass: the lifted tile shows at least 80% coverage with adhesive at the edges and corners; no tile sounds hollow.
- Pass: the 2 m straightedge does not rock and you cannot feel any lippage by hand.
- Not yet: spot-bedding, spreading so much adhesive that it skins over, or using adhesive to build the fall.
Once your floors are solid, move on to the next roadmap step: Wall tiling bathrooms & kitchens, where you start walls from the second row, drill holes for sockets and taps, and mitre outside corners at 45 degrees.
Keep learning tiling: after floors come wall tiling, epoxy grout, a full bathroom project and per-m² quoting. See the 8-step tiler roadmap.