A laptop that overheats is, most of the time, suffering from dust packed into the heatsink fins and thermal paste between the chip and the copper plate that has dried out after 2–4 years of use. The fix is to measure temperatures first, remove the bottom cover, clean the fan and heatsink, reapply thermal paste, then measure again to prove the temperatures have dropped. If the laptop is still hot after a correct job, the fan squeals, a heatpipe is dented or the battery is swollen, it belongs in a repair shop or an authorised service centre. This lesson walks through it the way a senior technician coaches an apprentice in a Vietnamese computer shop: diagnosis, step-by-step procedure, a reference temperature table and a worked job with before-and-after readings.
By the end of this lesson, you will be able to:
- Measure CPU and GPU temperatures at idle and under heavy load with monitoring software (such as HWMonitor) and record them on a before/after job sheet.
- Tell apart the five common causes of laptop overheating: dust, dried paste, a weak fan, bad usage habits, and software or hardware faults.
- Remove the bottom cover, disconnect the battery, take out the cooling assembly, clean the fan and apply the right amount of new paste in about 60–90 minutes.
- Recognise jobs beyond a beginner (laptop under warranty, dented heatpipe, swollen battery, faulty motherboard) and refer them on at the right moment.
Want to learn computer and laptop repair properly? Upgrading, cleaning and repasting is step 4 of the roadmap, after hardware and ESD safety, building PCs and installing Windows. See the 8-step computer and laptop repair roadmap to know what to learn first and what comes next.
Why laptops overheat: follow the path of the heat
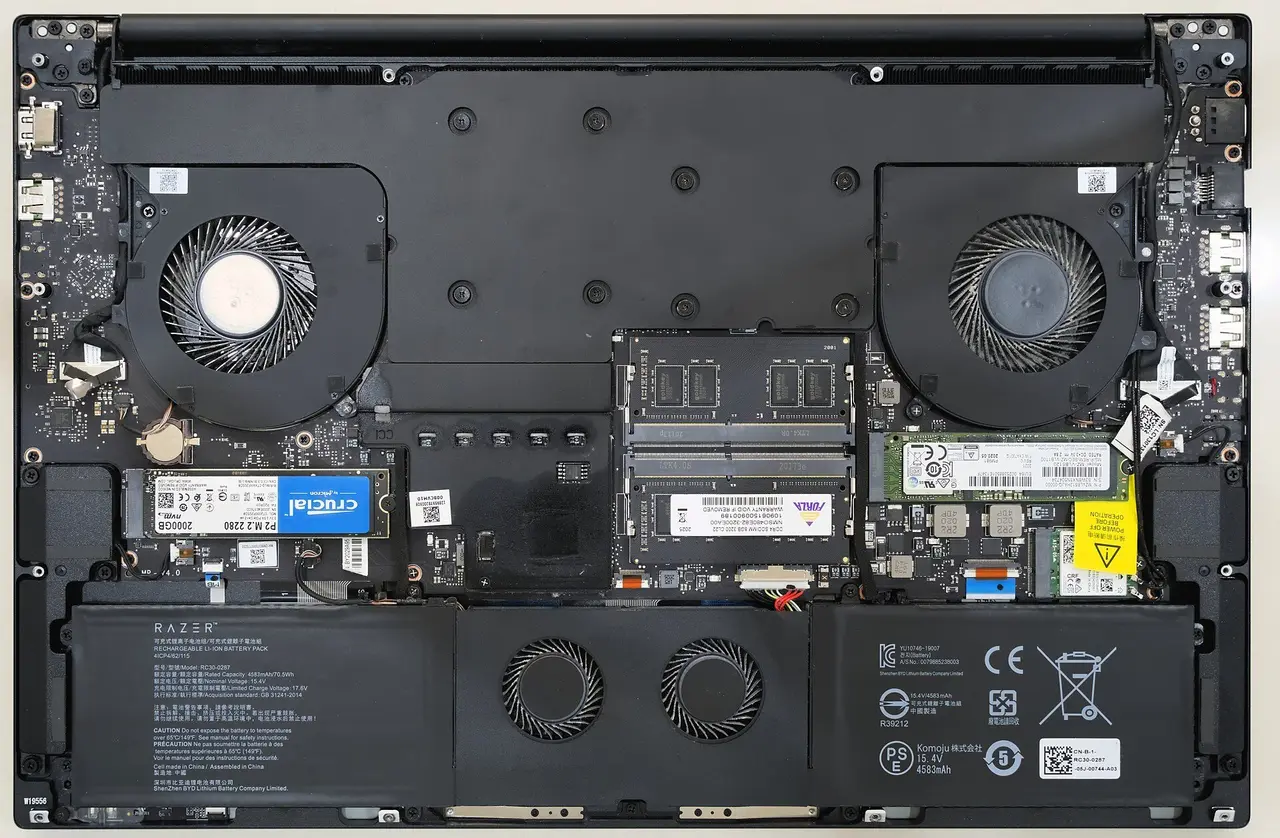
The CPU and GPU turn almost all of the power they use into heat. That heat passes through the thermal paste into a copper plate, travels along heatpipes (sealed copper tubes in which a liquid evaporates and condenses) to a fin stack of thin aluminium or copper, and the fan blows air through the fins and out of the vents. Figure 1 shows a laptop with its bottom cover removed: two fans, the heatpipes and the fins sit right along the rear edge.
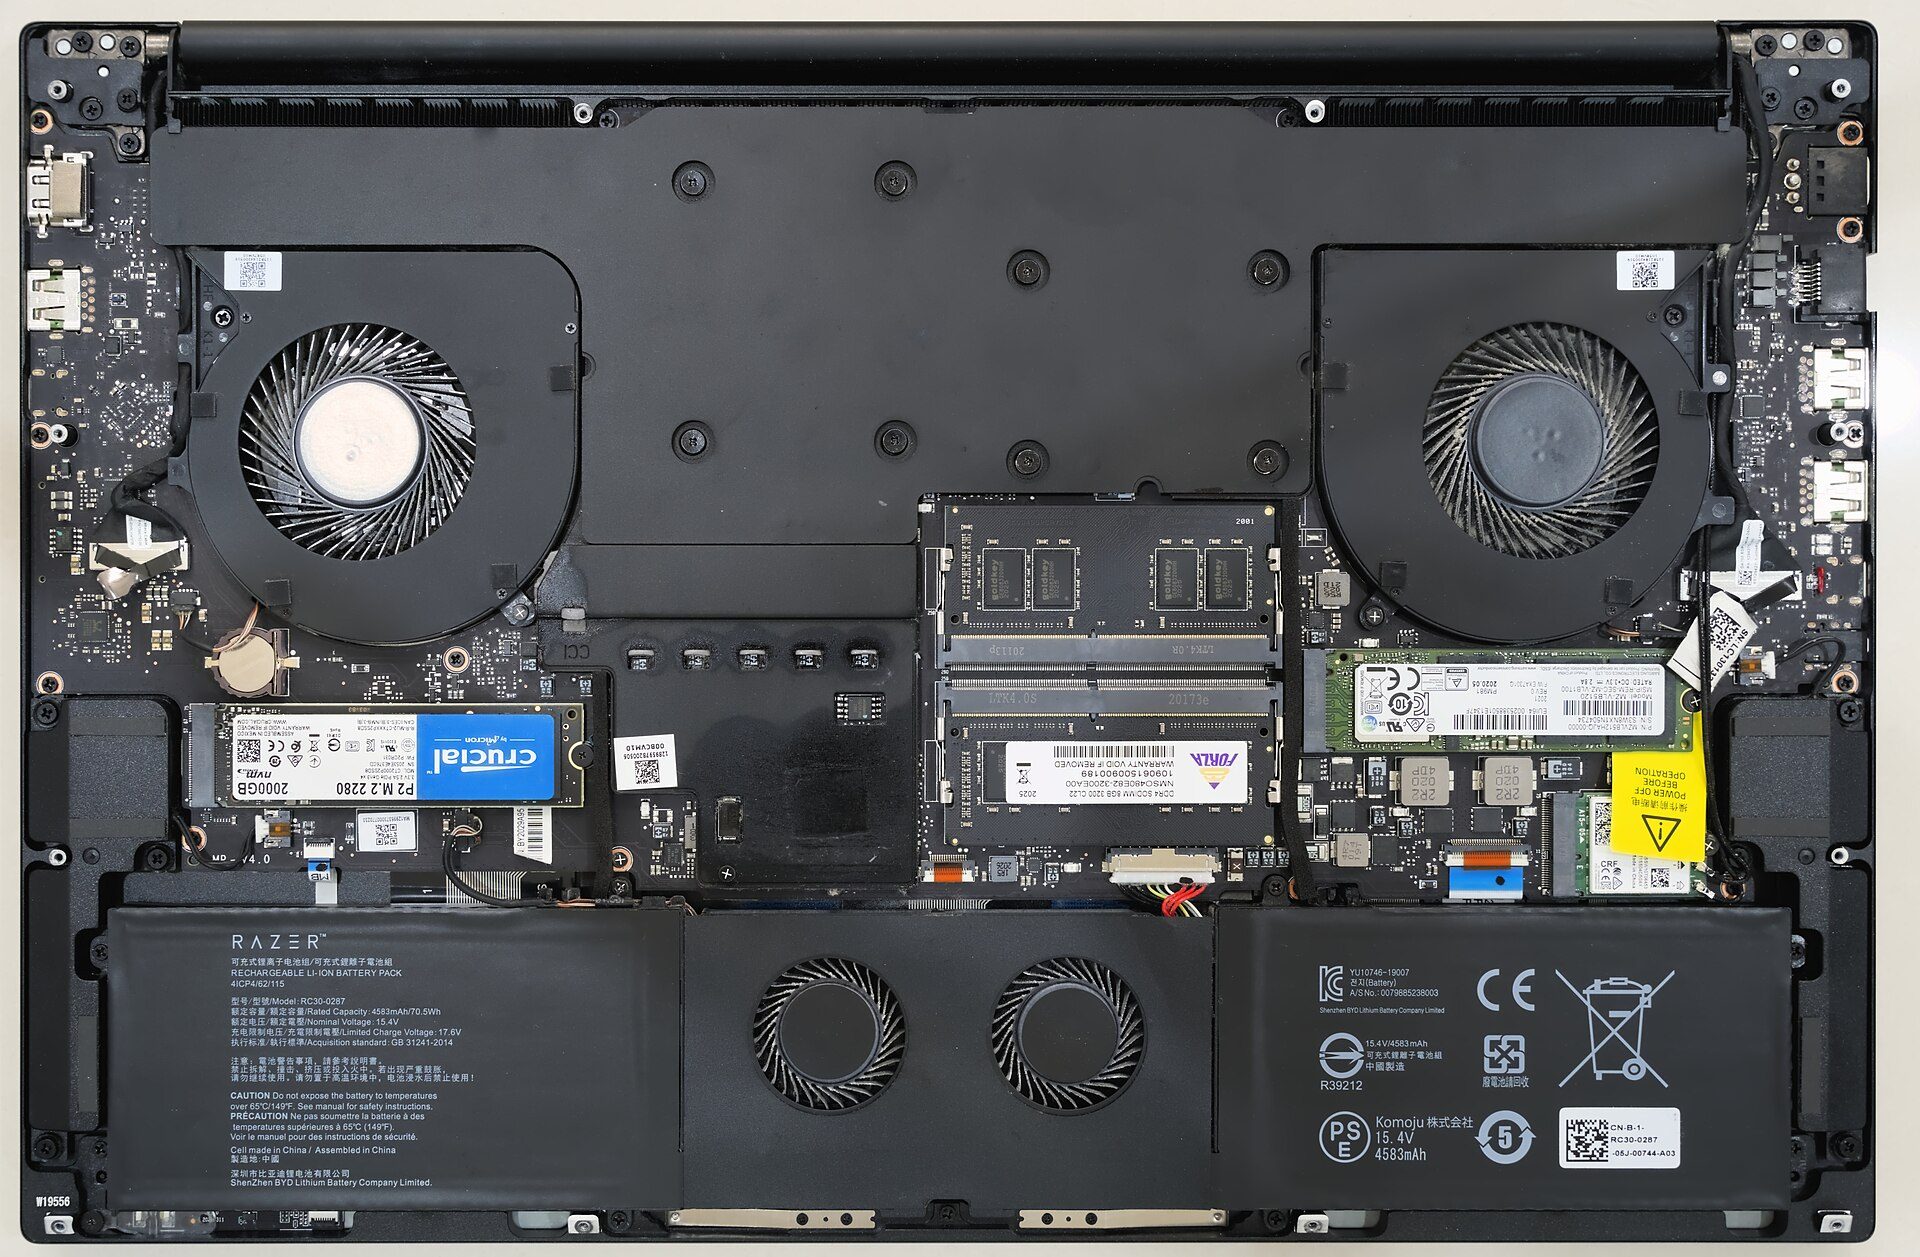
Photo: Benlisquare / Wikimedia Commons, CC BY-SA 4.0

One blocked link heats up the whole system
Dust on the fins stops the airflow; dry, cracked paste stops heat reaching the copper plate; a worn fan bearing spins slowly. These faults add up over time, so a three-year-old laptop usually runs much hotter than when it was new, even with the same software.
Thermal throttling: heat makes the laptop slow
When the chip reaches the manufacturer's safe temperature limit (around 95–100°C on many laptop CPUs), it lowers its clock speed to protect itself. The user sees stutter, dropped frames in games and longer video exports. If the temperature keeps rising, the laptop can shut down without warning. That is why "hot" and "slow" are often the same fault.
How hot is too hot?
There is no single number for every machine, because thin-and-light chips and gaming chips differ. The table below shows the reference ranges technicians use in rooms of about 28–32°C, which is normal in Vietnam; always check the chip's specification on the manufacturer's website.
| Situation | Normal (reference) | Worrying | Fix now |
|---|---|---|---|
| Idle, browser only | 40–55°C | 60–70°C | Above 70°C, fan loud all the time |
| Office work, video calls | 50–70°C | 75–85°C | Above 85°C, laptop stutters |
| Gaming or video editing for 15 minutes | 70–88°C | 90–95°C | Hits the limit, heavy throttling or shutdowns |
| Palm rest and underside | Warm | Uncomfortable on your lap | Too hot to touch for long, burning smell |
Diagnose before you open the laptop
Good technicians do not open the case straight away: five minutes of questions and measurements give you the numbers for a clear quote.
Ask the customer five questions
- How old is the laptop, and has it ever been cleaned or repasted?
- When does it get hot: right after boot, while gaming, or while charging?
- Is the fan loud, squealing, or silent even when the laptop is hot?
- Where is it usually used: on a desk, a mattress, a blanket, a lap?
- Is it still under warranty, and has it been dropped, wet or repaired elsewhere?
Measure with software and fill in a job sheet
Install a temperature monitor such as HWMonitor and record CPU and GPU temperatures and clock speed after 10 minutes at idle. Then run a heavy load for 15 minutes (a CPU stress test or a game the customer plays) and record the highest temperature and the lowest clock speed. Take a screenshot to compare with the results after the job and to send to the customer.
Rule out software causes
Open Task Manager and look for processes using the CPU constantly while the laptop is idle. Crypto-mining malware, a stuck updater or a browser with dozens of tabs can all make a laptop hot. If the CPU sits at 60–100% at idle, fix the software first (the Windows and drivers step); cleaning will not cure the root cause.
Five common causes
| Cause | Symptom | How to confirm | Fix |
|---|---|---|---|
| Dust on fins and vents | Fan is loud but airflow is weak and barely warm | Shine a torch into the vent and see a felt-like dust layer | Clean the fan and heatsink |
| Dried thermal paste | Temperature shoots up as soon as load starts | Over 2 years without repasting; paste is hard and cracked when removed | Clean off and apply new paste |
| Weak or worn fan | Squealing or rattling; spins slowly or not at all | Check fan speed (RPM) in software, listen with the cover off | Replace with the correct part number |
| Bad usage habits | Only hot on a mattress or blanket | On a flat desk the temperature drops clearly | Advise the customer, use a cooling stand |
| Software or motherboard fault | High CPU use at idle, or one corner gets hot as soon as the charger is plugged in | Task Manager; an unusual hot spot on the board | Fix the software; refer to a board-level technician |
Tools and safety
The tools are cheap, but missing one of them is how screws, ribbon cables and motherboards get damaged.
Minimum tool kit
- Small screwdrivers (PH0, PH00, and Torx T5–T6 for many models), plastic spudgers, a thin plastic card.
- An anti-static wrist strap or mat; a screw tray with compartments.
- A soft brush, a hand air blower or a small electric duster; tweezers.
- High-purity isopropyl alcohol (IPA), lint-free cloths or cotton buds.
- Standard, non-conductive thermal paste, and thermal pads of the correct thickness if they need replacing.
Choosing paste and pads
Beginners should only use ordinary non-conductive thermal paste. Liquid metal conducts heat better but also conducts electricity; if it spreads it shorts components, so it is for experienced technicians and laptops designed for it. Thermal pads (the soft pads on VRAM and power circuits) must be replaced with the same thickness: too thick and the copper plate no longer presses flat on the main chip, too thin and they do not touch the components.
Safety warning: shut the laptop down fully (Shut down, not Sleep), unplug the charger, remove the bottom cover and disconnect the battery cable from the motherboard before anything else; many laptops also have a battery-disable option in the BIOS, so use it if available. A lithium battery that is punctured, bent or shorted can catch fire: never pry the battery with a metal screwdriver and never press on it. If a swollen battery is pushing up the bottom cover or keyboard, stop, do not continue cleaning, and recommend a battery replacement in the next step. Do not let the fan spin freely while blowing air at it: it can overspin and damage its bearing, and the fan motor can feed current back into the board. If you use an air compressor, drain the moisture from the tank first and keep the nozzle well away from components. Work on a dry bench, wear the wrist strap, and never work with wet hands.
Warranty, and photos at every step
If the laptop is still under the manufacturer's warranty, ask the customer and read the current warranty policy, because opening it yourself can void the warranty with some brands or if a seal is broken. In that case send it to the service centre. When you open the laptop, photograph the screws and cables at each step; screws have different lengths, and a long screw in a short hole can punch through to the keyboard or crack the board.
Cleaning the fan and heatsink step by step
The order below suits most laptops with a removable bottom cover. For unibody laptops, or models where the keyboard or screen must come off first, read the service manual for that model before you start.
Remove the bottom cover and disconnect the battery
- Count and remove all the bottom screws, laying them out in the tray to match the case; check for hidden screws under rubber feet or labels.
- Run a plastic spudger along the edge, starting near a hinge, and release the clips slowly without forcing them.
- Disconnect the battery connector by pulling straight along the connector, never by the wires.
- Hold the power button for about 10–15 seconds to drain residual charge from the board.
Remove the cooling assembly
The cooling assembly is the copper plate, heatpipes, fins and fan, held to the board by numbered screws around the chip (see Figure 2). Loosen the screws in reverse number order (usually from the highest number down to 1), unplug the fan cable and lift the assembly straight up. If old paste is holding it, twist it gently a little side to side until it lets go; never pry against the chip.
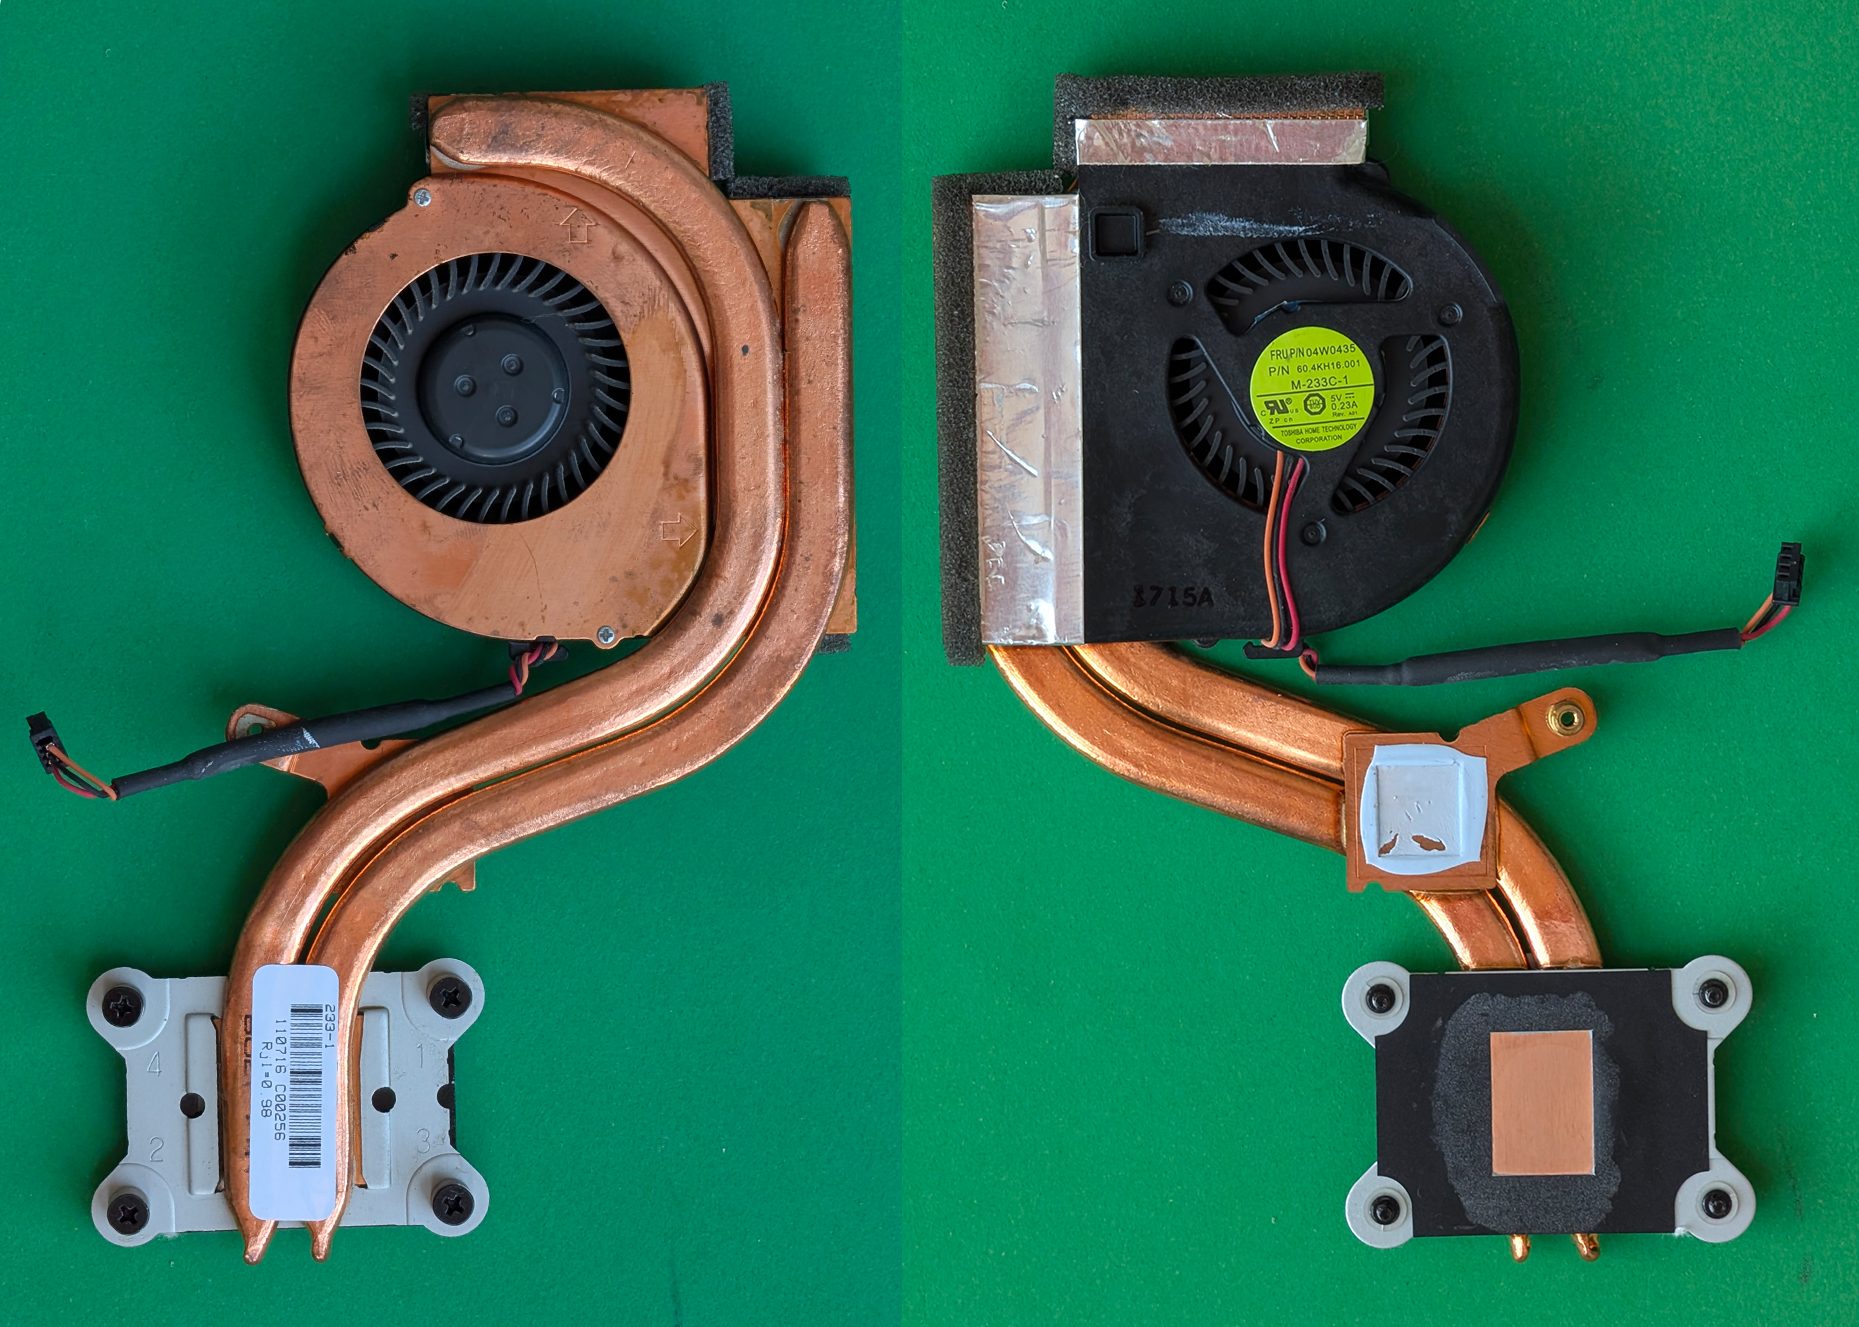
Photo: Siarhei Besarab / Wikimedia Commons, CC BY-SA 4.0

Clean the fan and fins
Dust inside a laptop usually forms a felt-like mat right on the face of the fins where the fan blows into them. Figure 3 shows dust on the fan and heatsink of a desktop cooler; in a laptop the layer looks the same but sits hidden inside, so you cannot see all of it from the outside vent.
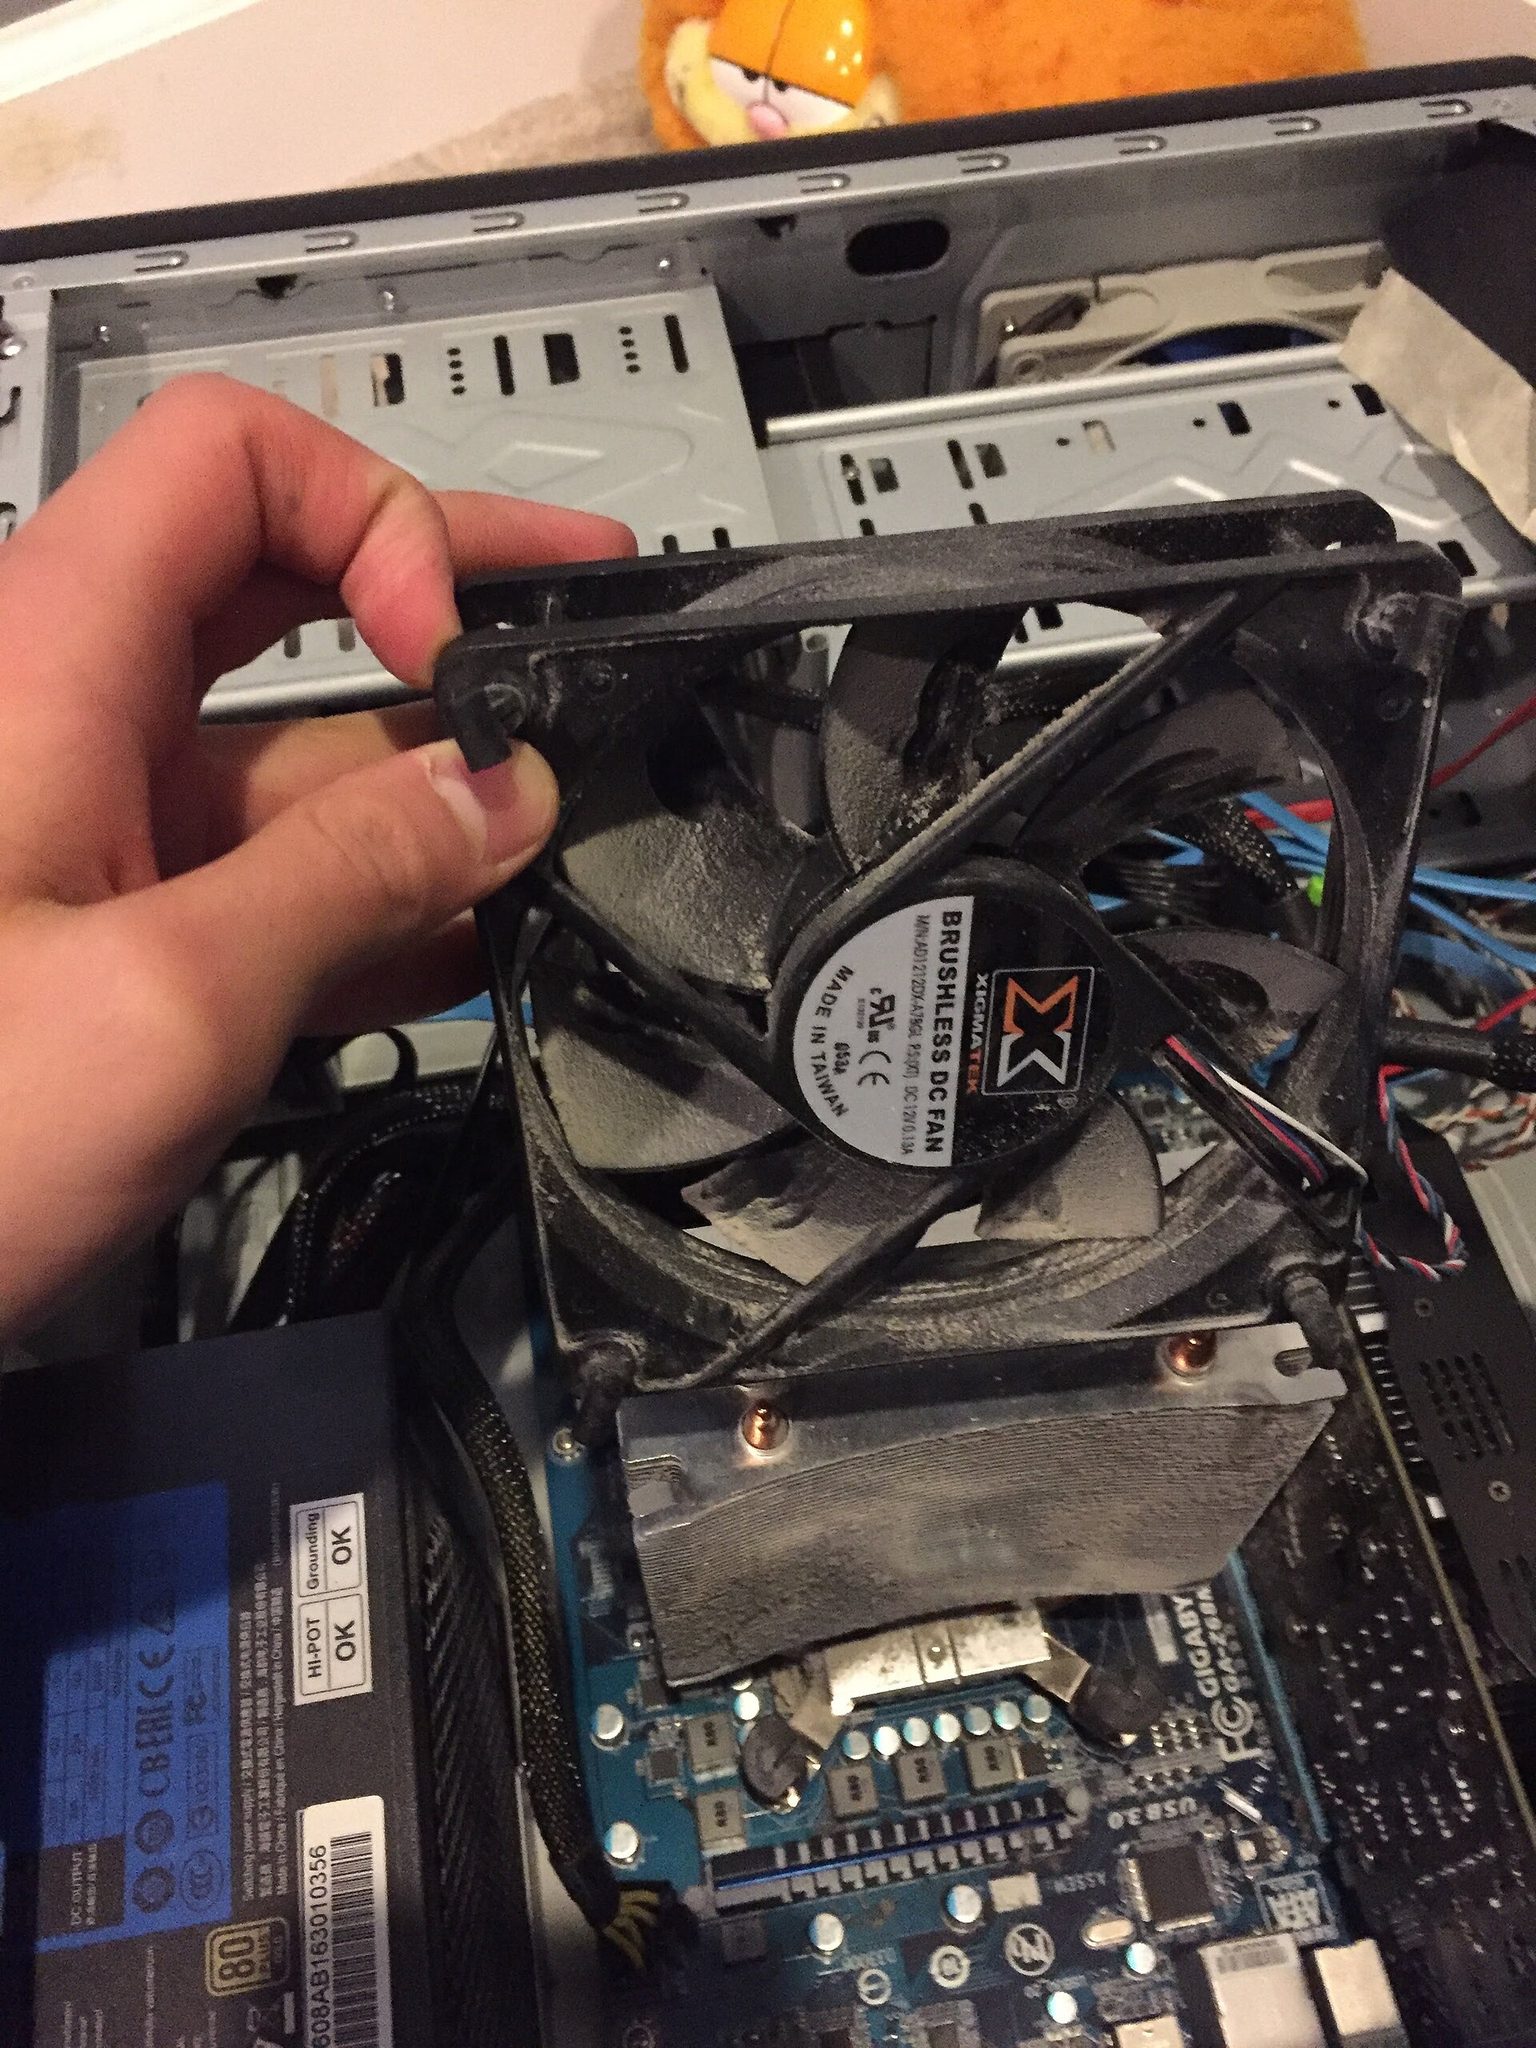
Photo: Atomicdragon136 / Wikimedia Commons, CC BY 3.0

- Use tweezers to lift the dust mat off the fins in one piece so it does not fall inside.
- Hold the fan blades still with a plastic tool and brush the blades and the fan housing with a soft brush.
- Blow dust out against the normal airflow (from the vent inwards), still holding the blades.
- Spin the fan by hand: it should be smooth, with no wobble and no rubbing. Wobble or rubbing means the fan should be replaced.
- Clean the intake vents in the bottom cover and any dust filter.
Applying thermal paste correctly
Thermal paste fills the microscopic gaps between the chip surface and the copper plate. The layer must be thin and complete; too thick blocks heat, too little leaves gaps.
Clean off the old paste
After several years old paste dries hard, turns grey or cracks like dry soil. Figure 4 shows old paste still on the base of a desktop cooler after removal; in a laptop the same imprint is left on the copper plate and the chip. Wipe with a lint-free cloth dampened with IPA, several passes, until the chip and the copper are clean and shiny with no streaks. Never scrape with metal, do not let alcohol pool around components, and wait 1–2 minutes for it to evaporate.
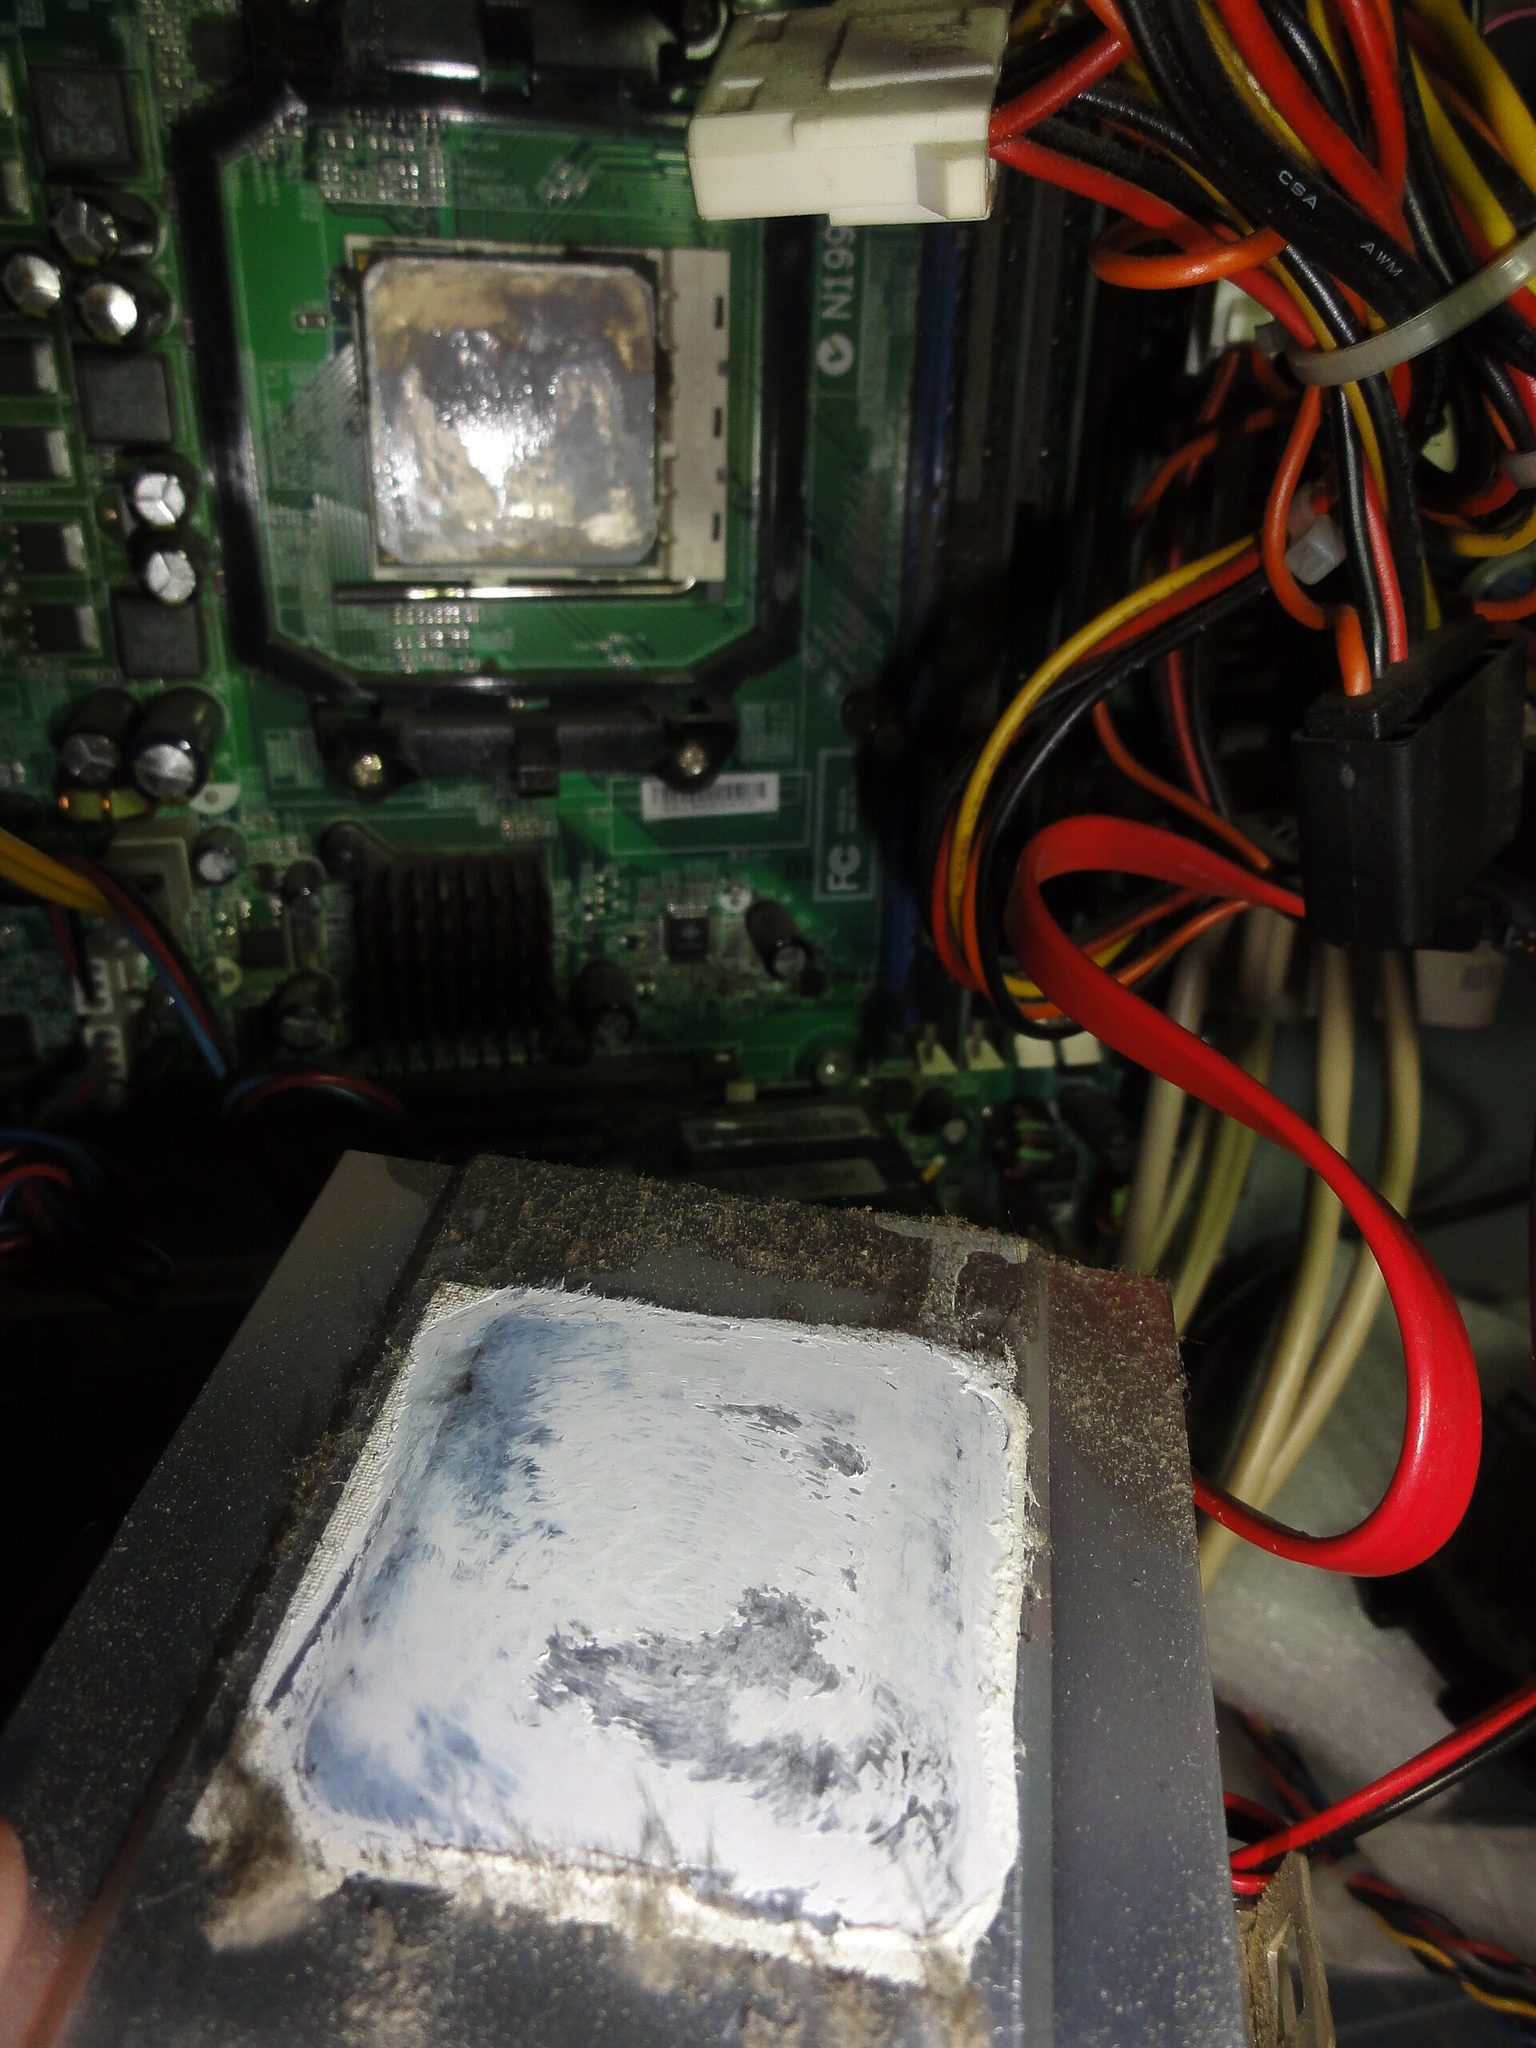
Photo: Mattes / Wikimedia Commons, CC BY-SA 2.0

How much paste, and how to apply it
Laptop chips come in two kinds: with a metal lid, or with a small bare rectangular die. On a bare die, put a line or a rice-grain-sized dot in the centre, then spread it thinly over the whole die with a plastic spreader or card; the edges of the die are where paste is most often missing. Figure 5 shows paste being applied to a chip before the heatsink goes on.
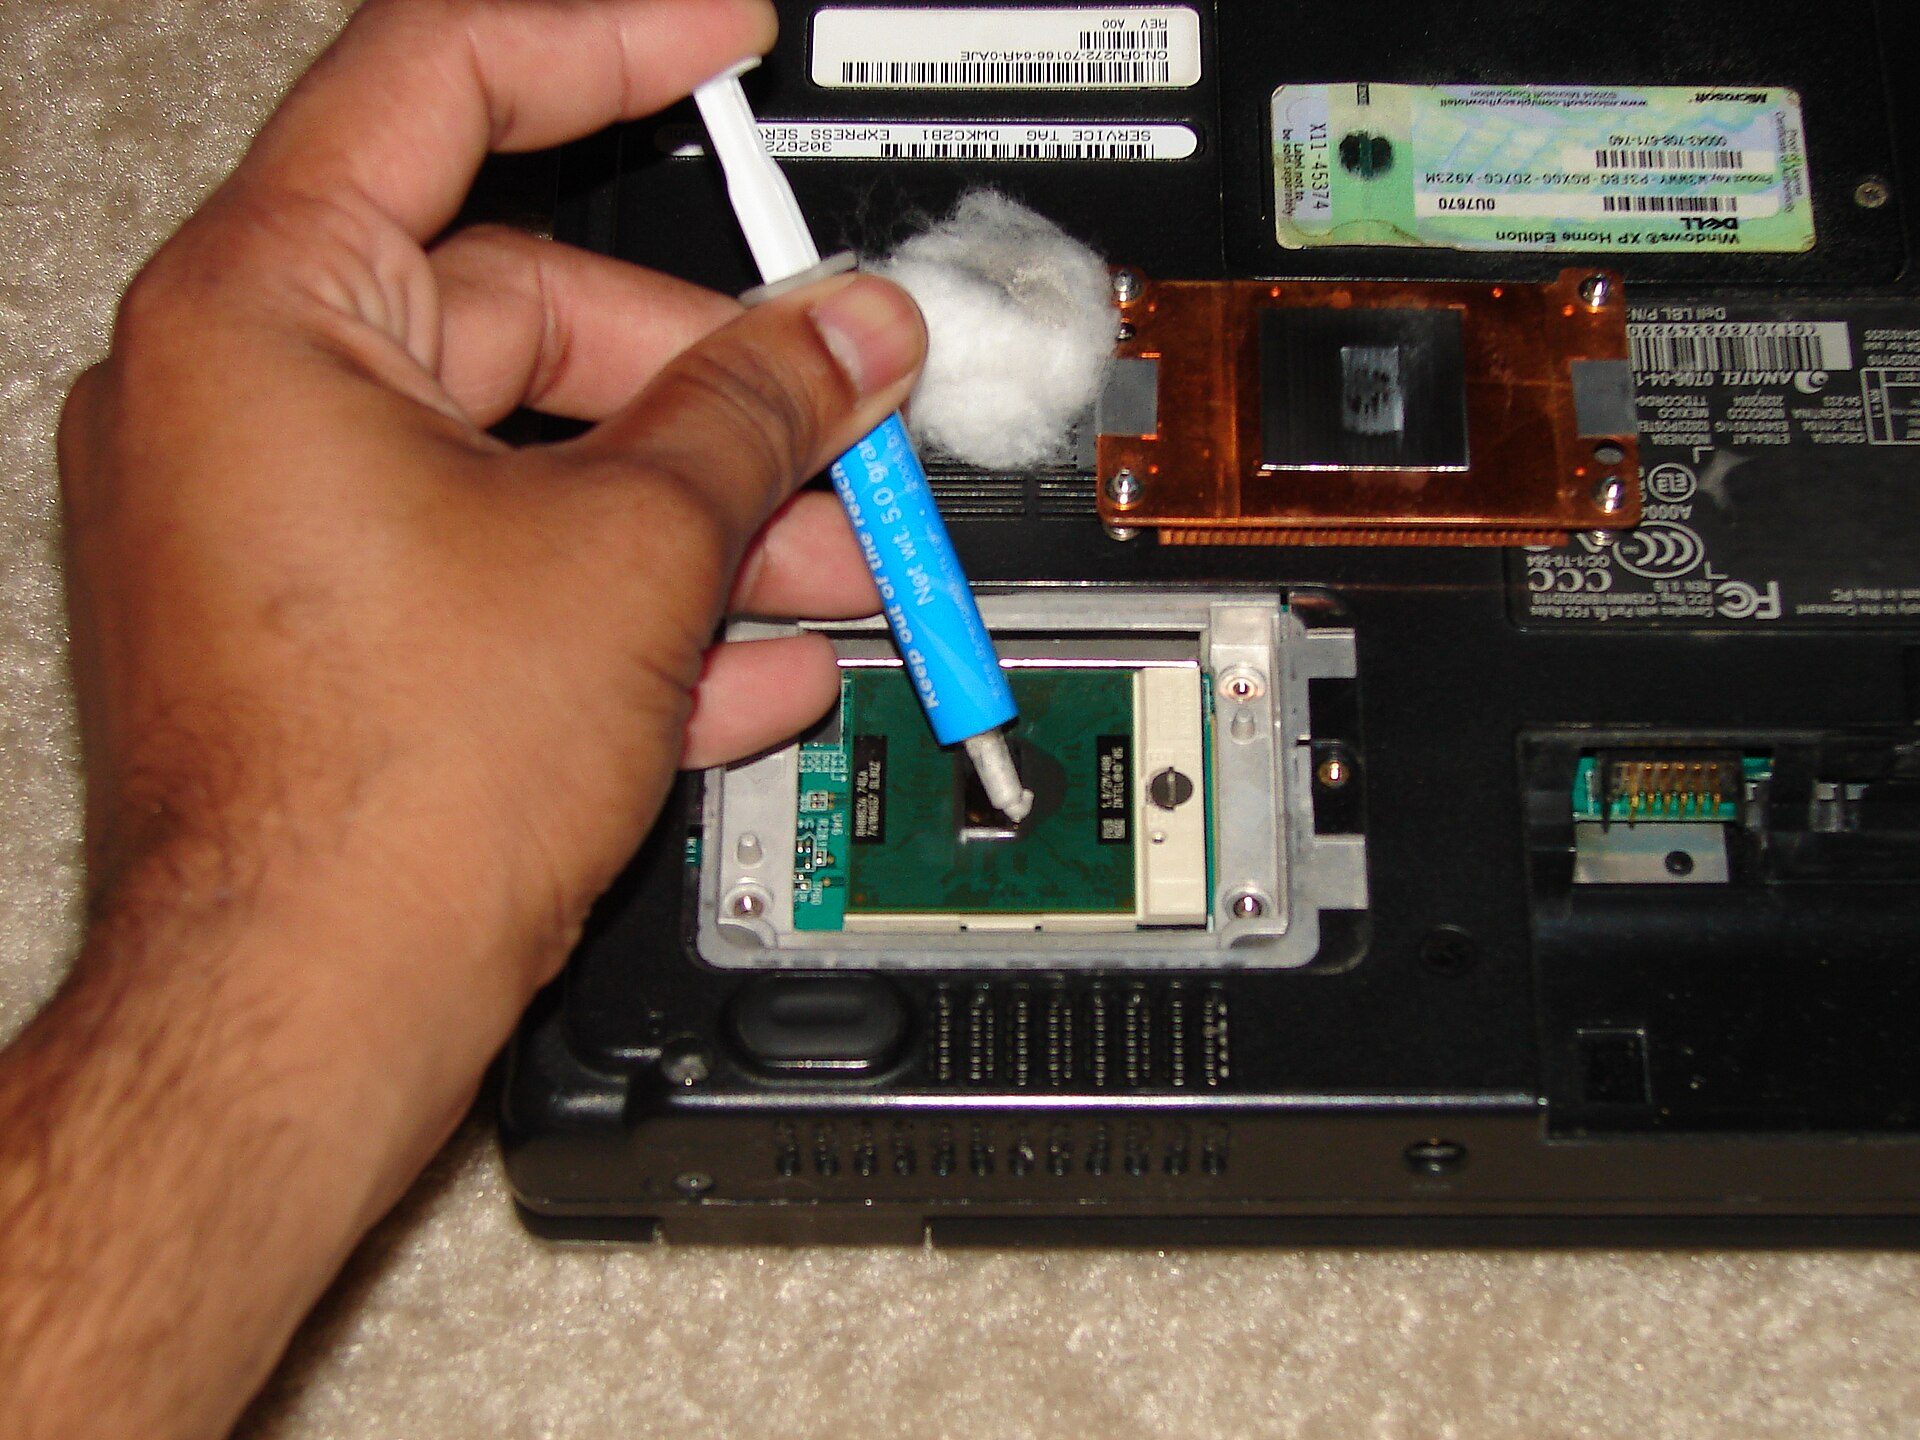
Photo: Jyothis at ml.wikipedia / Wikimedia Commons, CC BY-SA 3.0

Refit and tighten in a cross pattern
Lower the assembly straight down without sliding it around. Tighten the screws in the order printed on the copper plate (1, 2, 3, 4), a few turns each, then gradually snug them all, so the pressure is even. Reconnect the fan and battery cables, close the cover and put every screw back in the place shown in your photos.
Worked example: a student laptop not cleaned for four years
Ha, a final-year student, brings a 15.6-inch gaming laptop bought four years ago and never cleaned. It runs very hot while editing video, the fan roars, and exporting a 10-minute video takes almost twice as long as when it was new. Apprentice technician Long follows the procedure above and records the following.
Measurements before the job
Room at 30°C, laptop on a flat desk, charger plugged in. After 10 minutes idle: CPU 58°C. After 15 minutes of CPU load: CPU reaches 98°C and the clock drops from about 3.6 GHz to 2.1 GHz. Task Manager shows nothing unusual at idle, so Long concludes the cause is the cooling hardware. With the cover off he finds a dust mat covering about two-thirds of the fins and old paste dried hard; the battery is not swollen and the fan spins smoothly.
Time for each step
| Step | Task | Time (minutes) |
|---|---|---|
| 1 | Remove bottom cover, photograph screws | 10 |
| 2 | Disconnect battery, drain charge | 2 |
| 3 | Remove cooling assembly | 10 |
| 4 | Clean fan, fins and vents | 15 |
| 5 | Remove old paste, apply new paste | 10 |
| 6 | Refit cooling assembly, battery, cover | 10 |
| 7 | Re-test under load for 15 minutes and fill in the sheet | 20 |
| Total | 77 | |
Check: 10 + 2 + 10 + 15 + 10 + 10 + 20 = 77 minutes. An experienced technician who knows the model is usually faster; a beginner should tell the customer about 1.5–2 hours so there is no need to rush.
Before and after, and the quote
| Reading | Before | After | Change |
|---|---|---|---|
| CPU at idle | 58°C | 44°C | down 14°C |
| Highest CPU temperature after 15 minutes of load | 98°C | 83°C | down 15°C |
| Lowest clock speed under load | 2.1 GHz | 3.4 GHz | up 1.3 GHz |
In Vietnam, shops typically charge about 150,000–400,000 VND (roughly 6–16 USD) for cleaning and repasting a mainstream laptop in 2026; two-fan gaming laptops or models that need a lot of disassembly can cost more, depending on the area. Long quotes 250,000 VND for labour; the actual materials are only a few tens of thousands of dong (about 0.3–0.5 g of paste, alcohol, cotton buds), because the price is mostly time and skill. He sends Ha the before-and-after job sheet and advises her not to put the laptop on a mattress while editing.
When to take the laptop to a shop or service centre
Cleaning and repasting fixes most overheating laptops, but not all of them. Knowing when to stop is a professional skill.
Jobs a beginner should not do
Laptops still under manufacturer warranty; unibody models with glued covers; swollen batteries, water damage or a burning smell; laptops that came with liquid metal from the factory. Refer these to the service centre or an experienced technician.
Signs a part needs replacing or the board needs repair
A squealing or wobbling fan, or software showing 0 RPM while the laptop is hot: replace the fan with the correct part. Dented or flattened heatpipes, or a warped assembly: replace the cooling assembly. If the temperatures barely change after a correct clean and repaste, or one corner of the board gets unusually hot as soon as the charger is connected, the power circuitry may be faulty and needs a board-level technician (step 6 of the roadmap).
Advice for the customer
Keep the laptop on a hard, flat surface without covering the vents, and have it cleaned roughly every 12–18 months, sooner in dusty rooms or homes with pets.
Common mistakes when cleaning and repasting
These three mistakes often bring customers back with a worse fault. Prying too hard and pulling cables by the wires are also familiar causes of torn keyboard and touchpad ribbons.
Forgetting to disconnect the battery and shorting the board
Symptom: the laptop will not power on after reassembly. Cause: a screwdriver touched a component while the battery was still supplying power. Prevention: disconnecting the battery is always step 2.
Too much paste, or none at the die edges
Symptom: temperatures do not drop, or even rise, and one CPU core is much hotter than the others. Cause: paste too thick, spilling over, or not reaching the edges of the die. Fix: take it apart, clean it and apply a thin, complete layer again.
Wrong pad thickness, uneven screw pressure
Symptom: the main chip runs unusually hot even though the paste is right. Cause: new pads thicker than the originals lift the copper plate, or one screw was fully tightened before the others. Fix: measure the old pads, replace with the same size and tighten in the numbered cross pattern.
Frequently asked questions
Will overheating damage my laptop?
Chips throttle and shut down to protect themselves, so they rarely burn out immediately. But long-term heat makes the laptop slow, ages the battery faster and keeps components around the chip under constant thermal stress. Deal with it early instead of waiting for shutdowns.
How often should thermal paste be replaced?
There is no fixed interval. In practice technicians repaste after about 2–3 years, or when load temperatures are clearly higher than in a previous measurement, combined with a routine clean.
Can a cooling pad replace cleaning?
No. A cooling stand only helps the laptop draw in cooler air and lowers temperatures by a few degrees. If the fins are blocked by dust or the paste is dry, the airflow still cannot carry the heat away.
Why is it hotter after I repasted it?
Usually the paste is too thick, does not cover the whole die, the protective film on a new pad was left on, or the screws were tightened unevenly. Take it apart and look at the paste imprint on the copper plate: it should be complete and even.
Practice tasks and self-assessment
- Measure and record temperatures (10 minutes idle, 15 minutes load) on two laptops belonging to friends or family, with screenshots.
- On an old practice laptop, remove the bottom cover, disconnect the battery and remove the cooling assembly, photographing every step.
- Clean, repaste and re-measure; build a before/after table like Long's.
Self-assessment criteria
- Pass: the battery is disconnected before you touch the board; no missing or extra screws; every function (keyboard, touchpad, charging, Wi-Fi, speakers) works after reassembly.
- Pass: CPU temperature under load is lower than before (or no higher if the laptop was already clean), the clock speed does not drop sharply under load, and the paste imprint covers the whole die.
- Not yet: you forgot to disconnect the battery, tore a cable or broke a clip, used conductive paste, or returned the laptop without before-and-after readings.
Once you are confident with cleaning, repasting and RAM and SSD upgrades in this step, move on to the next step of the roadmap: Replacing laptop screens, keyboards, hinges and batteries — looking up panel part numbers, replacing riveted keyboards, reinforcing hinges with broken screw mounts and choosing the right battery.
Keep going in laptop repair: after cleaning and repasting come screen, keyboard and battery replacement, data recovery and basic motherboard diagnosis. See the 8-step computer and laptop repair roadmap to track your progress.