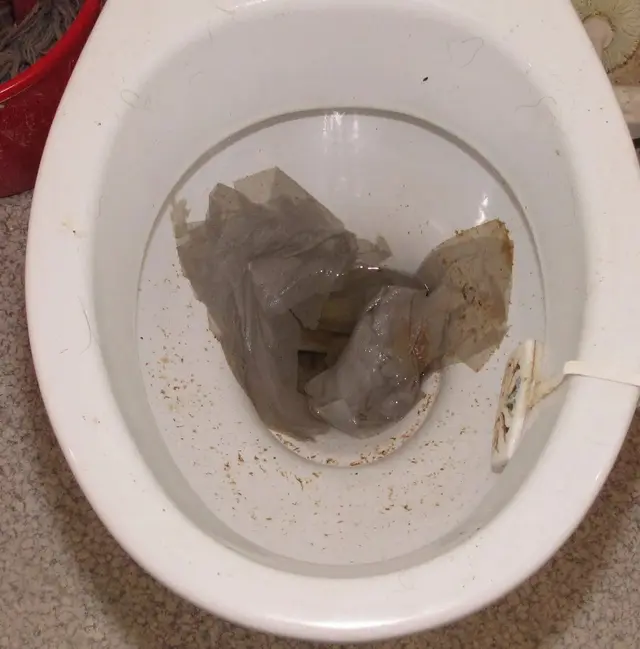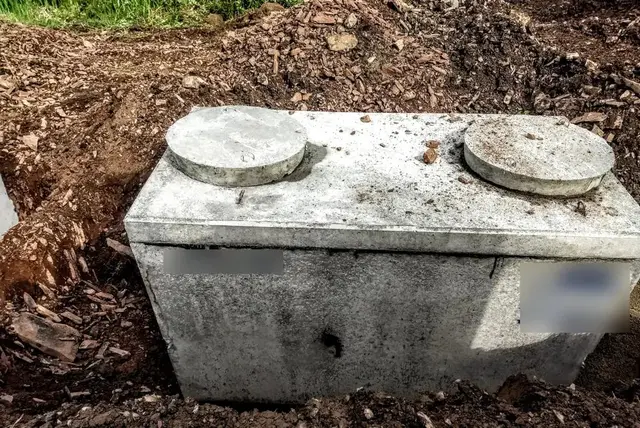
Bathroom odours and slow drainage are the two most common complaints a plumber receives. Most of the causes lie in how the drainage was installed: the wrong slope, missing traps, no vent pipe. These faults sit under the floor and inside the walls, so by the time they are discovered they are very expensive to fix.
By the end of this lesson, you will be able to:
- Calculate the fall and the floor recess depth needed for each drain run, and check the slope with a spirit level or a laser.
- Choose and position the right trap for each fixture, and avoid the double-trap mistake.
- Explain what a vent pipe does and lay out venting for a townhouse.
- Diagnose, in order, why a bathroom smells, and inspect the drain line yourself before tiling.
Why slope matters
Waste water flows by gravity. Too little slope and the water moves slowly, so sediment settles and causes blockages. Too much slope and the water runs ahead and leaves solids behind, and it can also siphon the water out of traps. The goal is a slope that is just enough for the water to carry the waste with it.
How slope is written and understood
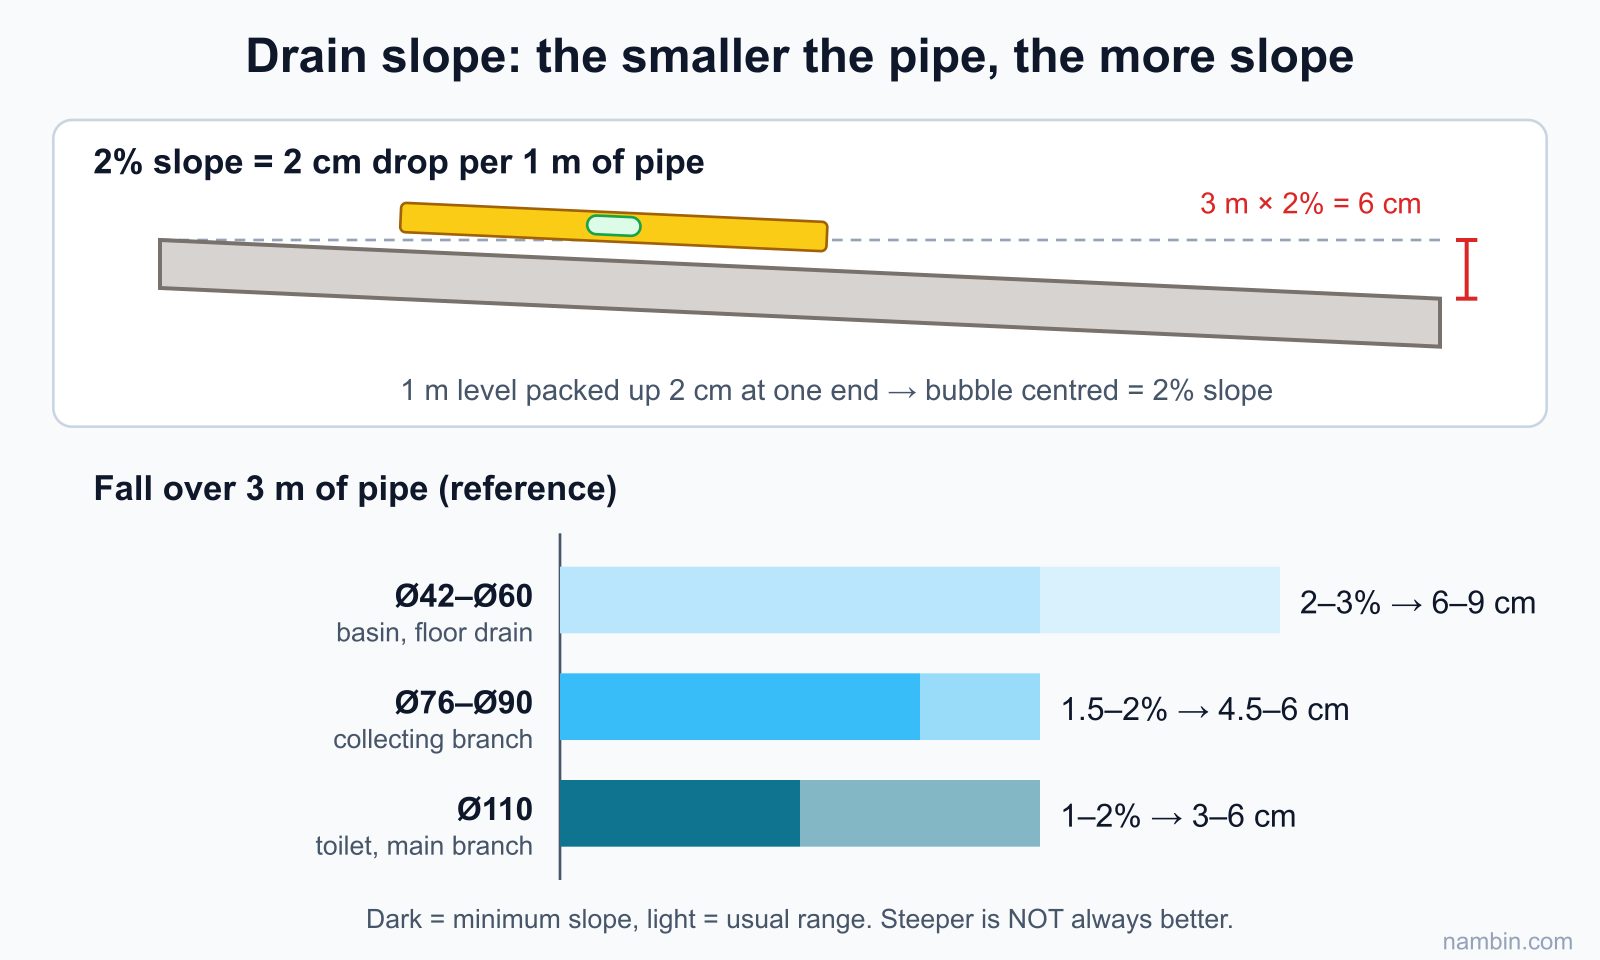
Slope is usually written as a percentage: a 2% slope means that for every 1 metre of length, the pipe drops 2 cm. Drawings sometimes write it as i = 0.02 — the same thing. The formula you will use every day:
Fall (cm) = Pipe length (m) × Slope (%)
Example: a pipe 3 m long at 2% slope has its far end 3 × 2 = 6 cm lower than its starting end.
Why small pipes need more slope than large ones
In small pipes (basins, floor drains), each discharge is a small amount of water and the flow is shallow, so they need more slope to carry hair and soap residue. Large pipes (toilets) receive a strong, large flush in a short time and the flow is fuller, so they need less slope. That is why the reference table below shows the slope falling as the diameter increases.
"Steeper is better" is wrong
New plumbers often think a steep slope is safer. In reality, with a toilet pipe, too much slope lets the water run ahead while solids stay stuck to the pipe wall, slowly building a blockage that is hard to clear. Too much slope also means a deeper floor recess, using more material and more storey height. If there is a large height difference, split it into a horizontal section at a moderate slope and a vertical section, joined by two 45° bends.
Reference slopes for homes
| Pipe diameter | Used for | Common slope | Fall over 3 m of pipe |
|---|---|---|---|
| Ø42–Ø60 | Basins, floor drains, washing machines | About 2–3% | 6–9 cm |
| Ø76–Ø90 | Branch pipes collecting several fixtures | About 1.5–2% | 4.5–6 cm |
| Ø110 | Toilet waste, main branch pipes | About 1–2% | 3–6 cm |
Also check the project's design documents and the standards that apply (for drainage systems inside buildings, Vietnamese designers usually refer to TCVN 4474, the national standard for internal drainage). Check the slope with a spirit level or a laser level; never judge it by eye.
Checking slope with a spirit level
With a 1 m spirit level (60 cm also works but is less accurate), place the level on the pipe and pack up one end with a piece of wood or a ruler exactly as thick as the slope you need: for 2% on a 1 m level, pack it up 2 cm. When the bubble is centred, the pipe is at the right slope. This is fast and far more accurate than looking by eye.
Marking levels with a laser
On long runs, project a horizontal laser line onto the wall and measure from the line down to the centre of the pipe at the start and end of the run. The difference between the two measurements is the fall. Write the numbers on the wall with a marker so the tilers and waterproofers know the pipe levels.
Worked example: setting levels for a tube-house bathroom
Situation: a 4-storey tube house (a narrow, deep townhouse typical of Vietnam), with a 2.2 × 1.8 m bathroom on the third floor. The Ø110 soil stack (the vertical pipe for toilet waste) is in the far corner. The toilet is 1.5 m from the stack along the pipe route, the floor drain in the middle of the room is 1.2 m from the grey-water stack, and the basin is 2 m away. The bathroom has a recessed floor (a sunken slab) so the pipes can run on top of the structural concrete slab.
Step 1: calculate the fall of each run
- Toilet → soil stack: Ø110, 2% slope chosen: 1.5 × 2 = 3 cm.
- Floor drain → grey-water stack: Ø60, 2.5% slope chosen: 1.2 × 2.5 = 3 cm.
- Basin → joining the floor-drain run: Ø42, 2.5% slope chosen: 2 × 2.5 = 5 cm.
Step 2: calculate the recess depth needed
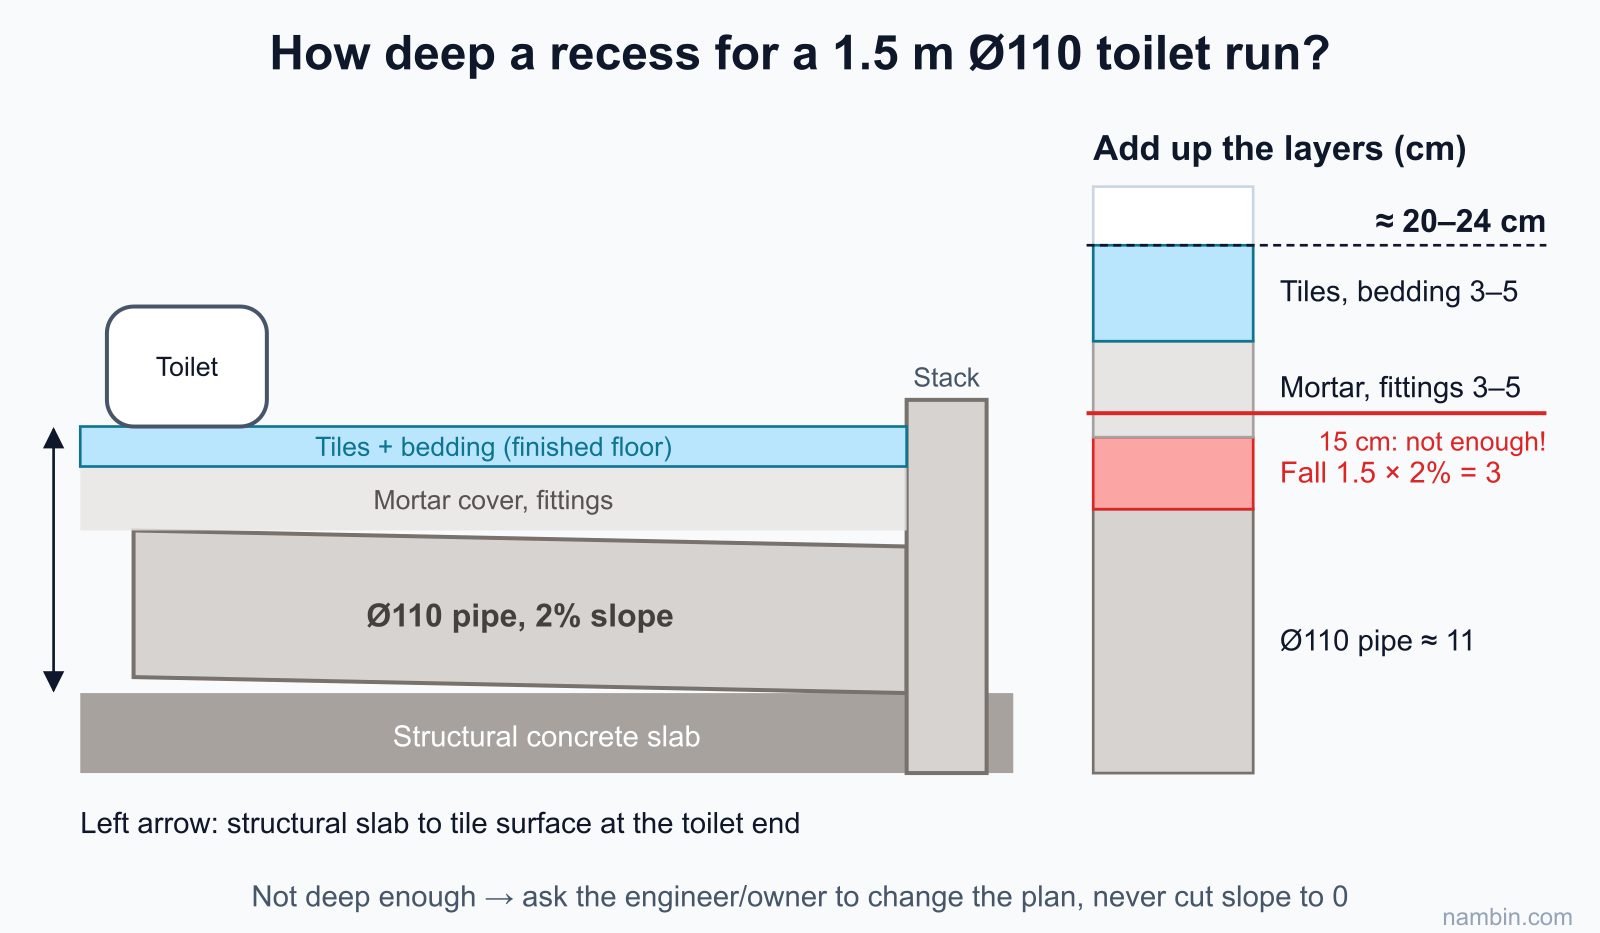
The toilet run decides the depth because it has the largest pipe. At its lowest point (next to the stack), the bottom of the pipe sits on the structural slab. At the toilet end, the height needed above the structural slab is:
Ø110 pipe (≈ 11 cm) + fall 3 cm + fittings, joints and mortar cover over the pipe (≈ 3–5 cm) + tiles and bedding mortar (≈ 3–5 cm) ≈ 20–24 cm
If the design only provides a 15 cm recess, you already know it is not enough — tell the owner or engineer immediately so they can change the plan (move the stack closer, use a rear-outlet toilet, or raise the finished floor level). Do not reduce the slope to almost zero on your own.
Step 3: check the floor drain
The floor drain must also sit on a sloped run, and the tiled floor must fall towards the drain at about 1–2% so water does not pool. Check that the drain grate sits a few millimetres below the surrounding tiles and that there is enough height for a drain body with a water trap. This is the spot that most often runs out of height in a shallow-recess bathroom.
Traps: a water "plug" against odours
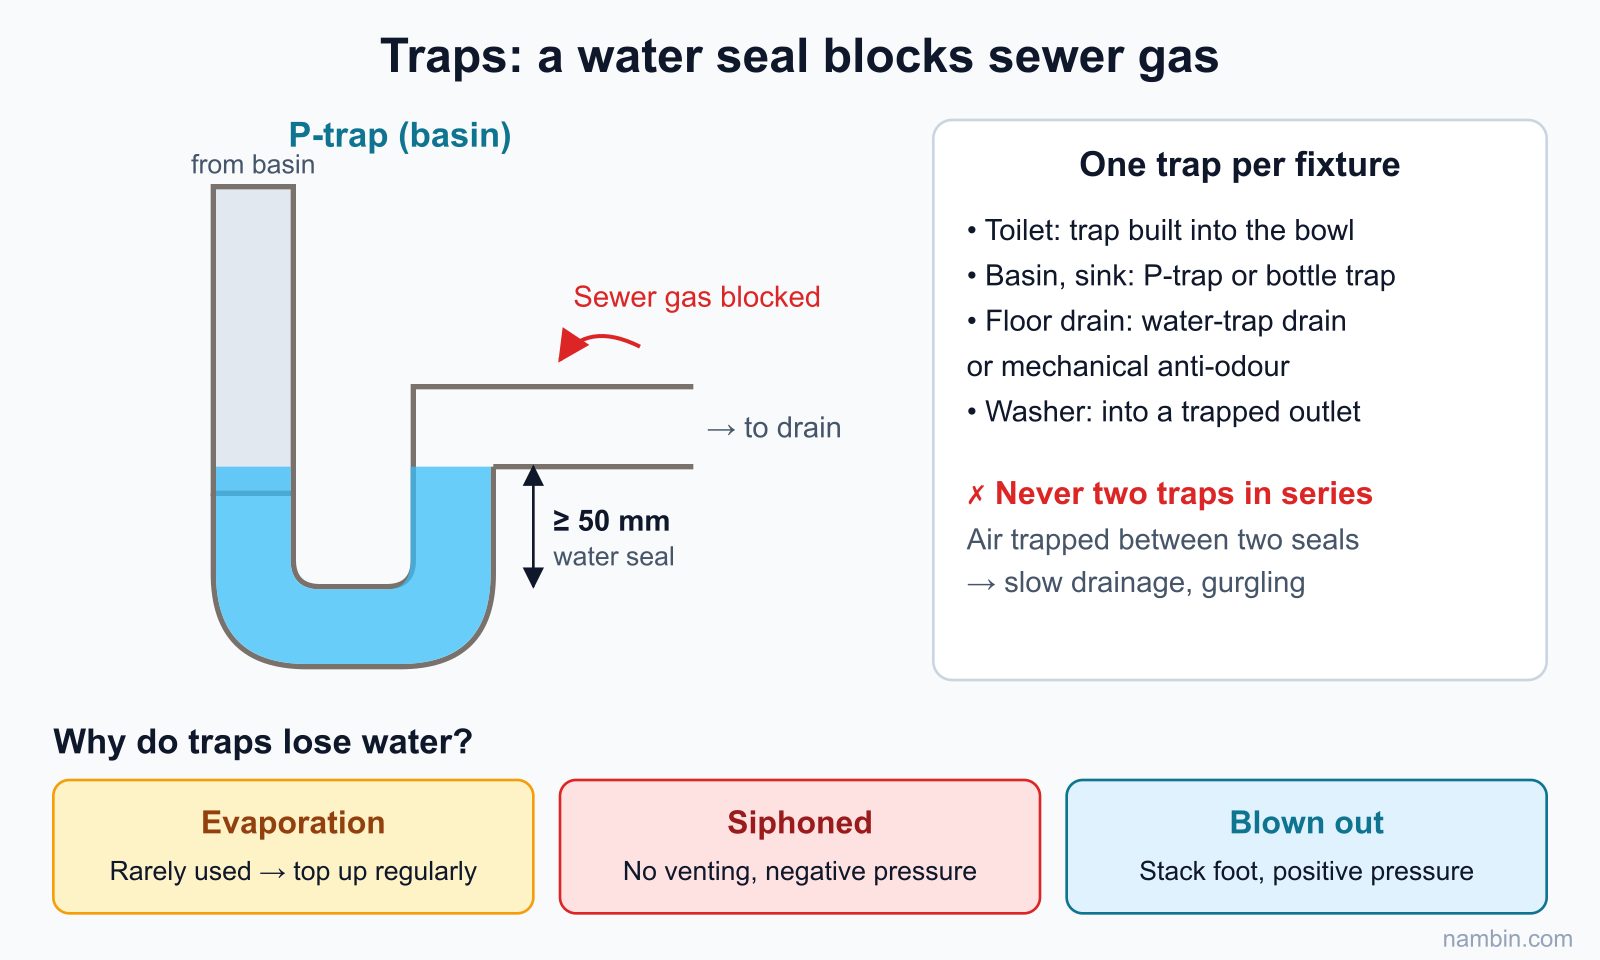
A trap (water seal) holds a small amount of water in a bend of pipe, which stops gases from the drainage system coming back into the room. The water seal is usually 50 mm deep or more; a shallower seal evaporates or gets siphoned out easily. Every fixture needs its own trap, either separate or built into the fixture.
Traps for each fixture
- Toilet: already has a trap inside the ceramic body — never add another trap on the toilet pipe.
- Basins and sinks: fit a P-trap or bottle trap under the basin.
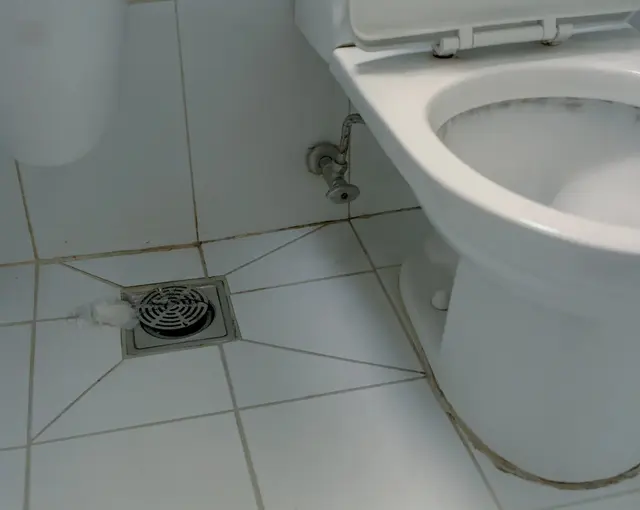
- Floor drains: use a floor drain with a water trap or an anti-odour mechanism.
- Washing machine: connect the outlet hose to a trapped drain point; never push it loosely into an open drain pipe.
- Kitchen sink: a trap under the sink; restaurants and large kitchens should also have a grease trap before the shared system.
Never fit two traps in series
One run needs only one water trap. Two traps in series (for example a basin with its own trap draining into a trapped floor drain) create an air pocket stuck between two water columns, so the water drains slowly and gurgles. If you must connect a basin to a floor drain, choose a drain with a branch inlet and remove the trap on one side following the drain's instructions.
Floor drains: water-trap and mechanical types
Floor drains with a water trap block odours well when used regularly. Mechanical anti-odour types (flap, membrane, float) do not depend on water staying in the trap, so they suit rarely used balconies and drying areas, but hair and debris can jam them — they need regular cleaning. Whichever type you use, the drain neck must be carefully waterproofed.
Why does it still smell when there is a trap?
- Dry trap: a rarely used floor drain where the water has evaporated. Fix: pour in water regularly or use a mechanical anti-odour drain.
- Siphoned trap: when a large volume is flushed and the system has no vent, negative pressure sucks the water out of the trap. Sign: gurgling from the floor drain when the toilet is flushed.
- Leaky joints: gaps between the pipe and the floor drain, or an unsealed toilet base.
- Damaged toilet base seal or a toilet fitted off-centre.
- Back-pressure on lower floors: at the foot of the stack, water falling from the floors above creates positive pressure that pushes air and foam through the traps of ground-floor fixtures. Sign: the ground-floor drain bubbles and puffs air when someone upstairs flushes.
Step-by-step odour diagnosis
Work from the cheap, quick checks to the labour-intensive ones: do not break up the floor before you have ruled out a dry trap.
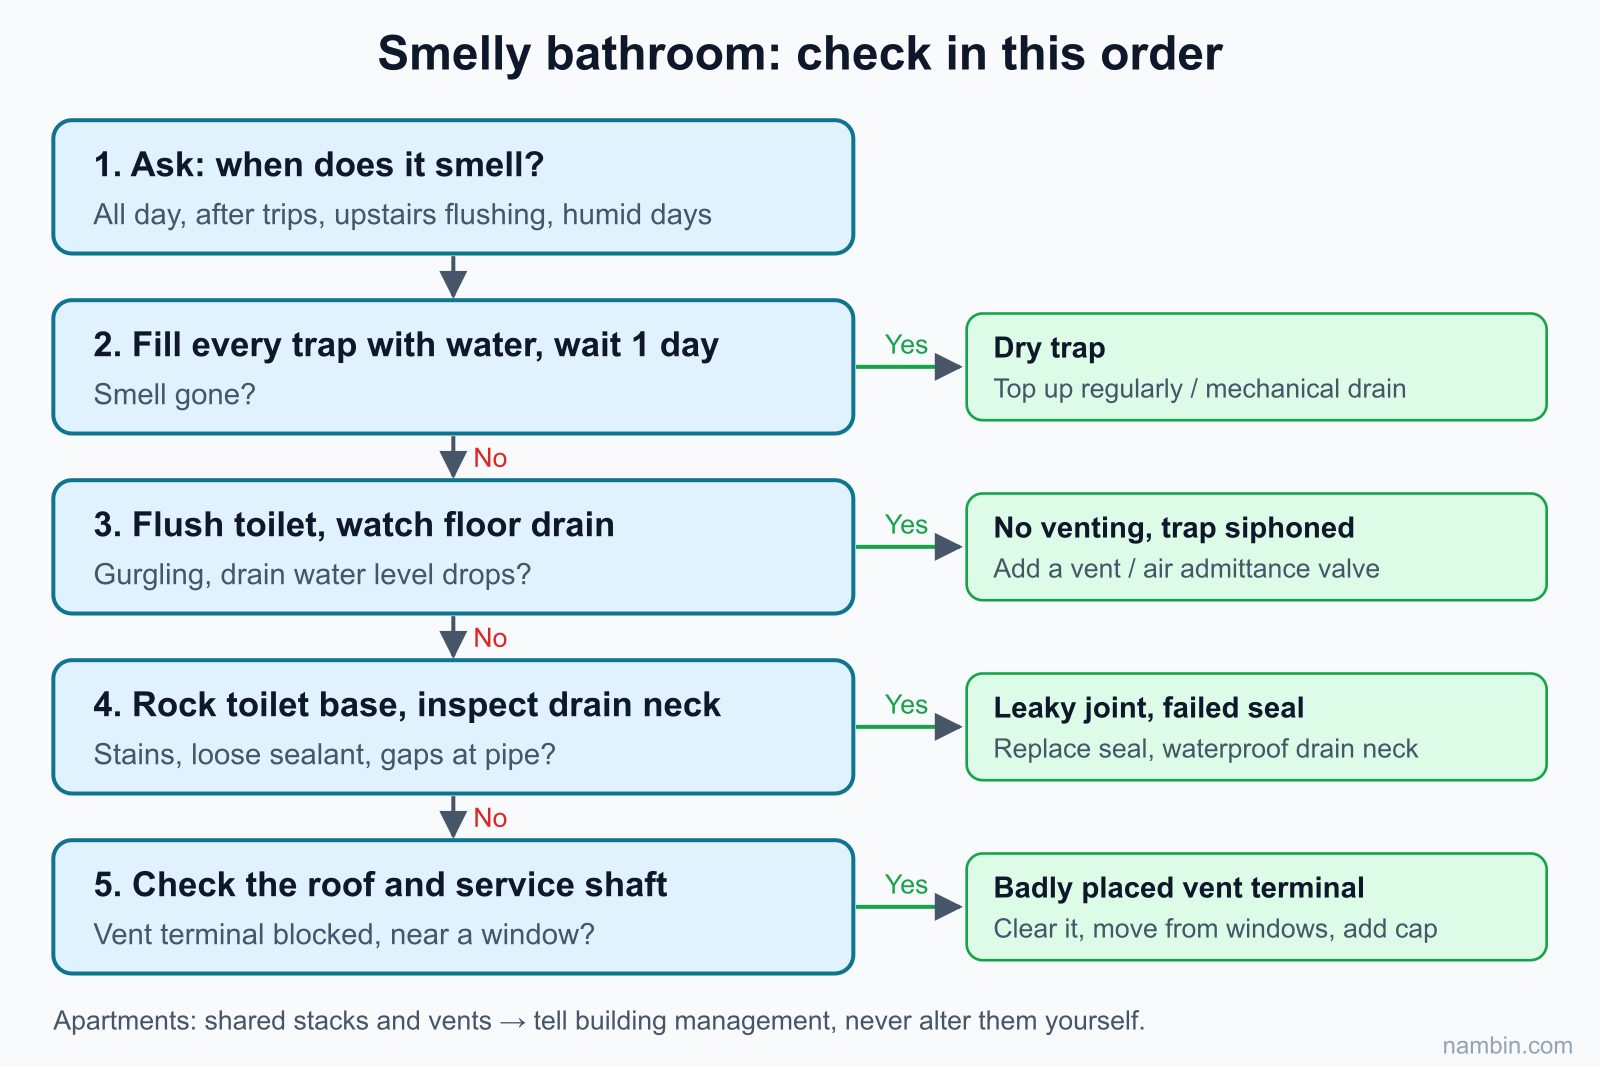
- Ask the owner: when does it smell (all the time, after being away, when the floor above flushes, in humid weather)?
- Fill every floor drain, basin and toilet with water and wait 1 day. If the smell goes, the cause was a dry trap.
- Flush the toilet and watch the floor drain and basin: do they gurgle, does the water level in the drain drop? If so, suspect missing venting.
- Check the toilet base: rock it gently, look for stains and loose sealant. Check the floor drain neck and the gap between pipe and floor.
- If you still have not found it: check the stack, the service shaft, and whether the vent terminal on the roof is blocked or too close to a window.
Vent pipes: the part that is often skipped
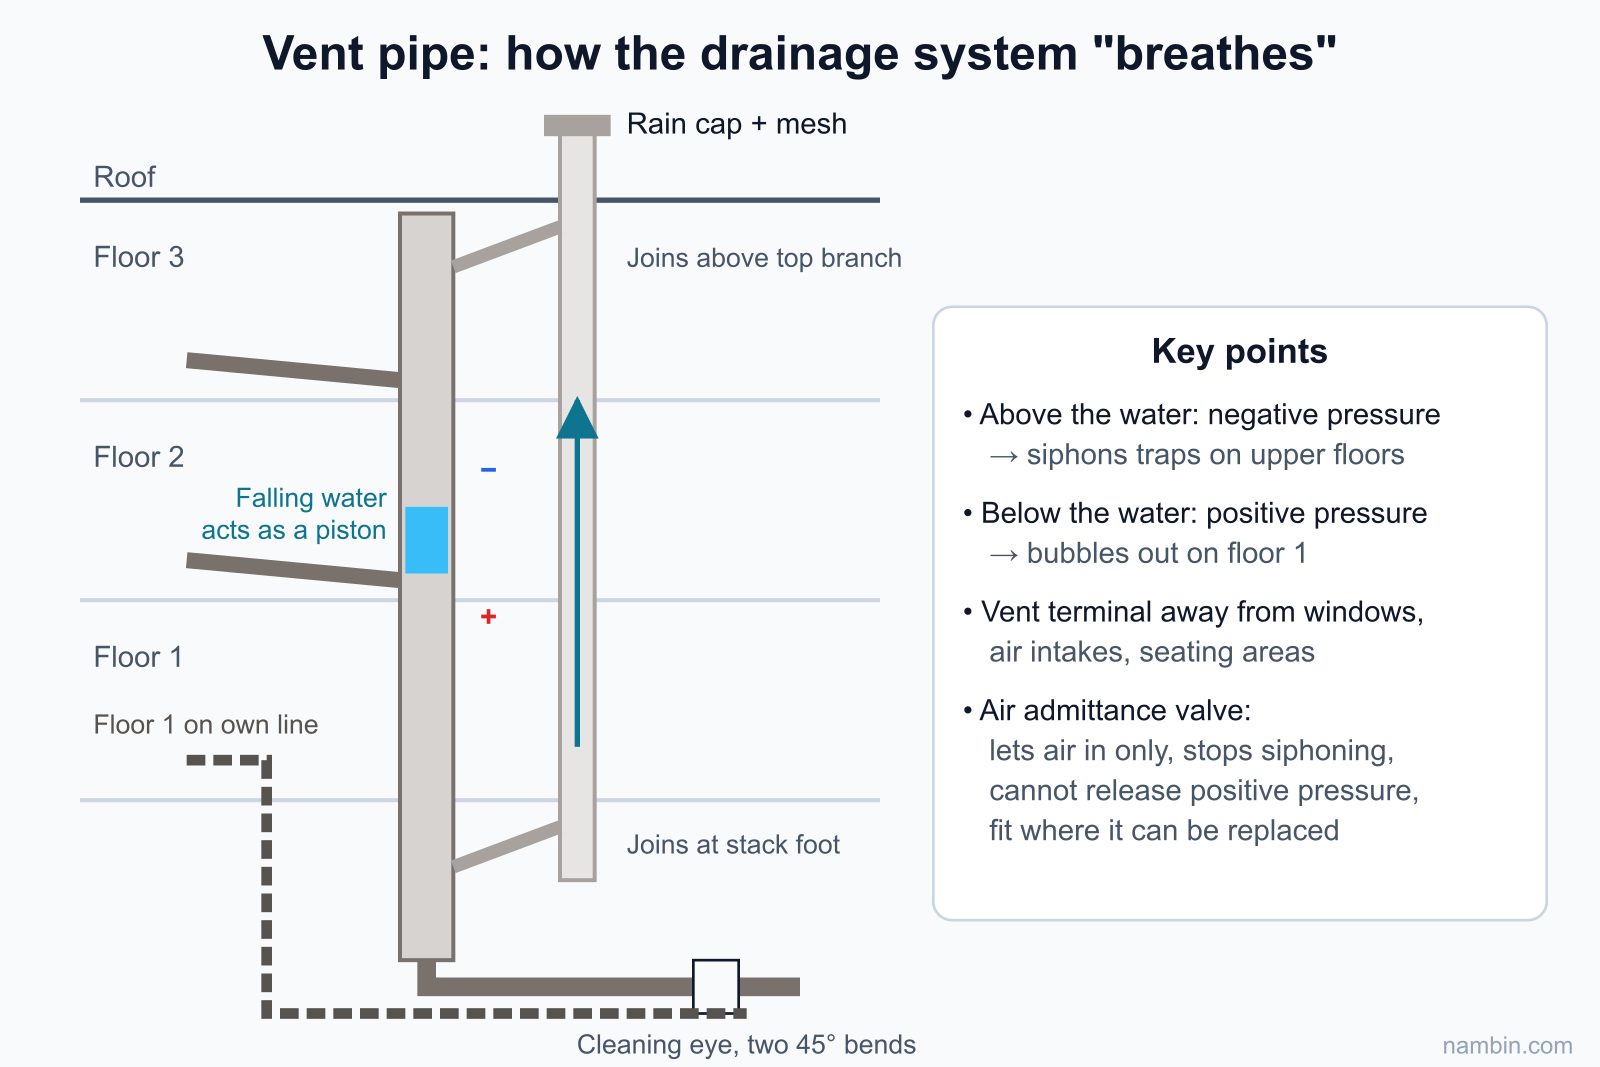
A vent pipe balances the pressure in the drainage system, so water flows smoothly and traps are not siphoned. In a townhouse, the vent usually runs parallel to the stack and exits through the roof. Where a full vent pipe is not possible, an air admittance valve (one-way vent valve) in a suitable position can be used in some cases.
The simple principle
Picture a column of water falling down the stack like a piston: above it, it sucks air (negative pressure); below it, it compresses air (positive pressure). If air has no way in or out, the system "borrows" air through the traps — siphoning them or blowing bubbles through them. The vent pipe is how the system breathes.
Layout in a townhouse
- The vent pipe connects to the stack above the highest branch connection and at the foot of the stack, and runs up to the roof.
- The vent terminal sticks up above the roof with a rain cap and insect mesh, away from windows, air intakes and places where people sit.
- Ground-floor fixtures should have their own drain line or join the shared pipe well away from the foot of the stack, avoiding the positive-pressure zone.
- At the foot of the stack, turn horizontal with two 45° bends or a long-radius bend, and fit a cleaning eye (inspection opening) for unblocking.
Air admittance valves
The valve only lets air into the pipe (preventing siphoning) and never lets foul air out. It must be installed higher than the outlet of the fixture it serves, in an accessible place so it can be replaced when it fails, never sealed inside a wall. A valve cannot fully replace the roof vent of the whole system, because it cannot release positive pressure.
Note for apartment buildings: Never cut, drill into or alter the building's shared stacks and vent pipes on your own. Every change must be agreed with the building management — one mistake can cause odours or flooding in other apartments too.
Safety: The air in septic tanks and closed inspection chambers can contain toxic and flammable gases and lack oxygen. Never climb down into a chamber or septic tank; never use a flame or smoke near the opening when the cover is off. Pumping out tanks and working in deep chambers requires a specialist contractor with protective equipment.
Drain installation procedure
Materials and tools
uPVC pipes and fittings of a matching system (inch or metric), solvent cement, sandpaper, a saw, a 1 m spirit level or laser, a marker, pipe hangers or clips, end caps in various sizes, and a pump or bucket for water testing.
Installation steps
- Set out the fixture positions and the connection point on the stack.
- Snap lines and mark the levels at the start and end so the slope is correct.
- Where possible, use 45° bends instead of 90° bends for horizontal changes of direction — the water flows more smoothly and blocks less. Join branches to the main pipe with a Y-junction, never a square tee that meets the flow head-on.
- Support the pipe with evenly spaced clips so it does not sag. Reference: about one clip every 0.5–0.8 m for Ø42–60 pipe and every 1–1.2 m for Ø90–110 pipe when suspended.
- Fit cleaning eyes at the head of horizontal runs and at the foot of the stack, facing a side where they can be opened.
- Cap the pipe ends during construction so mortar cannot fall in.
- Water test: pour water through to check it flows freely and look for leaks at the joints before backfilling, waterproofing and tiling.
Leak test before backfilling
Plug the low ends, fill the branches with water up to the fixture outlets, mark the water level and leave it for a few hours (overnight is best). If the level does not drop and the solvent joints stay dry, it passes. After the floor is waterproofed, it is usually flood-tested for another 24–48 hours as the waterproofing team requires. Photograph the pipe runs with a tape measure in view before backfilling — very useful when repairs are needed later.
Common mistakes and how to fix them
- Pipe sagging between clips: sign — water stands in the sagging section and the same spot blocks again and again. Cause: clips too far apart, or the pipe runs over uncompacted fill. Fix: add clips, and support the pipe with mortar or bricks along the run.
- A section running uphill: sign — slow drainage even though the pipe is not blocked. Cause: no level lines, aligned by eye. Fix: take that section apart and redo it; there is no outside "quick fix".
- Square tee used for a branch: sign — blockages at the junction, branch water pushed back. Fix: replace it with a Y-junction or a swept tee.
- Floor drain higher than the tiles: sign — water pools around the drain. Cause: tile and mortar thickness not allowed for. Fix: lower the drain neck and re-tile the area around it at the correct fall.
Frequently asked questions
Should the floor drain be connected to the toilet pipe?
In many townhouses, the toilet pipe goes to the septic tank, while grey water from basins and floor drains goes separately to an inspection chamber or the sewer. Whether to combine or separate them depends on the design and local drainage rules; do not merge them on your own, because it can overload the septic tank or cause odours to back up.
How often should I pour water into a rarely used floor drain?
It depends on the weather, but once a week is usually enough for a drain with a water trap. If the house will be empty for a long time, pour in water and cover the drain tightly, or switch to a mechanical anti-odour drain.
Why does it only smell in humid weather or strong wind?
Changes in air pressure, and wind blowing across a badly placed vent terminal, can push foul air back into the house or into a nearby window. Check the position of the vent terminal and its cap on the roof.
Ø90 or Ø110 stack for toilets?
Homes usually use Ø90 or Ø110 for the soil pipe depending on the design and the number of fixtures. Never use a pipe smaller than the toilet's outlet; when in doubt, follow the drawings or ask the design engineer.
Can drain-cleaning chemicals fix the smell?
Chemicals only dissolve build-up; they cannot fix a wrong slope, missing venting or leaky joints. Using a lot of them can also damage seals and harm the bacteria in the septic tank.
Handover checklist and practice exercise
Handover checklist
- Water drains quickly at every outlet, with no pooling.
- No gurgling from the floor drain when the toilet is flushed.
- No smell after 24 hours.
- All joints are dry, with no seepage.
- Cleaning eyes are in accessible positions; the pipe runs were photographed before backfilling.
Practice exercise
- Calculate the fall for a Ø60 run 4.5 m long at 2.5% and a Ø110 run 2.2 m long at 1.5%.
- Using a 1 m spirit level and a packer, set up a 2 m length of Ø60 pipe on supports at a 2% slope; check it by measuring the level at both ends.
- Draw the drainage layout of a bathroom you know, marking the traps, cleaning eyes and vent connection.
- Carry out the odour diagnosis procedure on a real bathroom (your own or a friend's) and write down your conclusion.
Self-assessment criteria
- Exercise 1 gives exactly 11.25 cm and 3.3 cm.
- The pipe in exercise 2 has a 4 cm difference between its ends, with an error of no more than 0.5 cm.
- Your drawing has no two traps in series, branches join with Y-junctions, and there is at least one cleaning eye.
- Your diagnosis names a specific cause and a fix, not just "it smells".
Next step in the roadmap (step 5 — Installing sanitary fixtures): a drain line with the right slope, traps and venting is only the part under the floor. In the next lesson you will install the toilet, basin, shower and kitchen tap on those very connection points — at the right height, with a sealed toilet base and a sealed drain neck — so the odour causes you have just learned about do not come back at the finishing stage.