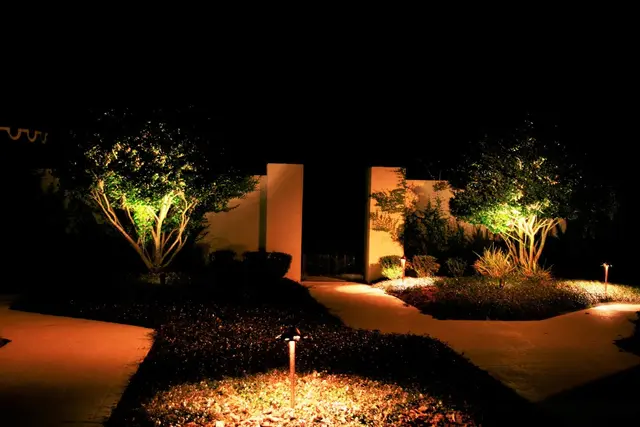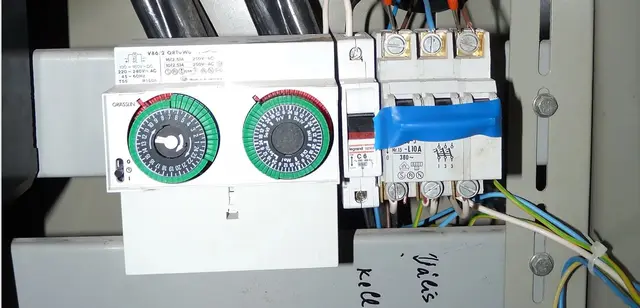
"The room is bright in one spot and dark in another", "two of the downlights died three months after installation", "the lights still glow faintly when switched off" — these are complaints electricians often hear after a client has a plasterboard ceiling put in. The cause is rarely the bulb itself: usually the number of lights was calculated wrongly, the layout is uneven, the driver is in the wrong place, or the switch is wired into the neutral. This lesson walks you through a recessed lighting job from drawing to handover.
By the end of this lesson, you will be able to:
- Calculate how many lights a room needs for a target illuminance using the lumen method, to within one light.
- Lay out an even grid of lights and work out the spacing between lights and from lights to walls.
- Split the lights into 2–3 switch groups, choose a power supply for LED strip, and choose the cable and breaker for the lighting circuit.
- Cut holes, run cable above the ceiling, connect and fit the lights correctly, and test before handover.
- Draw up a materials list, time estimate and reference quote for a 20 m² living room.
Understand light properly before choosing fittings
Clients often ask "how many watts should the lights be?". A good electrician answers with three other numbers: how many lux the room needs, how many lumens each light gives, and what colour the light is. Power (W) only tells you how much electricity the light uses.
Lumens, lux and luminous efficacy
Luminous flux (lumen, lm) is the total amount of light a lamp gives out. Illuminance (lux) is the amount of light falling on one square metre of surface: 1 lux = 1 lm/m². Luminous efficacy (lm/W) tells you how many lumens each watt of electricity produces. Ordinary recessed LED downlights today achieve about 80–100 lm/W, so a 9W light usually has about 750–850 lm printed on the box.
That is why two 9W lights from two manufacturers can differ noticeably in brightness. Always read the lumen figure on the box, not just the wattage.
Recommended illuminance for each space
The illuminance levels below are reference ranges based on common residential lighting design practice, measured at the working plane (about 0.8 m above the floor). If the client likes it bright, pick the upper end; if the room has additional decorative lighting, pick the lower end.
| Space | Reference illuminance (lux) | Recommended colour temperature |
|---|---|---|
| Living room | 150–300 | 3000–4000K |
| Bedroom | 100–150 | 2700–3000K |
| Kitchen, cooking area | 300–500 | 4000K |
| Study or work desk | 300–500 | 4000–5000K |
| Hallway, stairs | 75–150 | 3000–4000K |
| Bathroom | 150–200 | 4000K |
Colour temperature and colour rendering index
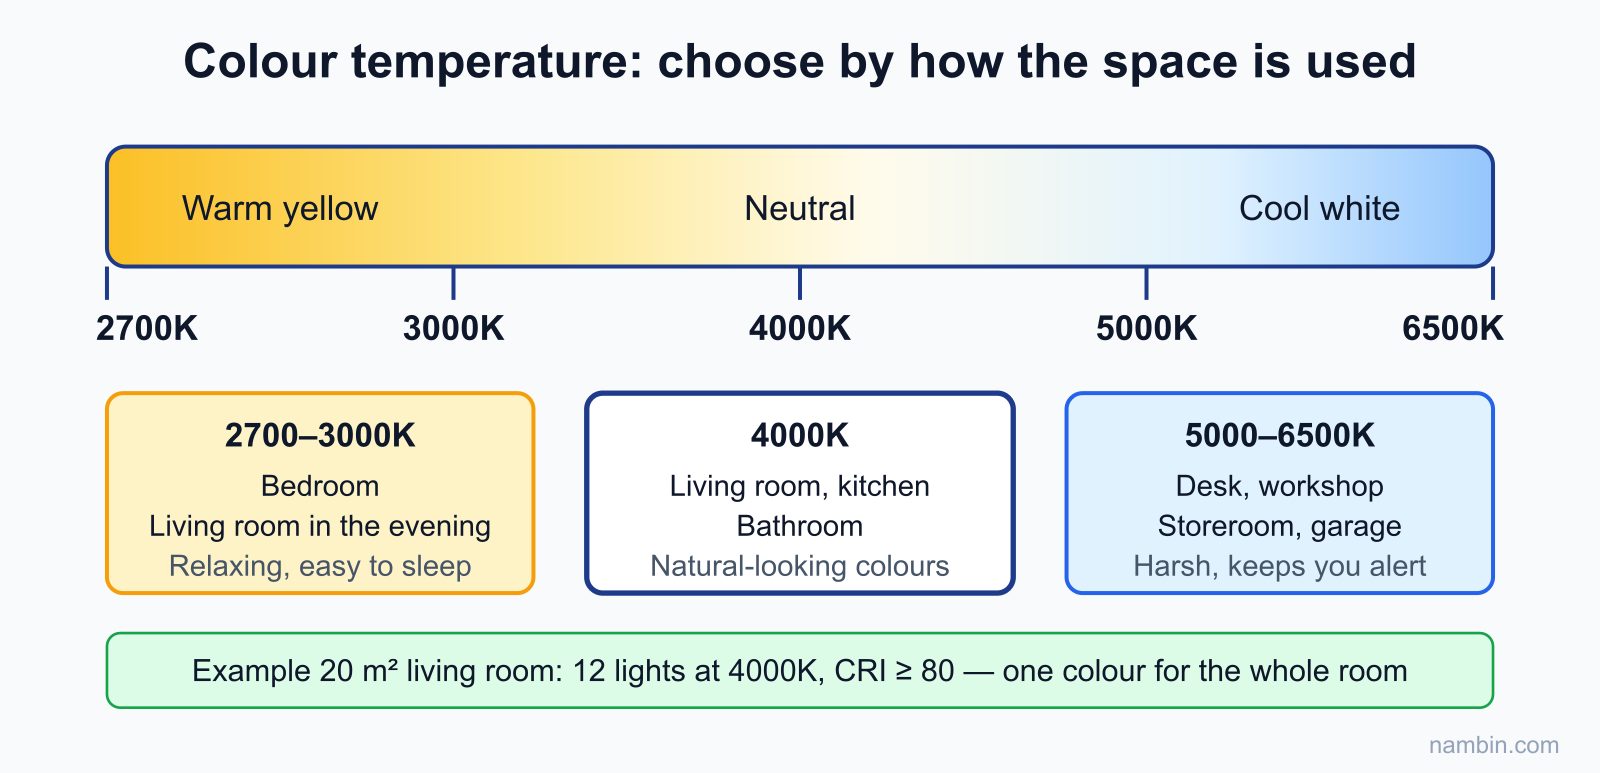
Colour temperature (K, kelvin) tells you whether light leans yellow or blue. Around 2700–3000K is warm yellow light, suited to bedrooms and living rooms in the evening. Around 4000K is neutral and looks natural, suited to kitchens and desks. Around 6500K is cool white and harsh, and easily makes a home look like an office (see Figure 1).
The colour rendering index (CRI or Ra) tells you whether objects under the light look the same colour as in daylight. Homes should use lights with a CRI of 80 or more; make-up tables and spa rooms should use 90 or more. A room should use one colour temperature for its main lights, avoiding a mix of "yellow lights and white lights".
Calculate the number of lights with the lumen method
You do not need software: you can calculate the number of lights for a room in a home with one formula. The result is accurate enough for quoting and marking out, and you then adjust it to fit the layout grid.
The formula and its factors
Total luminous flux needed: Φ = E × S ÷ (UF × MF). Here E is the target illuminance (lux), S is the floor area (m²), UF is the utilisation factor and MF is the maintenance factor. Number of lights: N = Φ ÷ luminous flux of one light, rounded up and then adjusted to the grid.
- Utilisation factor UF: the share of light that actually reaches the working plane. For a room with light-coloured ceiling and walls, under 3 m high, take about 0.6; for dark walls, take 0.45–0.5.
- Maintenance factor MF: compensates for dust build-up and the lights dimming over time. For homes, take about 0.8.
From number of lights to layout grid
Recessed lights should be arranged in an even grid of rows and columns. An easy rule to remember: the distance from a light to the wall equals half the distance between two lights. For a side of length L divided into n lights, the spacing between lights is L ÷ n and the first light is L ÷ (2n) from the wall.
Also check that the spacing between two lights does not exceed about 1.5 times the height from the light to the working plane. If it does, there will be dark patches between lights. Narrow-beam lights (under 60°) need to be placed closer together than wide-beam lights (90–120°).
Integrated-driver and separate-driver lights
Recessed downlights come in two types. Integrated-driver lights have the driver (power supply) mounted on the back; they are quick to fit and suit low ceiling voids. Separate-driver lights have a driver connected by a plug, which lies on top of the plasterboard next to the hole; when the driver fails, you can replace it without changing the whole light. The driver is the hottest part and the part that fails most often; where you place it determines the light's lifespan.
Worked example: a 4 m × 5 m living room with a plasterboard ceiling
The brief
A four-storey tube house (a narrow, deep townhouse typical in Vietnam); the ground-floor living room is 4 m wide and 5 m long, with a finished plasterboard ceiling 2.7 m high and cream-painted walls. The client wants moderate brightness, an LED strip cove light around the ceiling recess for watching films in the evening, and three switch buttons by the entrance door. The chosen lights are 9W recessed downlights, 800 lm, 4000K, 100° beam angle, 90 mm cut-out.
Calculate the number of lights
- Area: S = 4 × 5 = 20 m². Choose E = 200 lux (the middle of the 150–300 range for living rooms).
- Luminous flux needed: Φ = 200 × 20 ÷ (0.6 × 0.8) = 4000 ÷ 0.48 ≈ 8333 lm.
- Number of lights: N = 8333 ÷ 800 ≈ 10.4 → at least 11 lights.
- Adjust to the grid: a 4 × 5 m room suits a grid of 3 rows × 4 columns = 12 lights.
- Check illuminance again: E = 12 × 800 × 0.48 ÷ 20 ≈ 230 lux — within the target range.
Lay out and check spacing
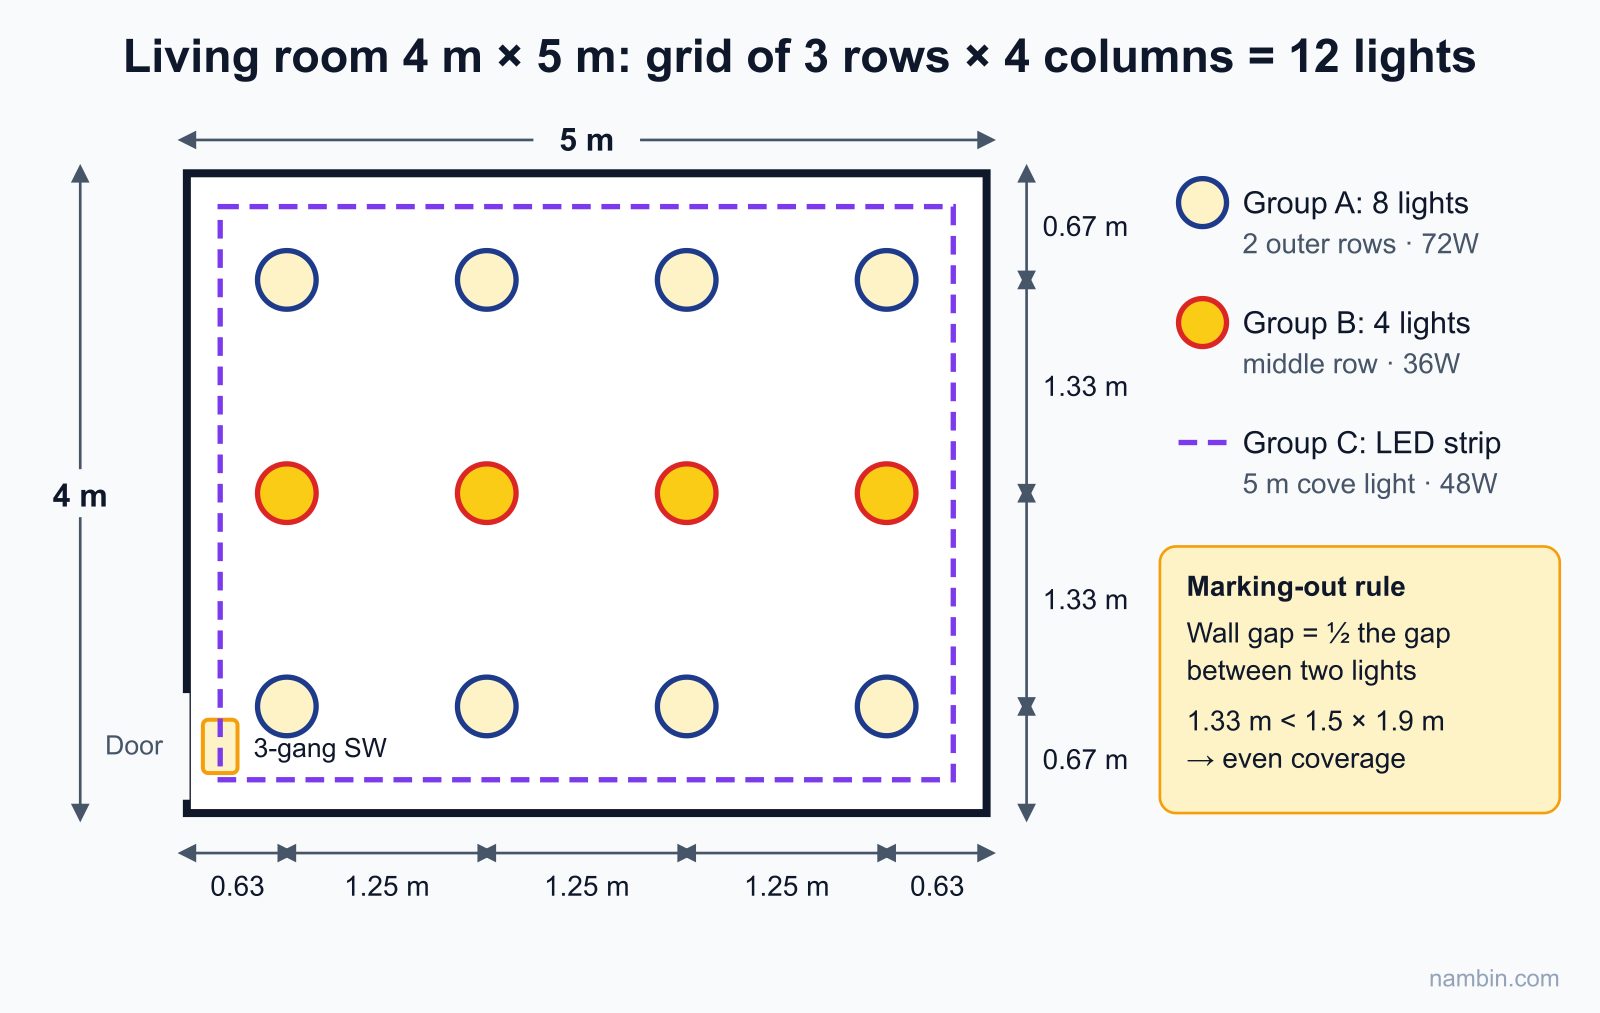
Along the 4 m side there are 3 rows: spacing between rows 4 ÷ 3 ≈ 1.33 m, outer rows about 0.67 m from the wall. Along the 5 m side there are 4 columns: spacing between columns 5 ÷ 4 = 1.25 m, outer columns 0.625 m from the wall (mark at 0.63 m). The height from the lights to the working plane is 2.7 − 0.8 = 1.9 m; the largest spacing, 1.33 m, is less than 1.5 × 1.9 ≈ 2.85 m, so the light covers evenly with no dark patches (see Figure 2).
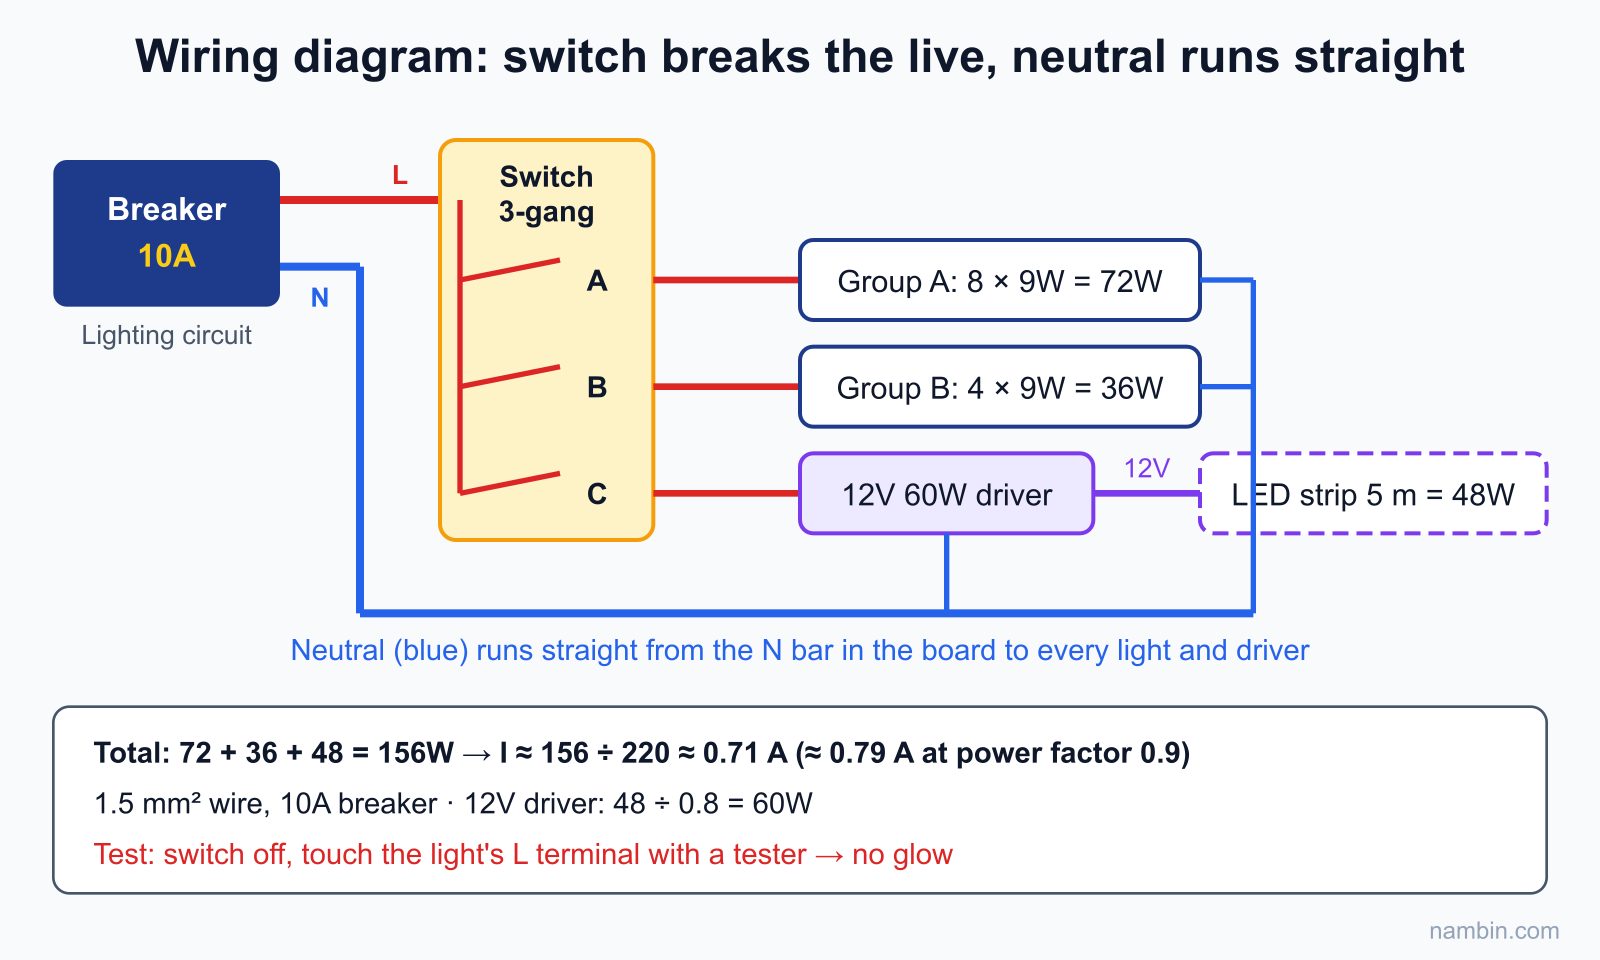
Split into switch groups and choose the LED strip power supply
Split into three groups according to how the room is actually used, with one switch button per group:
- Group A — 8 lights in the two outer rows: 8 × 9 = 72W. Switched on for relaxed visits.
- Group B — 4 lights in the middle row: 4 × 9 = 36W. Added when maximum brightness is needed.
- Group C — 12V LED strip in the ceiling cove, 5 m long, 9.6 W/m: 5 × 9.6 = 48W.
A 12V power supply for LED strip should run at no more than about 80% of its rated power to stay cool and last: 48 ÷ 0.8 = 60W → choose a 12V 60W supply. Total power for the room: 72 + 36 + 48 = 156W. Current is about 156 ÷ 220 ≈ 0.71 A (Vietnamese homes are supplied at 220V); allowing for a driver power factor of about 0.9, the real current is about 0.79 A. A ground-floor lighting circuit using 1.5 mm² cable and a 10A breaker, as learned in the "Reading diagrams & calculating household load" step, has plenty of spare capacity.
Lighting circuit wiring diagram
The number-one rule of every lighting circuit: the switch always breaks the live (phase) wire. The neutral and earth wires run straight to the lights without passing through the switch. When wired correctly, switching off leaves the light completely dead; when wired by mistake into the neutral, the light holder is still "live" and the person changing the lamp can get a shock.
Running cable from the breaker to the 3-gang switch
From the 10A lighting circuit breaker, the live wire (red) goes down to the 3-gang switch box and feeds all three input terminals of the switch. The three outgoing wires (also red or yellow, marked A, B and C) go up to the ceiling. The neutral wire (blue) runs from the N bar in the distribution board straight up to the ceiling, to a central junction box. If the metal body of a light has an earth terminal, connect the earth wire (green–yellow) properly (see Figure 3).
Parallel connection within each group
The lights in a group are connected in parallel: the group's live wire and the neutral pass by each light position and branch down to each light using lever-type push connectors or covered terminal blocks. Do not twist wires together and wrap them in tape above the ceiling — twisted joints gradually loosen, heat up and are the origin of many fires inside ceiling voids. Every joint should sit in a covered junction box placed where it can be opened and checked through a light hole.
Where to put the LED strip power supply
The 12V power supply takes 220V from wire C and sits on the ceiling near the start of the LED strip, no more than about 2–3 m from the strip's lead, to avoid voltage drop making the far end of the strip dimmer. A 5 m strip is fine fed from one end; strips longer than 5 m should be fed from both ends or split into sections. Place the supply somewhere ventilated, with a ceiling access hatch or near a light hole so it can be replaced later.
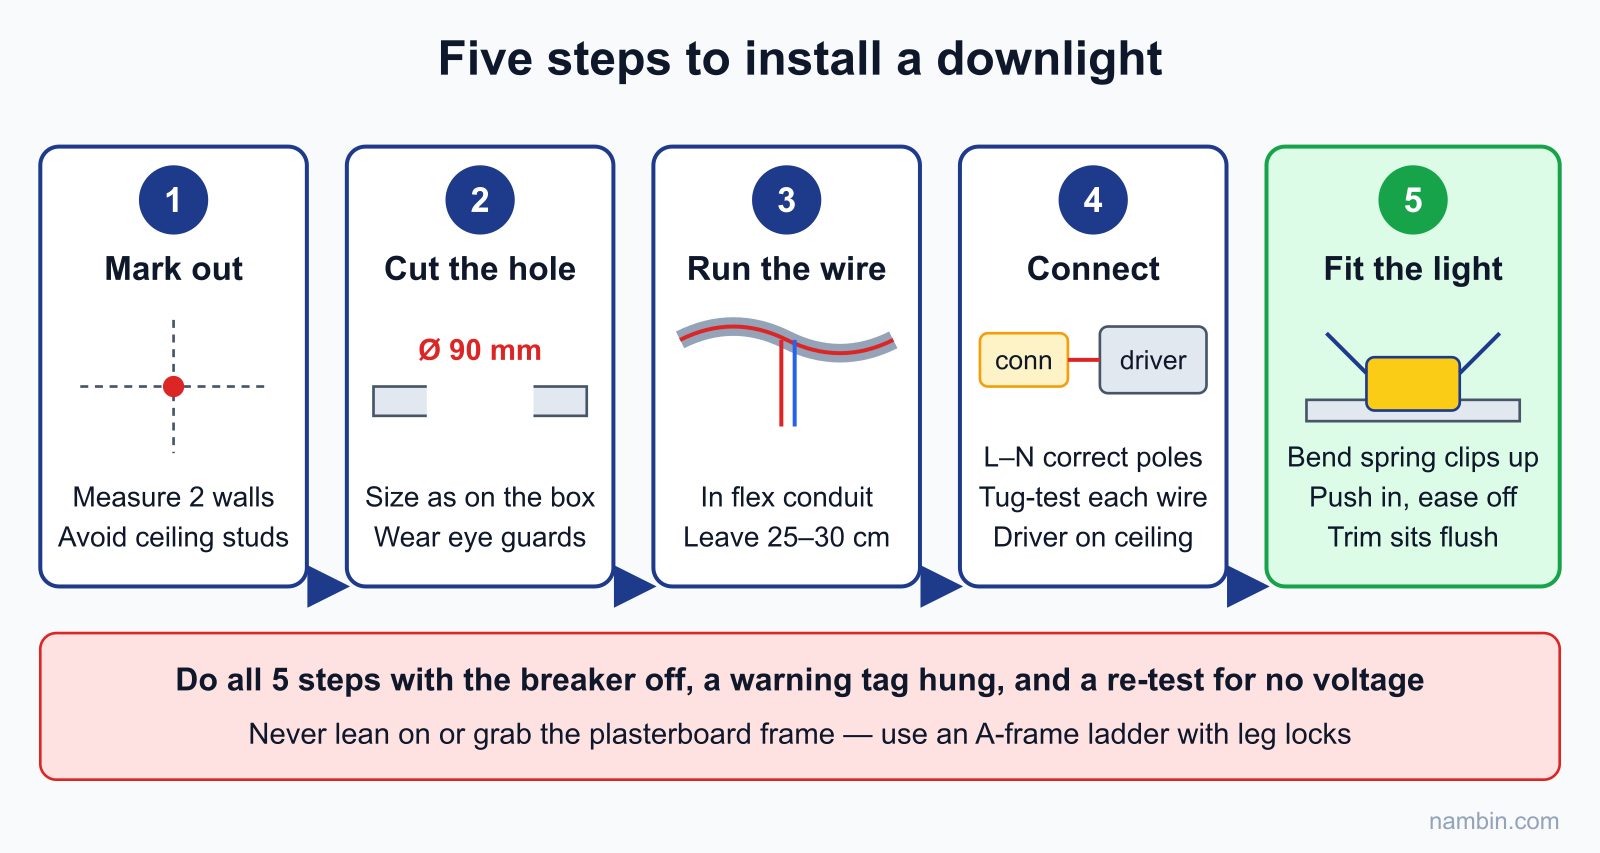
Safety: Do all cable running, connecting and light fitting with the lighting circuit breaker switched off, a "Do not switch on" tag hung on it, and a voltage tester used to confirm there is no power. Work from an A-frame ladder with leg locks and do not stand on the top step; a plasterboard ceiling cannot carry a person's weight, so never grab or lean on the ceiling frame.
Step-by-step installation
Tools and materials to prepare
- A-frame ladder, voltage tester pen, multimeter, tape measure, pencil, chalk line or laser level.
- Drill with a plasterboard hole saw of the right diameter (for example 90 mm) or a compass cutter, safety glasses, dust mask.
- Wire strippers, side cutters, insulated screwdrivers, fish tape for pulling cable through conduit.
- 1.5 mm² cable in three colours (red, blue, green–yellow), flexible corrugated conduit, conduit clips, push connectors, covered junction boxes.
- Lights, LED strip power supply, LED strip, 3-gang switch and switch plate.
Installation steps
- Mark out: measure from two perpendicular walls, draw the centre lines of rows and columns, and mark the centre of each light. Tap lightly or use a magnetic stud finder to make sure the hole centre does not hit a ceiling stud; if it does, shift the whole row, not just one light.
- Cut the holes: cut exactly the diameter printed on the light's box. A hole too big leaves the light loose and the trim cannot cover it; a hole too small has to be enlarged and breaks the plasterboard edge.
- Run cable above the ceiling: run the cable in flexible conduit, clip the conduit to the hanger rods or main ceiling channels, and do not let cable lie directly on the plasterboard. At each light position, leave a tail about 25–30 cm long sticking out of the hole.
- Connect: strip exactly the length the connector requires (usually 10–12 mm), push the core all the way in, close the lever and tug-test each wire. The group live goes to the light's L terminal, neutral to N, and earth to the earth terminal if there is one.
- Fit the light: lay the driver flat on the plasterboard next to the hole, bend the two spring clips up against the light body, push the light into the hole and release slowly so the trim presses evenly onto the ceiling (see Figure 4).
- Test and hand over: measure before switching on, then turn on each group and check that the switch breaks the live wire (section below).
Checks before and after switching on
Before switching on: with the breaker still off, remove any one light from each group, use a multimeter on continuity to make sure wires A, B and C go to the right switch buttons, and measure the resistance between live and neutral with the switch off — it must be open circuit (no short). After switching on: turn on each button in turn and count that every light in each group lights up. Turn off all switches and touch the L terminal of a removed light with a tester pen: the pen must not light up. If it does, the switch is wired into the neutral — switch off the power and rewire it.
Common faults and how to fix them
Most complaints after a downlight installation fall into the five faults below. Each fault has its own signs; check in this order when a client calls you back under warranty.
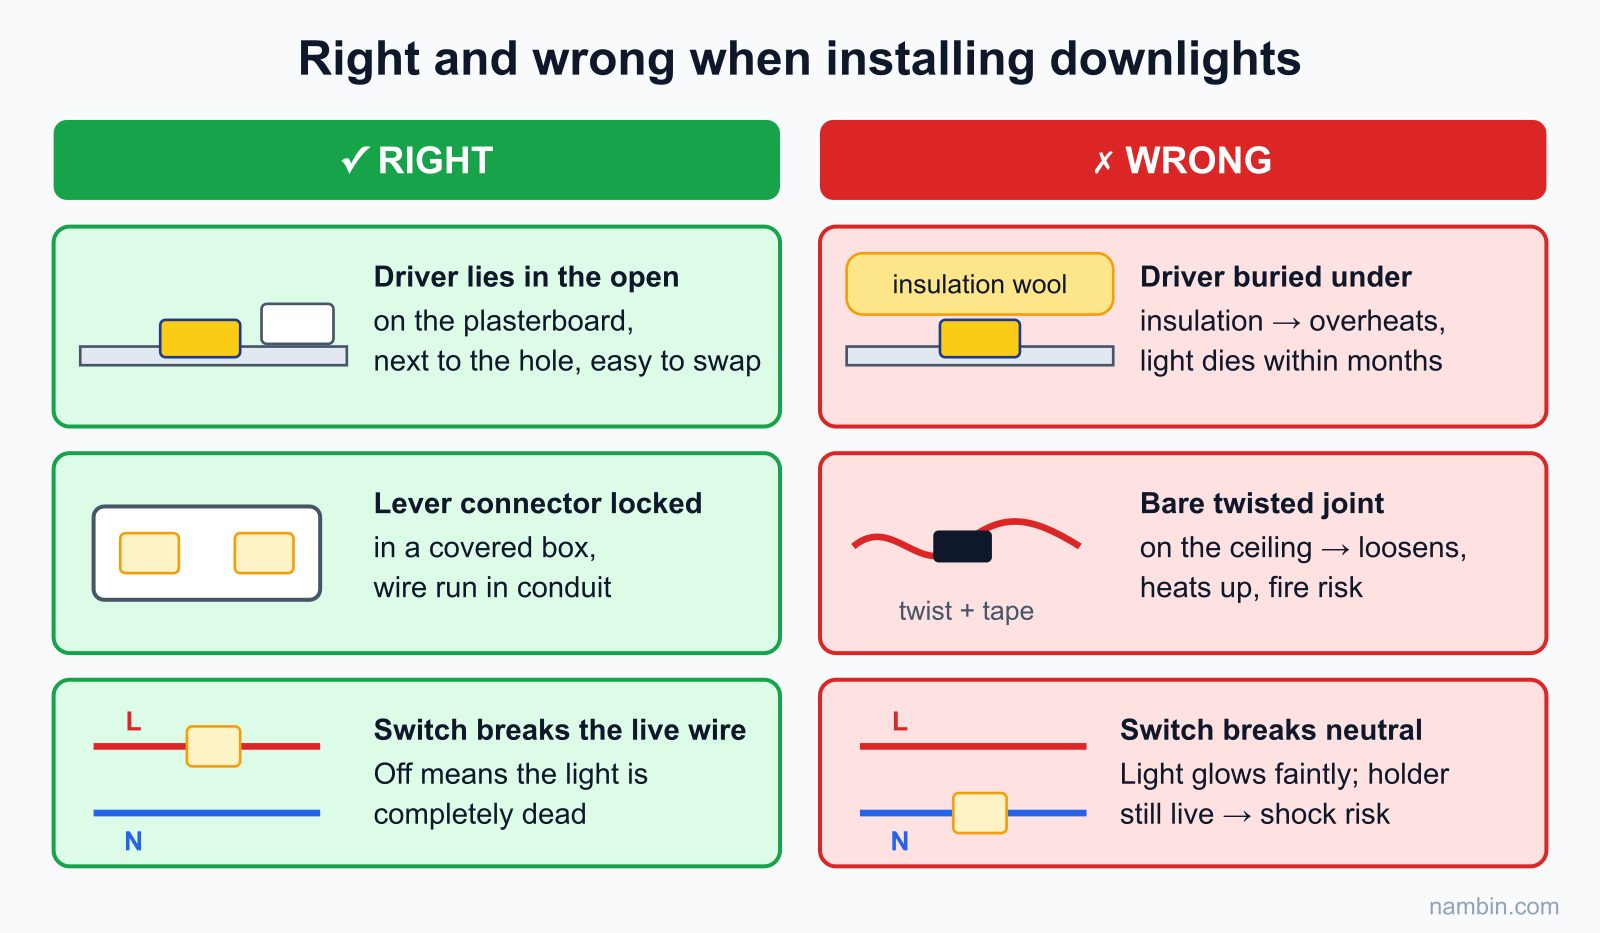
- Lights die early after a few months: signs — the light flickers and then goes out completely, the body is hot. Cause — the driver is buried under insulation wool, pushed up against a metal roof, or a high-power light sits in a closed ceiling recess. Fix — place the driver somewhere ventilated, keep the clearance above the light shown on the box, choose lights with aluminium heat sinks.
- Lights still glow faintly when switched off: signs — the light glows dimly or flickers slightly when off. Cause — the switch breaks the neutral, or a switch with an indicator light or an electronic switch lets a small leakage current through the driver. Fix — wire the switch into the live; use a mechanical switch without an indicator, or add a dummy load as recommended by the switch manufacturer.
- Uneven lighting with dark patches: signs — the area between two lights is clearly darker. Cause — the spacing is more than about 1.5 times the mounting height, or narrow-beam lights were used. Fix — recalculate the grid, add lights or switch to wide-beam lights.
- Lights flicker when other appliances start: signs — the lights flicker when the water pump or washing machine starts. Cause — a loose joint, or the lights share a circuit with motor loads. Fix — retighten the joints and separate the lighting circuit at the board.
- Crooked trim, cracked ceiling around the hole: signs — the light tilts, with gaps around the trim. Cause — wrong hole size or the hole hits a stud, or the spring clips snapped back hard. Fix — cut the right size, shift the whole row when you hit a stud, release the clips slowly.
Fire warning: A twisted, taped joint lying on a plasterboard ceiling is a hot spot that the breaker cannot detect, because the current is still below the rating. Never leave bare joints or cable outside conduit above the ceiling, especially where there is insulation wool, timber or fabric curtains near the lights.
Materials, time and reference quote
Materials for a 20 m² living room
The prices below are common reference prices in large cities in 2026 and vary by brand and region (VND is the Vietnamese dong; 100,000 VND is roughly 4 US dollars). For a real quote, ask the prices at the supply shop where you work.
| Item | Quantity | Reference unit price | Amount |
|---|---|---|---|
| Recessed downlight 9W, 800 lm, 4000K | 12 pcs | 100,000 VND | 1,200,000 VND |
| LED strip 12V, 9.6 W/m | 5 m | 40,000 VND | 200,000 VND |
| 12V 60W power supply | 1 unit | 150,000 VND | 150,000 VND |
| 1.5 mm² cable (three colours) | 60 m | 7,000 VND | 420,000 VND |
| Flexible conduit, conduit clips | 30 m | 5,000 VND | 150,000 VND |
| Push connectors, junction boxes | 30 pcs | 3,000 VND | 90,000 VND |
| 3-gang switch + plate | 1 set | 120,000 VND | 120,000 VND |
| Total materials | 2,330,000 VND | ||
Installation time
One lead electrician and one helper take about one working day: marking out 1 hour, cutting holes 1 hour, running cable above the ceiling 2.5 hours, connecting and fitting lights 1.5 hours, fitting the LED strip and supply 1 hour, testing and handover 0.5 hours — 7.5 hours in total. For ceilings with many recesses, higher than 3 m, or where cable must be pulled through an existing ceiling, add 30–50%.
Labour quote
Labour is usually charged per point: for reference, 80,000 VND per downlight point including cabling, plus about 150,000 VND for the whole LED strip and supply item. For the example: 12 × 80,000 + 150,000 = 1,110,000 VND. Total quote for materials and labour: 2,330,000 + 1,110,000 = 3,440,000 VND (about 3.4 million VND). State clearly in the quote: does not include re-cutting ceiling holes in wrong positions made by other trades; 12-month warranty on connections; lights covered by the manufacturer's warranty.
Frequently asked questions
Should I use 3-colour lights (colour changed by the switch)?
They work for living rooms and bedrooms when the client wants to change the mood. Note that all lights in the same group must be the same model, because each time you flick the switch quickly to change colour, lights of different models can get out of step with each other. If the client only needs one colour, single-colour lights are usually more durable and cheaper.
Can recessed lights be fitted into a concrete ceiling?
Recessed lights need space above for the light body and driver, so they can only be fitted into a false ceiling (plasterboard, plastic, timber). For a bare concrete ceiling with no false ceiling, use surface-mounted ceiling lights with cable run in pre-embedded conduit or surface trunking.
Do bathroom downlights need a special type?
Yes. Choose lights with moisture protection (IP44 or higher for areas near the shower, following the manufacturer's instructions), and do not put a light directly above the shower unless it is a purpose-made type. The bathroom lighting circuit should pass through a 30 mA residual current device.
Do I need a dimmer for LED lights?
Only use one when the light clearly states that it supports dimming. Ordinary LED lights fitted with a dimmer will flicker, buzz and quickly ruin the driver. If the client wants adjustable brightness, buy a matching set of lights and dimmer as recommended by the manufacturer.
How many LED lights can one 10A breaker carry?
By power, a great many: 10A × 220V ≈ 2200W, equivalent to more than 200 lights of 9W. However, LED drivers draw a large inrush current for a split second when switched on, so if one switch button turns on several dozen lights at once, the breaker may trip. In homes, use one lighting circuit per floor and keep each switch button under about 20 lights.
Practical exercises
- Calculate the number of lights, draw the layout plan and split into groups for a 3.5 m × 4 m bedroom with a 2.7 m ceiling, target illuminance 120 lux, using 7W 600 lm lights. Write out every calculation step as in the example.
- On a practice board, install a circuit with a breaker, a 2-gang switch and 4 recessed lights in two groups, with cable in flexible conduit and joints made with push connectors.
- Draw up a materials list and quote for the bedroom above, following the template in this lesson.
Self-assessment criteria — you pass when:
- The lumen calculation follows the formula, the chosen number of lights is justified by the layout grid, and the rechecked illuminance is within the target range.
- The light-to-wall distance is half the spacing between two lights, with a marking-out error of no more than 2 cm.
- The switch breaks the live wire: with the switch off, a tester pen touching the light's L terminal does not light up.
- There are no twisted joints, every cable is in conduit, and drivers lie on top of the ceiling.
- The materials list adds up correctly and is marked "reference prices" with the year.
If you fail any safety criterion (switching the live, joints, conduit), redo the whole exercise. Once you are confident with lighting circuits, the next step in the roadmap is Home distribution board: MCB, RCBO & earthing — where you learn to split lighting, sockets and water heaters into separate branches with suitable protection.