A good relaxing massage leaves the client feeling light and wanting to come back; a poor one leaves them sore or feeling "rushed". The difference comes down to three things: your posture, even pressure and an unbroken rhythm. This lesson gives you the framework of a 60-minute treatment that you can practise until it becomes second nature.
It builds on the two previous steps of the roadmap (skin, muscle groups and contraindications; treatment-room hygiene). By the end of this lesson, you will be able to:
- Adjust the bed and use the two standing postures, lunge and horse stance, so you can treat many clients a day without back, wrist or thumb pain.
- Perform the five foundation strokes: gliding, kneading, stripping, pressure-and-hold, and vibration–tapping.
- Complete the back – shoulders – legs – arms – neck sequence in exactly 60 minutes, and shift time when a client wants to focus on one area.
- Read the client's verbal and non-verbal feedback to adjust pressure, and avoid exactly the areas that must not be pressed.
Preparing before the client lies down
Room, bed and supplies
A smooth 60-minute session starts with everything ready before the client walks in, so you never have to take your hands off the client to look for something. Prepare:
- A disinfected bed with a clean sheet and a fresh face-hole cover or towel.
- Two or three large towels to drape the body, and a small towel for wrapping hair or wiping oil.
- An ankle bolster (for lying face down) and a knee bolster (for lying face up).
- Massage oil or cream in a pump bottle, placed where you can reach it without taking a step.
- A room warm enough for the client to lie undressed without feeling cold; soft lighting; quiet music.
- Drinking water for the client after the session, and a clock or timer that does not beep loudly.
Quick questions and a contraindication check
In the first 5 minutes, review the client card and ask: do they have a fever or feel unwell today, are they taking any medication; which area hurts or do they want you to focus on; is there anywhere they do not want touched; do they prefer light, medium or firm pressure; are they allergic to any oils or essential oils. Then answer for yourself the three screening questions from step 1: fever or a possibly contagious illness, an open wound, recent surgery or suspected deep-vein thrombosis (a swollen, hot, painful calf on one side) means stop; pregnancy, blood pressure, heart conditions, diabetes or varicose veins means adjust according to the spa's procedure or hand over to someone trained.
Warming your hands and getting into the right state
Wash your hands and rub them together until warm. Cold hands on the back make the client tense up at once. Take a few deep breaths and drop your shoulders: for the next 60 minutes, your focus will travel through your hands.
Therapist posture: protecting your own back
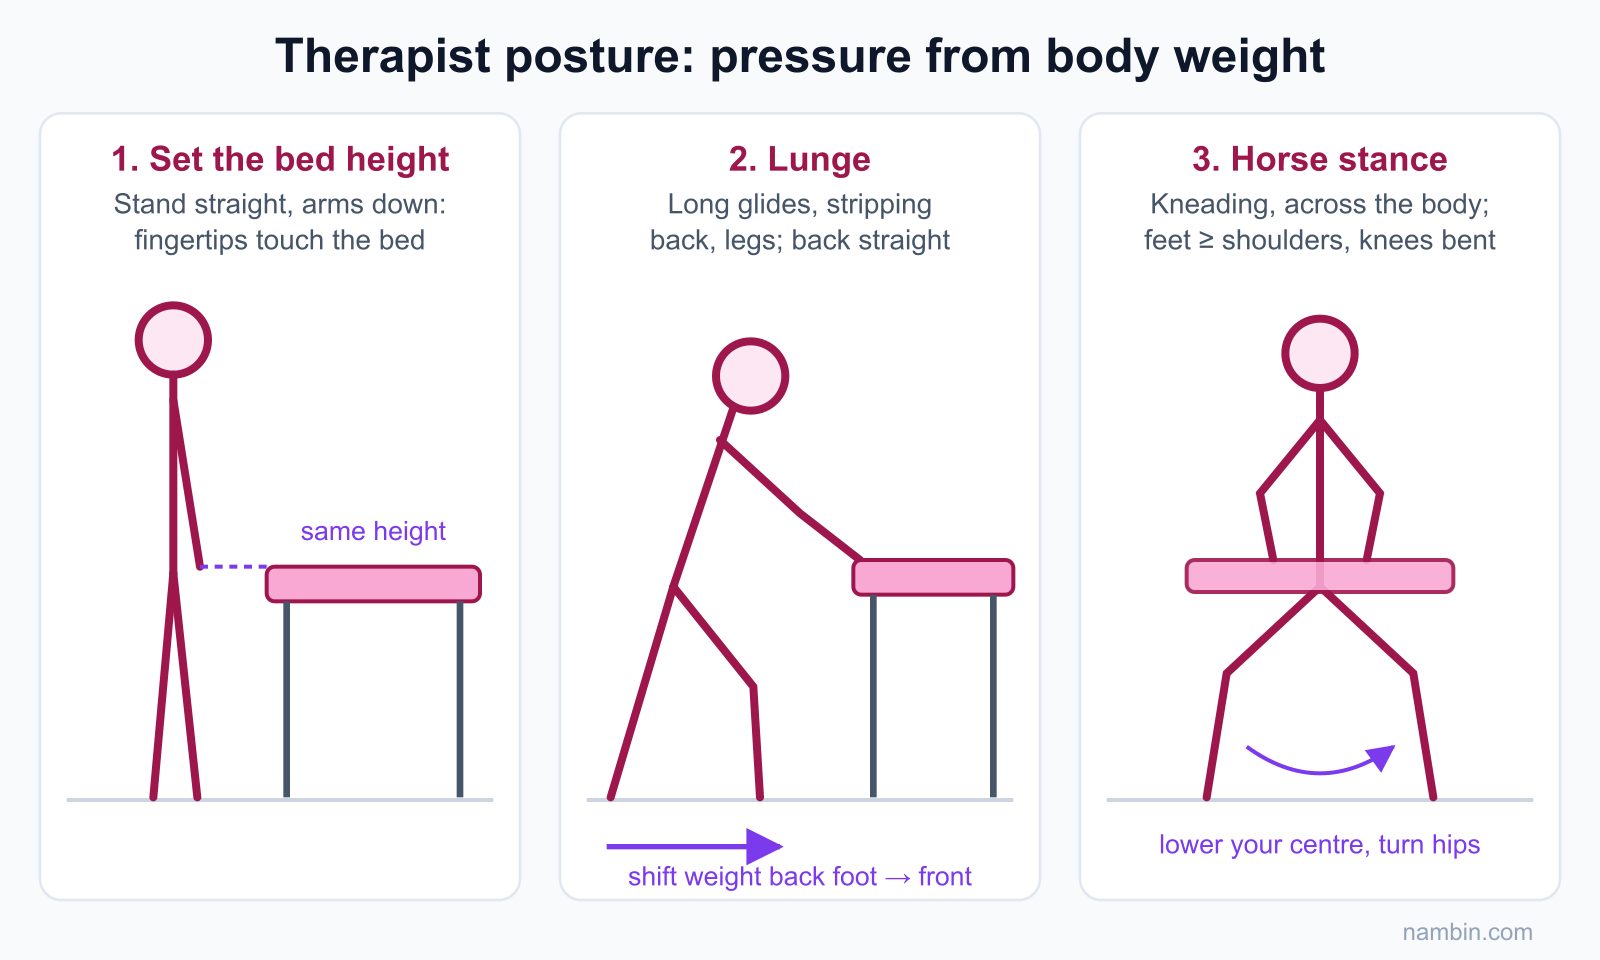
- Set the bed at a height where, standing straight with your arms hanging down, your fingertips touch about the surface of the bed.
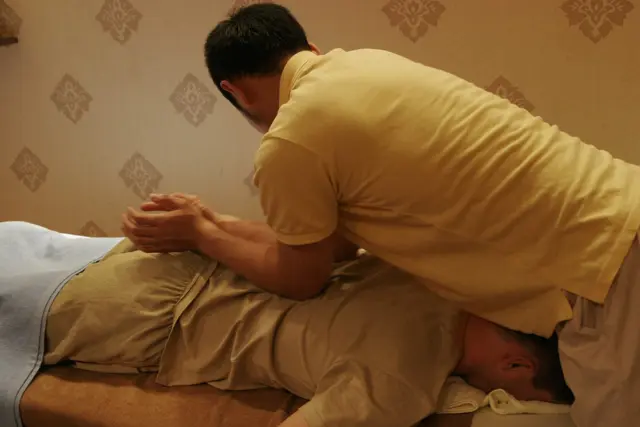
- Stand with one foot in front of the other, knees slightly bent, and use your body weight to create pressure instead of straining your wrists and shoulders.
- Keep your back straight, move your feet with the stroke, and never overreach.
- Relax your shoulders and breathe evenly — the client can feel your tension through your hands.
Two basic standing postures
Lunge: one foot in front and one behind, pointing in the direction of the stroke. Use it for long gliding strokes and stripping along the back or legs. The pressure comes from shifting your weight from the back foot to the front foot; your hands are just the "channel" for that force. Horse stance (wide stance): feet as wide as your shoulders or wider, parallel to the edge of the bed, knees slightly bent. Use it for kneading or working across the client's body. The pressure comes from lowering your centre of gravity and turning your hips.
Protecting your wrists and thumbs
The thumb is the weak point of the massage profession: stripping with your thumbs for 60 minutes, for several clients a day, easily causes joint pain. Keep your thumb in line with your forearm when pressing, never bent back; alternate with the heel of your hand, a soft fist or your forearm on large muscle areas like the back and thighs. Keep your wrist straight and avoid bending it back too far when pressing with the heel of the hand. If wrist or finger pain lasts for several days, tell your manager and see a doctor rather than pushing through.
The 5 foundation strokes
| Stroke | How to do it | Purpose |
|---|---|---|
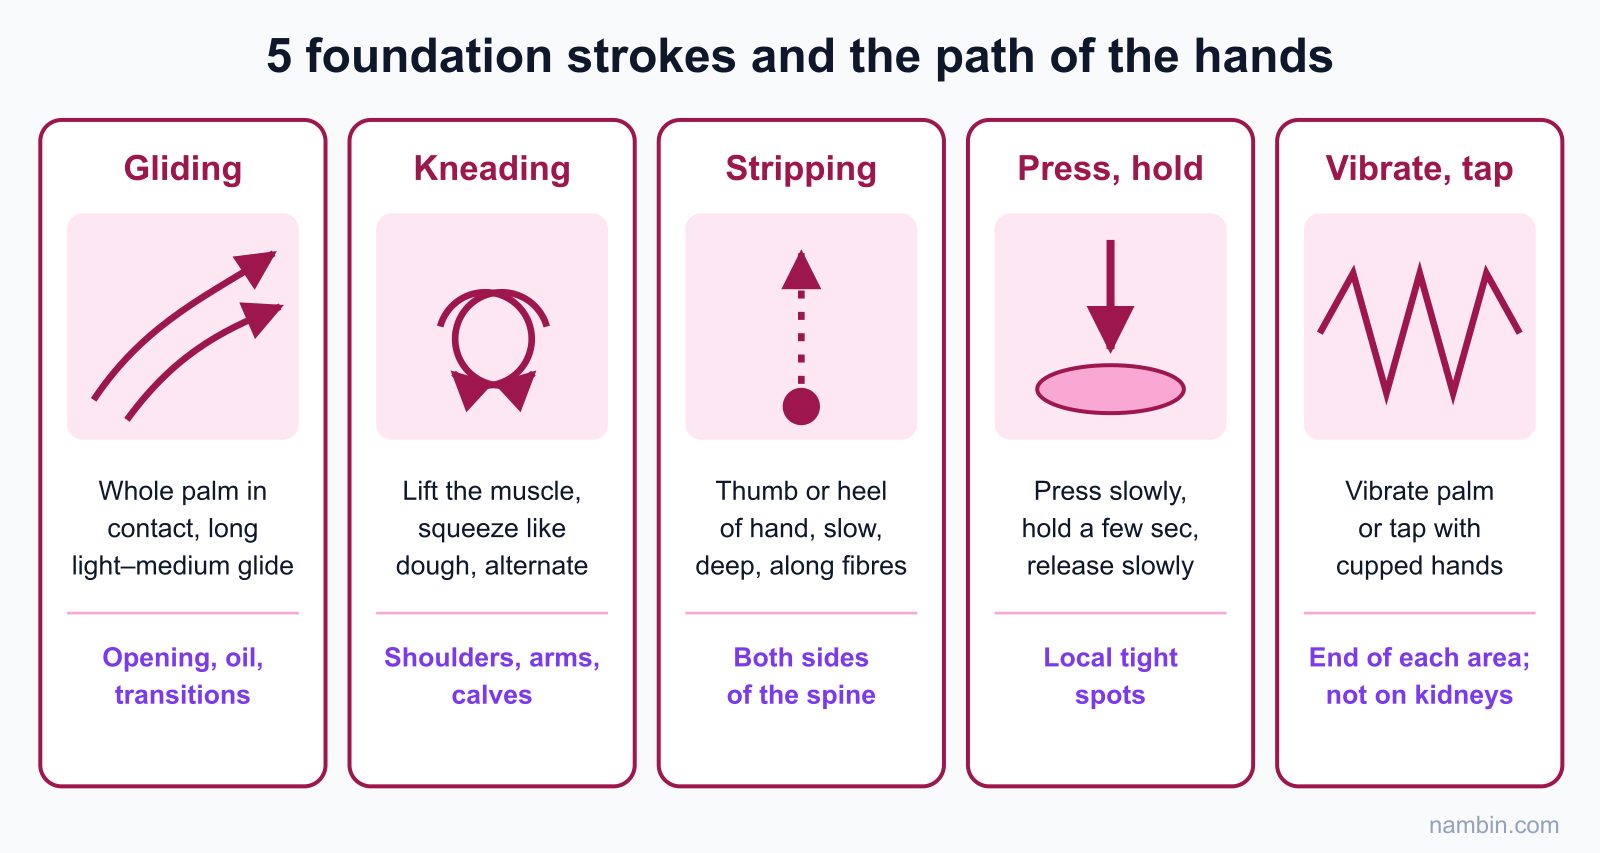
| Gliding (effleurage) | Palms flat on the skin, long glides along the muscle fibres, light to medium pressure | Opening, spreading oil, moving between areas, closing |
| Kneading | Lift and squeeze the muscle between the thumb and the other fingers, rhythmically | Softens muscles of the shoulders, upper arms and calves |
| Stripping | Thumb or heel of the hand moves slowly and deeply along the muscle fibres | Releases tight spots along both sides of the spine |
| Pressure and hold | Press slowly, hold for a few seconds, release slowly | Relaxes local tight spots |
| Vibration, light tapping | Vibrate the palm or tap lightly and quickly with cupped hands | Wakes up the muscles; used at the end of an area |
Gliding: the "glue" of the whole session
Gliding fills most of the transition time. The whole palm and fingers stay in contact with the skin, relaxed, with no fingers lifting up. On the arms and legs, glide towards the heart (from ankle to thigh, from wrist to shoulder) with medium pressure, and return with a light touch. Keep the rhythm slow and even — one long glide up the back takes a few seconds, not as fast as wiping a table. Every time you start a new area, glide 3–5 times to get acquainted and spread the oil before working deeper.
Kneading and stripping: working with the muscle
When kneading, lift the muscle away from the bone and then squeeze gently, like kneading dough, with the two hands alternating to create a wave rhythm. Never pinch the skin with your fingertips — the client will feel a sharp sting. When stripping, move much more slowly than when gliding and feel the tight "strands" of muscle under your hands. When you meet a hard spot, slow down and keep the pressure steady instead of suddenly pressing harder.
Pressure-and-hold, vibration and tapping: the accents
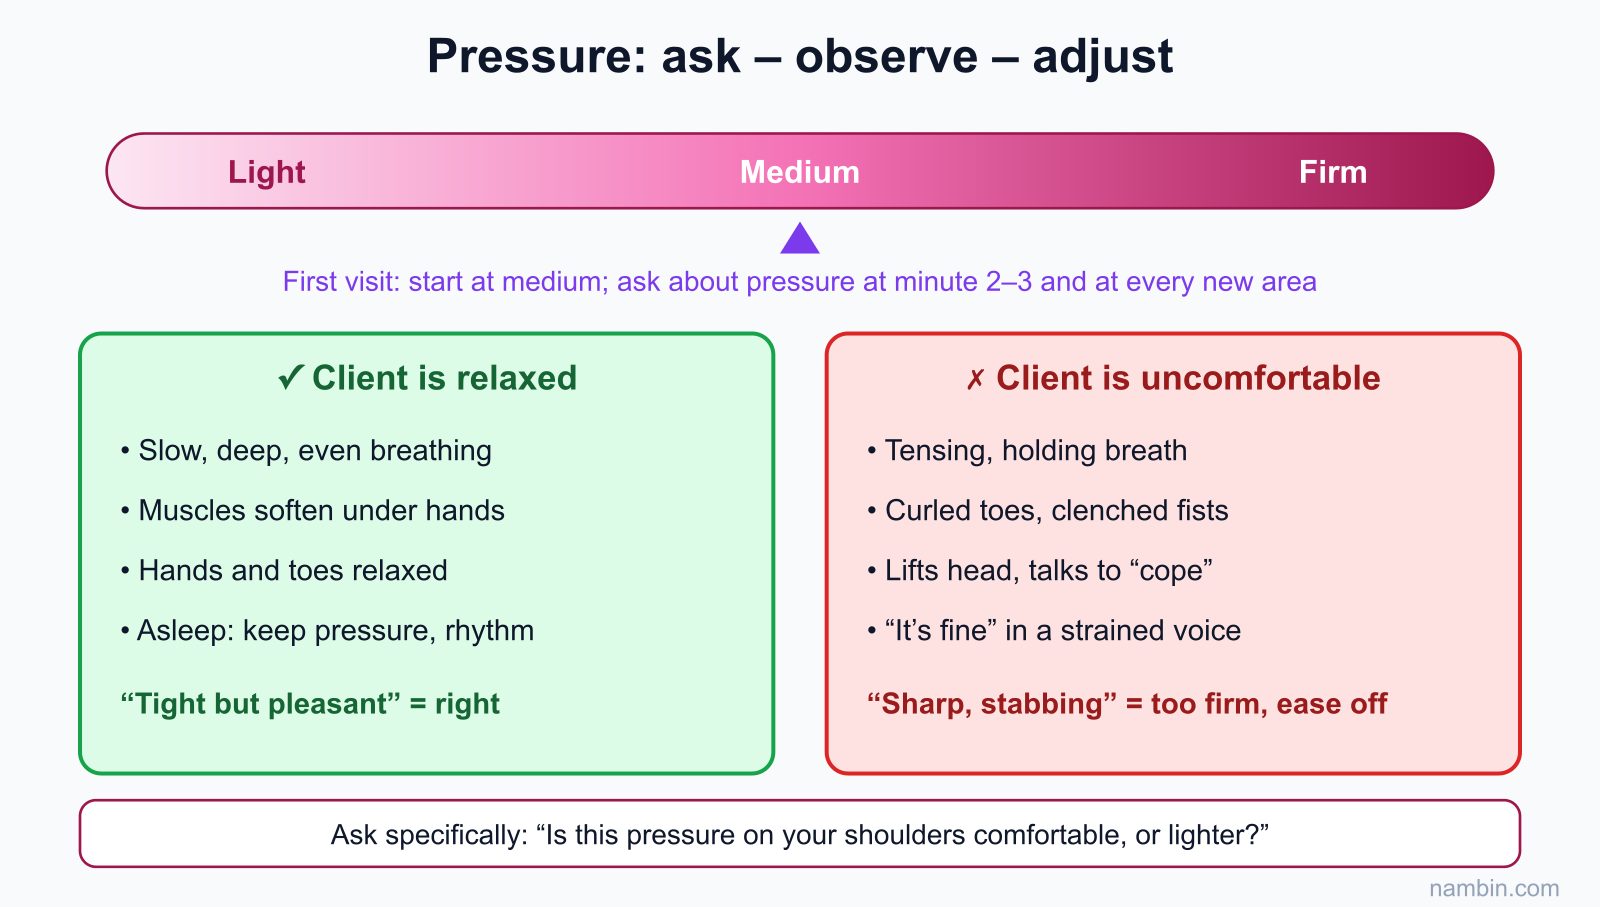
Pressure and hold on a tight spot: press slowly over a few breaths, hold for a few seconds, and release just as slowly. Ask the client how it feels: "a good, tight feeling" is right; "sharp, stabbing" is too strong. Use vibration and cupped tapping sparingly, at the end of each area, quickly and lightly; in relaxing massage, never tap hard and never tap over the kidney area of the lower back.
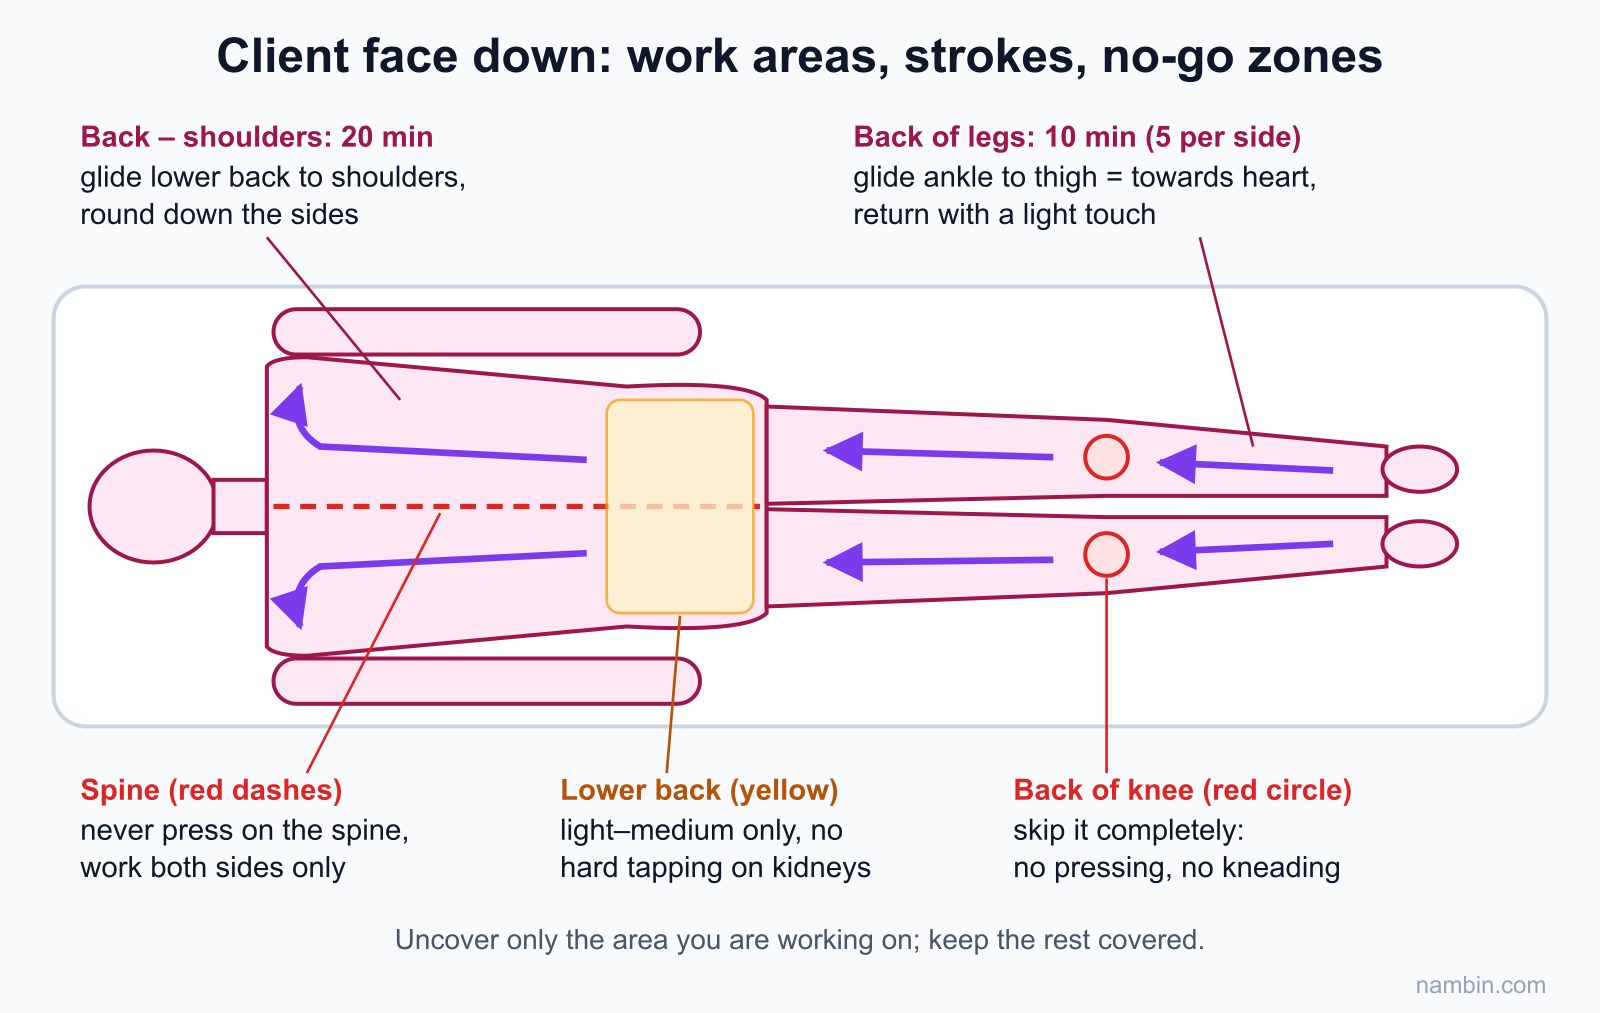
Never press directly on the spine, the back of the knee, the front of the neck, or areas with bulging veins or bruises. Always work on both sides of the spine, never on it. If the client feels numbness spreading down the arms or legs, dizziness, nausea or a sharp pain when you press, stop working on that area immediately, check on them and tell your manager; advise the client to see a doctor if the symptoms continue after the session.
Timing a 60-minute session
| Stage | Time | Notes |
|---|---|---|
| Welcome, quick check, preparation | 5 minutes | Ask about painful areas, preferred pressure, contraindications |
| Back – shoulders (face down) | 20 minutes | Usually the client's tightest area |
| Back of the legs | 10 minutes | 5 minutes per side, avoid the back of the knee |
| Front of the legs, feet (face up) | 10 minutes | Bolster under the knees |
| Arms, neck, shoulders from the head end | 10 minutes | Lighter pressure on the neck |
| Closing, offering water, aftercare advice | 5 minutes | Fill in the client card |
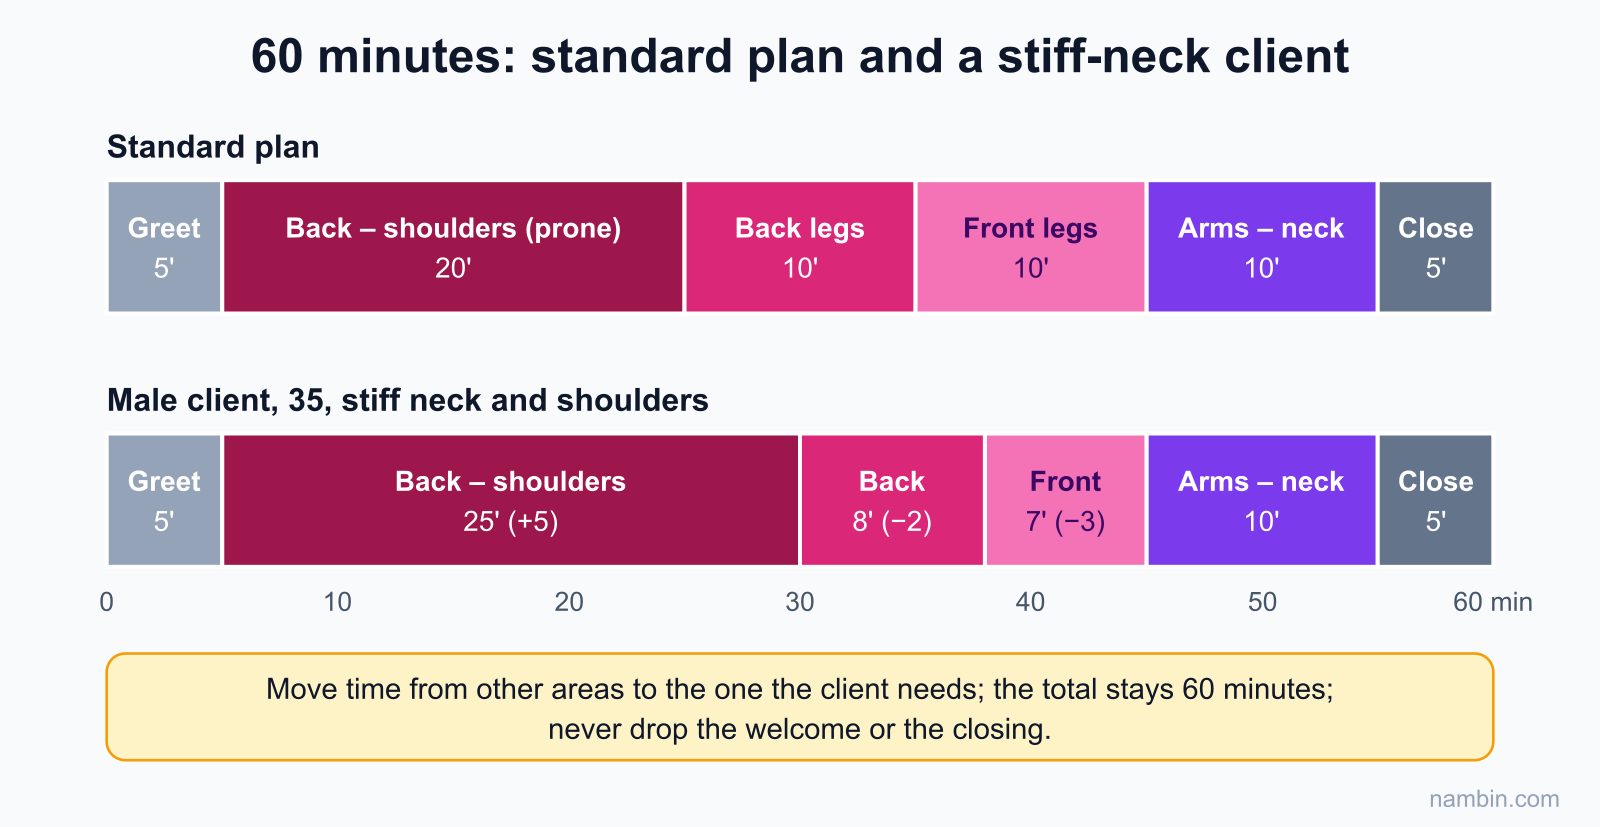
This framework is a guide; when a client asks you to focus on an area, move some time from other areas to it, but keep the total at 60 minutes and never drop the welcome or closing entirely. Figure 3 compares the standard framework with the adjusted one for the client with a stiff neck and shoulders in the worked example below. Time yourself while practising so your hands learn the rhythm; once you are skilled, you will sense the time without constantly checking the clock.
Detailed sequence for each area
Before going through each area, remember the map in Figure 4: the main gliding directions, the spine, the lower back and the back of the knee. The three marked areas are where beginners most often go wrong.
Back – shoulders (face down, 20 minutes)
- Rest both hands on the client's back for a few seconds (first contact) and tell the client you are starting.
- Glide long strokes from the lower back up to the shoulders and round down the sides of the ribs, 5–6 times, to spread the oil.
- Knead the shoulders and the trapezius muscle, one side at a time.
- Strip with your thumbs along both sides of the spine, from bottom to top, 3 passes with gradually increasing pressure.
- Work the shoulder-blade area: strip around the shoulder blade and press and hold tight spots.
- Finish with long glides that get lighter, then cover with a towel to keep the client warm.
Tip: when working on the left side of the back, either stand on the right side of the bed and reach across, or walk round to the left — choose whichever keeps your back straight. On the lower back, use light to medium pressure and never press hard, because there are no ribs underneath to protect it.
Back of the legs (10 minutes)
- Uncover one leg, tucking the edge of the towel neatly to keep the buttocks and the other leg covered.
- Glide from the ankle up to the thigh and return lightly, 4–5 times.
- Knead the calf and the back of the thigh, skipping the back of the knee.
- Strip along the calf with the heel of your hand, medium pressure.
- Finish with gliding, cover with the towel and move to the other leg.
Turning over and the front of the legs (10 minutes)
When turning the client over, lift the towel as a "screen", hold the edge on your side firmly, guide the client to roll towards you, then lower the towel. Place a bolster under the knees to reduce strain on the lower back. Glide from the ankle up to the front of the thigh, knead the thigh muscles gently, and avoid pressing directly on the kneecap and shinbone. Feet: rub the sole with your thumbs, gently pull each toe and glide over the top of the foot. Some clients are ticklish or do not like their feet touched — you asked at the start, so do exactly what they want.
Arms, neck and shoulders from the head end (10 minutes)
Each arm: glide from the wrist up to the shoulder, knead the upper arm and strip the palm. Then stand at the head of the bed, slide both hands under the shoulders and draw them gently up both sides of the neck towards the hairline; knead the nape lightly. On the neck, work only the back and sides, with lighter pressure than on the back; never press the front of the neck and never twist the client's neck. Finish with a few glides from the shoulders up to the hairline, then rest your hands still for a few seconds.
Closing the session (5 minutes)
Tell the client the massage is finished and let them lie still for a moment. Guide them to sit up slowly by rolling onto their side and pushing up with their arms — especially older clients or those with low blood pressure. Offer water, remind them to drink, to avoid a very cold shower straight away and to rest if they feel tired. Fill in the card: tight areas, pressure used, feedback, and adjustments for next time.
Pressure: ask – observe – adjust
Ask the client about pressure at minute 2–3 and after every change of area. Use a simple scale of light – medium – firm; with first-time clients, start at medium. Alongside your questions, your eyes should always be reading the client's body, as in Figure 5.
Keep continuous contact: when you take more oil or change position, keep one hand on the client. Breaking contact suddenly startles the client and breaks the feeling of relaxation.
"Firm" does not mean painful
Many clients ask you to "go harder" because they believe it only works if it hurts. Relaxing massage aims for a pleasant feeling; too much pressure can leave bruises or soreness the next day. Increase pressure gradually on large muscle areas and keep it at a level the client finds satisfying while still breathing evenly. If the client still wants more than is safe, explain gently and recommend a deep-tissue service performed by an experienced therapist.
Reading non-verbal feedback
Relaxed clients usually breathe slowly and deeply, their muscles soften under your hands, and some fall asleep. Uncomfortable clients usually tense up, lift their head, keep talking to "put up with it", or answer "yes, it's fine" in a strained voice. When you see these signs, reduce pressure and ask again with a specific question: "Is this pressure on your shoulders comfortable, or would you like it lighter?"
Worked example: an office worker with a stiff neck and shoulders
A 35-year-old male client who works at a computer all day books a 60-minute body massage, complains of a stiff neck and shoulders, and likes firm pressure. His card shows no underlying conditions, no fever and no recent injuries.
- Adjust the timeline: back and shoulders go up to 25 minutes, back of the legs down to 8 minutes, front of the legs to 7 minutes, and arms – neck – shoulders stay at 10 minutes.
- Back and shoulders: glide to spread the oil, then knead the trapezius at medium pressure; at minute 3 you ask about pressure and he wants it firmer. You switch to using your forearm to strip along the trapezius and both sides of the spine, giving deep pressure without loading your thumbs.
- You find a hard spot on the inner edge of the right shoulder blade: press and hold slowly and ask how it feels; he says "tight but pleasant". Hold for a few breaths, release, and glide to soothe.
- Legs: medium pressure, even rhythm, so he relaxes after the back work.
- Head end: work the nape and both sides of the neck carefully with lighter pressure than on the back; do not twist his neck even if he asks you to "crack it" — explain that this is not part of relaxing massage technique.
- Closing: offer water and suggest he stands up and stretches every hour at work. Note on the card: tight spot at the right shoulder, likes firm pressure, forearm technique worked well.
How to check the result: when he turns his neck and lifts his shoulders, they feel lighter than before the session; there are no bruises; and your thumbs are not tired afterwards.
Common beginner mistakes
- Using too much wrist and thumb strength — you tire quickly, and over time it causes joint pain.
- Uneven pressure, sometimes firm and sometimes light depending on how tired you are.
- Too much oil makes your hands slip and pressure hard to build; too little oil drags the skin.
- Talking a lot when the client wants to rest.
- Not covering areas you have not worked on yet, which makes the client cold and self-conscious.
Specific fixes: uneven pressure usually comes from poor posture that tires you quickly — go back to the lunge and use your body weight. Oil: start with a small amount for each area and add more when your hands start to drag the skin; put the oil on your own hands first, then on the client, and never drip oil directly onto the client. Conversation: ask short questions at the start, then let the client lead; if the client closes their eyes, silence is a sign you should keep the room quiet.
Frequently asked questions
Should I use oil or massage cream?
Oil is more slippery and suits long gliding strokes; cream grips more, makes stripping pressure easier and runs less. Many spas use oil for relaxing sessions. Whichever you use, ask the client about allergies and use the products your spa provides.
If the client falls asleep, should I wake them to ask about pressure?
No. A sleeping client is relaxing well. Keep the same pressure and rhythm, and only wake them gently when it is time to turn over.
How long does it take to master a 60-minute session?
It varies, but following the practice schedule below you can usually complete the full sequence on time after about a month. Even pressure and reading clients well take many more real sessions under supervision.
Can a client with back pain from a herniated disc be massaged?
This is a medical condition that needs a doctor's opinion. A relaxing-massage therapist does not treat spinal conditions. Advise the client to ask their doctor first; if they have been cleared, use only light pressure, avoid the painful area and inform your manager.
What should I do if the client bruises after the massage?
Apologize, note the bruised area and tell your manager. Next time, reduce pressure on that area. If the bruise spreads, is very swollen and painful, or the client takes blood thinners, advise them to see a doctor.
Practice schedule and self-assessment
- Week 1: practise the 5 strokes on the upper arms and calves of a family member, 20 minutes a day.
- Week 2: do the full 20-minute back – shoulders section and ask someone to comment on your pressure and rhythm.
- Weeks 3–4: do the full 60 minutes, timing each stage and recording feedback.
Self-assessment criteria after each practice session:
- Each stage is within a few minutes of the framework; the whole session is exactly 60 minutes.
- Your practice partner rates your pressure as good and even on all three areas: back, legs and neck.
- You have no wrist, thumb or lower-back pain after the session.
- Contact was never broken suddenly; towels always covered the areas not being worked on.
- The client card is complete: tight areas, pressure used, feedback and adjustments for next time.
Alongside body massage, the roadmap has the skill step Basic facial care. Once you are confident in both, move on to Client consultation & health information form to learn how to ask the right questions from the start of a session, then combine everything into a complete treatment. The 15-minute demonstration in the safety assessment at the end of the roadmap usually uses this very back – shoulders section, so practise until your posture and pressure are even without having to think about them.