A client buys a dimmer and asks you to swap it for the living-room switch. With incandescent bulbs almost any dimmer worked. With LED lighting, the dimmer, the lamps or drivers and the size of the load must all suit each other. If they don't, the lights flicker, buzz, glow when off or refuse to dim, and in the worst case the dimmer or drivers overheat and fail.
This guide shows trainee electricians how to choose a compatible dimmer, wire it in place of an ordinary one-way switch and fix the common problems afterwards. It is written for Vietnamese homes on a single-phase supply of nominally 220–230 V, 50 Hz.
Scope and safety. This article covers replacing a one-way wall switch with a mains wall dimmer on a lighting circuit. It does not cover new circuits, work inside the distribution board or professional lighting control systems. Mains voltage can kill. Learners should do this work only under the supervision of a qualified electrician. If you find burnt, damaged or confusing wiring, stop and have a qualified electrician inspect the circuit. Numbers here are for reference only; the dimmer and lamp manufacturers' instructions always come first, together with the rules that apply where you work.
How a wall dimmer works (the short version)
Most household wall dimmers are phase-cut dimmers. Instead of simply lowering the voltage, they let through only part of each half-cycle of the AC waveform (100 half-cycles a second on a 50 Hz supply). The less of the waveform that gets through, the less power the lamp receives.
There are two ways to cut the waveform:
Leading-edge dimmers cut the start of each half-cycle. They are usually built around a TRIAC and often include a choke (a coil) to reduce interference. They were designed for incandescent lamps, mains halogen lamps and low-voltage halogen lamps with wire-wound (iron-core) transformers.
Trailing-edge dimmers cut the end of each half-cycle, usually with MOSFET or IGBT transistors. They switch more gently, tend to run quieter and are generally the better match for electronic loads such as LED drivers and electronic transformers.
An incandescent bulb is a simple resistance and accepts either waveform. An LED lamp contains an electronic driver that turns the AC into a controlled DC current for the LEDs. Whether it can follow a chopped waveform and dim smoothly depends on its design, which is why "dimmable" on the box matters.
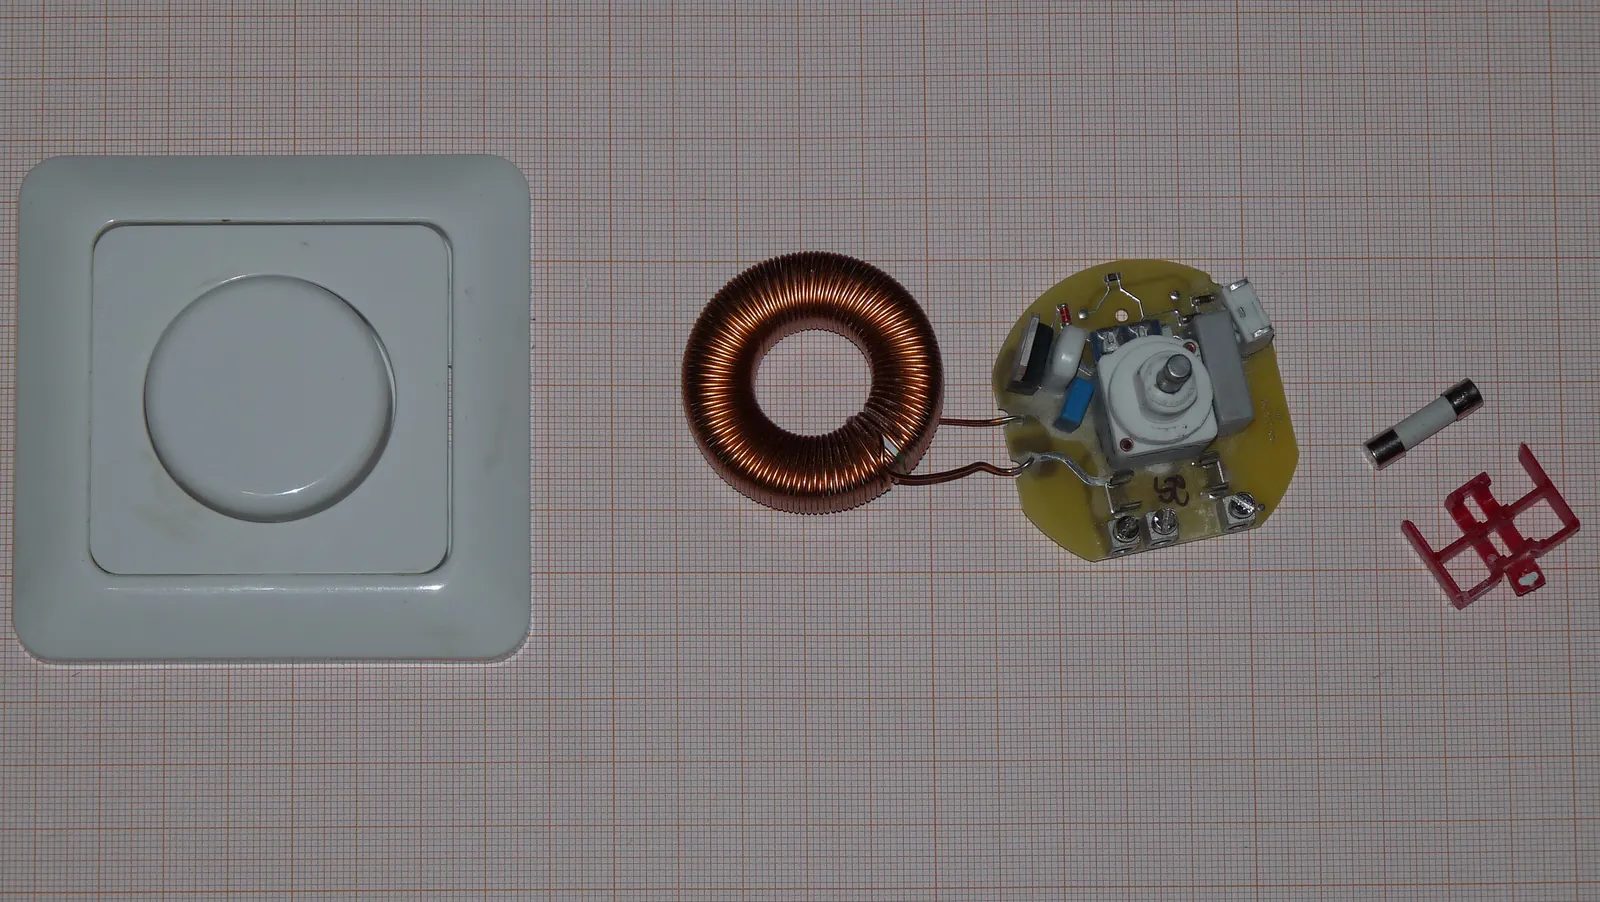
Figure 1. A rotary wall dimmer taken apart: cover plate and knob, a copper toroidal choke coil, the round circuit board with rotary control and screw terminals, and a glass cartridge fuse. A choke like this is typical of TRIAC (leading-edge) dimmers and can hum under load. (Photo: Dmitry G, Wikimedia Commons, CC BY-SA 3.0)
Step 1: Survey the job before you buy anything
Many dimmer problems start at the shop. Before buying, check:
What the switch feeds. Lights only: no socket, ceiling fan, exhaust fan or appliance on the switched side.
The lamps. Every lamp or LED fitting must be marked dimmable. A separate driver should state its dimming method, such as "TRIAC dimmable", "phase-cut dimmable" or "1–10 V". A 1–10 V, 0–10 V or DALI driver cannot be dimmed by an ordinary wall dimmer; it needs a separate control circuit.
The total load. Add up the rated wattage of all lamps on the switch.
The switch box. In many Vietnamese homes it holds only the permanent live and the switched live, with no neutral. Check the depth too: dimmers are often deeper than switches and need space to lose heat.
One-way or two-way? This article covers one-way switching; two-way dimming needs a dimmer designed for it (see the FAQ).
The plate system. With modular plates, check that a dimmer module fits the same frame.
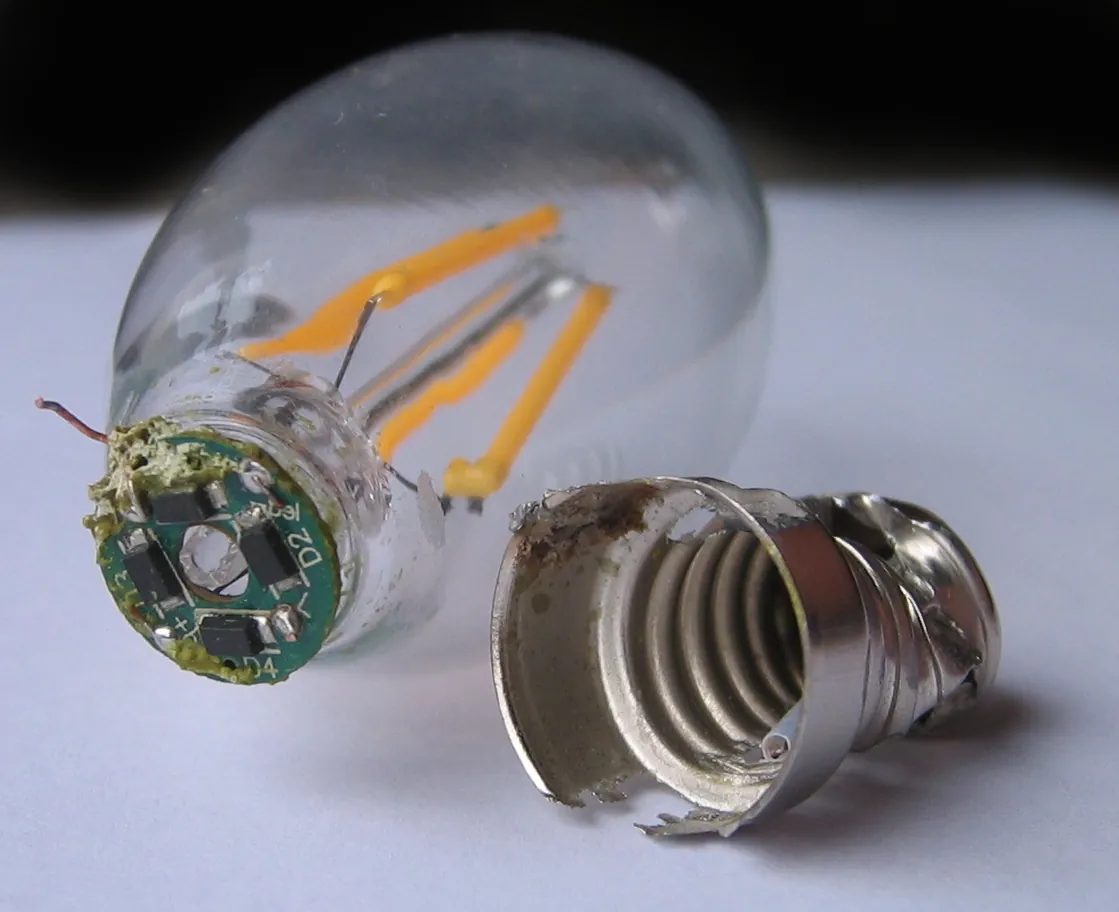
Figure 2. A dimmable filament LED lamp broken open for study: LED filaments, a tiny rectifier board at the neck and the detached screw cap. The electronics are this small, so only lamps designed and marked as dimmable belong on a dimmer. Never open lamps on the job. (Photo: Hans Haase, Wikimedia Commons, CC BY-SA 4.0)
Step 2: Choose a compatible dimmer
Match the dimmer type to the load
The dimmer's markings and leaflet tell you which loads it accepts. You will often see letters: R (resistive: incandescent, mains halogen), L (inductive: wire-wound transformers) and C (capacitive: electronic transformers and many LED drivers). A leading-edge dimmer is typically marked R, L; a trailing-edge dimmer R, C; a universal dimmer R, L, C. Many dimmers made for LED loads also show "LED" with a separate LED rating.
Dimmer type | How it cuts the waveform | Normally suitable for | Avoid or check carefully |
|---|---|---|---|
Leading-edge (TRIAC, often marked R, L) | Cuts the start of each half-cycle | Incandescent, mains halogen, low-voltage halogen with wire-wound transformers; some LED lamps that the lamp maker lists as compatible | Most LED loads unless listed; capacitive electronic transformers and drivers unless the maker allows them |
Trailing-edge (MOSFET/IGBT, often marked R, C) | Cuts the end of each half-cycle | Dimmable LED lamps and drivers, electronic transformers, incandescent | Wire-wound (iron-core) transformers and other inductive loads |
Universal / "LED dimmer" (often marked R, L, C or LED) | Detects the load or has a leading/trailing mode switch | Mixed situations, LED retrofits; usually has a low-end trim adjustment | Still check its LED rating and minimum load; do not mix very different load types on one dimmer |
1–10 V, 0–10 V or DALI controller | Sends a control signal on extra wires; mains is switched separately | Fittings with drivers made for that control type | Not a replacement for an ordinary wall dimmer; needs extra control conductors |
DC (PWM) LED strip dimmer | Dims the 12 V or 24 V DC output side of an LED power supply | Low-voltage LED strips | Never on 230 V AC; not a wall-switch replacement |
For reference only. Always follow the markings and leaflet of the specific dimmer and lamps.
Check compatibility lists
Many LED lamp and dimmer makers publish lists of tested combinations, which give the best chance of smooth, silent dimming. If no list exists, choose a trailing-edge or universal LED dimmer and treat the first switch-on as a test.
Minimum load: the most common trap with LED
Most dimmers that replace a switch are two-wire dimmers: like the switch, they connect only to the permanent live and the switched live, with no neutral. They power their own electronics by passing a small current through the lamps, which only works properly above the dimmer's stated minimum load.
Three 60 W incandescent bulbs were far above any minimum. Three 7 W LED lamps total only 21 W, which may be below the minimum of a dimmer designed for incandescent loads, causing flicker, glowing when off or lamps that never start properly. The dimmer in Figure 3 is marked "Load: 60–600W"; a small LED load is very unlikely to work well on it.
Ways to solve a minimum-load problem:
Choose a dimmer with a low stated minimum load for LED.
Use a three-wire dimmer (with a neutral connection) if the box has a neutral from the same circuit. It powers its electronics from the neutral, not through the lamps.
Add lamps to the circuit, if that suits the client.
Fit a load-correction device (often sold as a "bypass" or "load compensator") at the light fitting, but only one that the dimmer or lamp manufacturer recommends, installed exactly as instructed.
Maximum load and derating
A dimmer's headline rating (for example 400 W) usually applies to incandescent lamps. The LED rating is usually much lower, because LED drivers draw short current peaks that stress the dimmer. Use the LED wattage or maximum number of LED lamps given by the maker, and leave a margin.
Also derate (reduce the allowed load) when the leaflet says so, for example for dimmers side by side in a multi-gang plate, in metal or shallow boxes, or in hot rooms. A warm plate is normal; a plate too hot to touch is not.
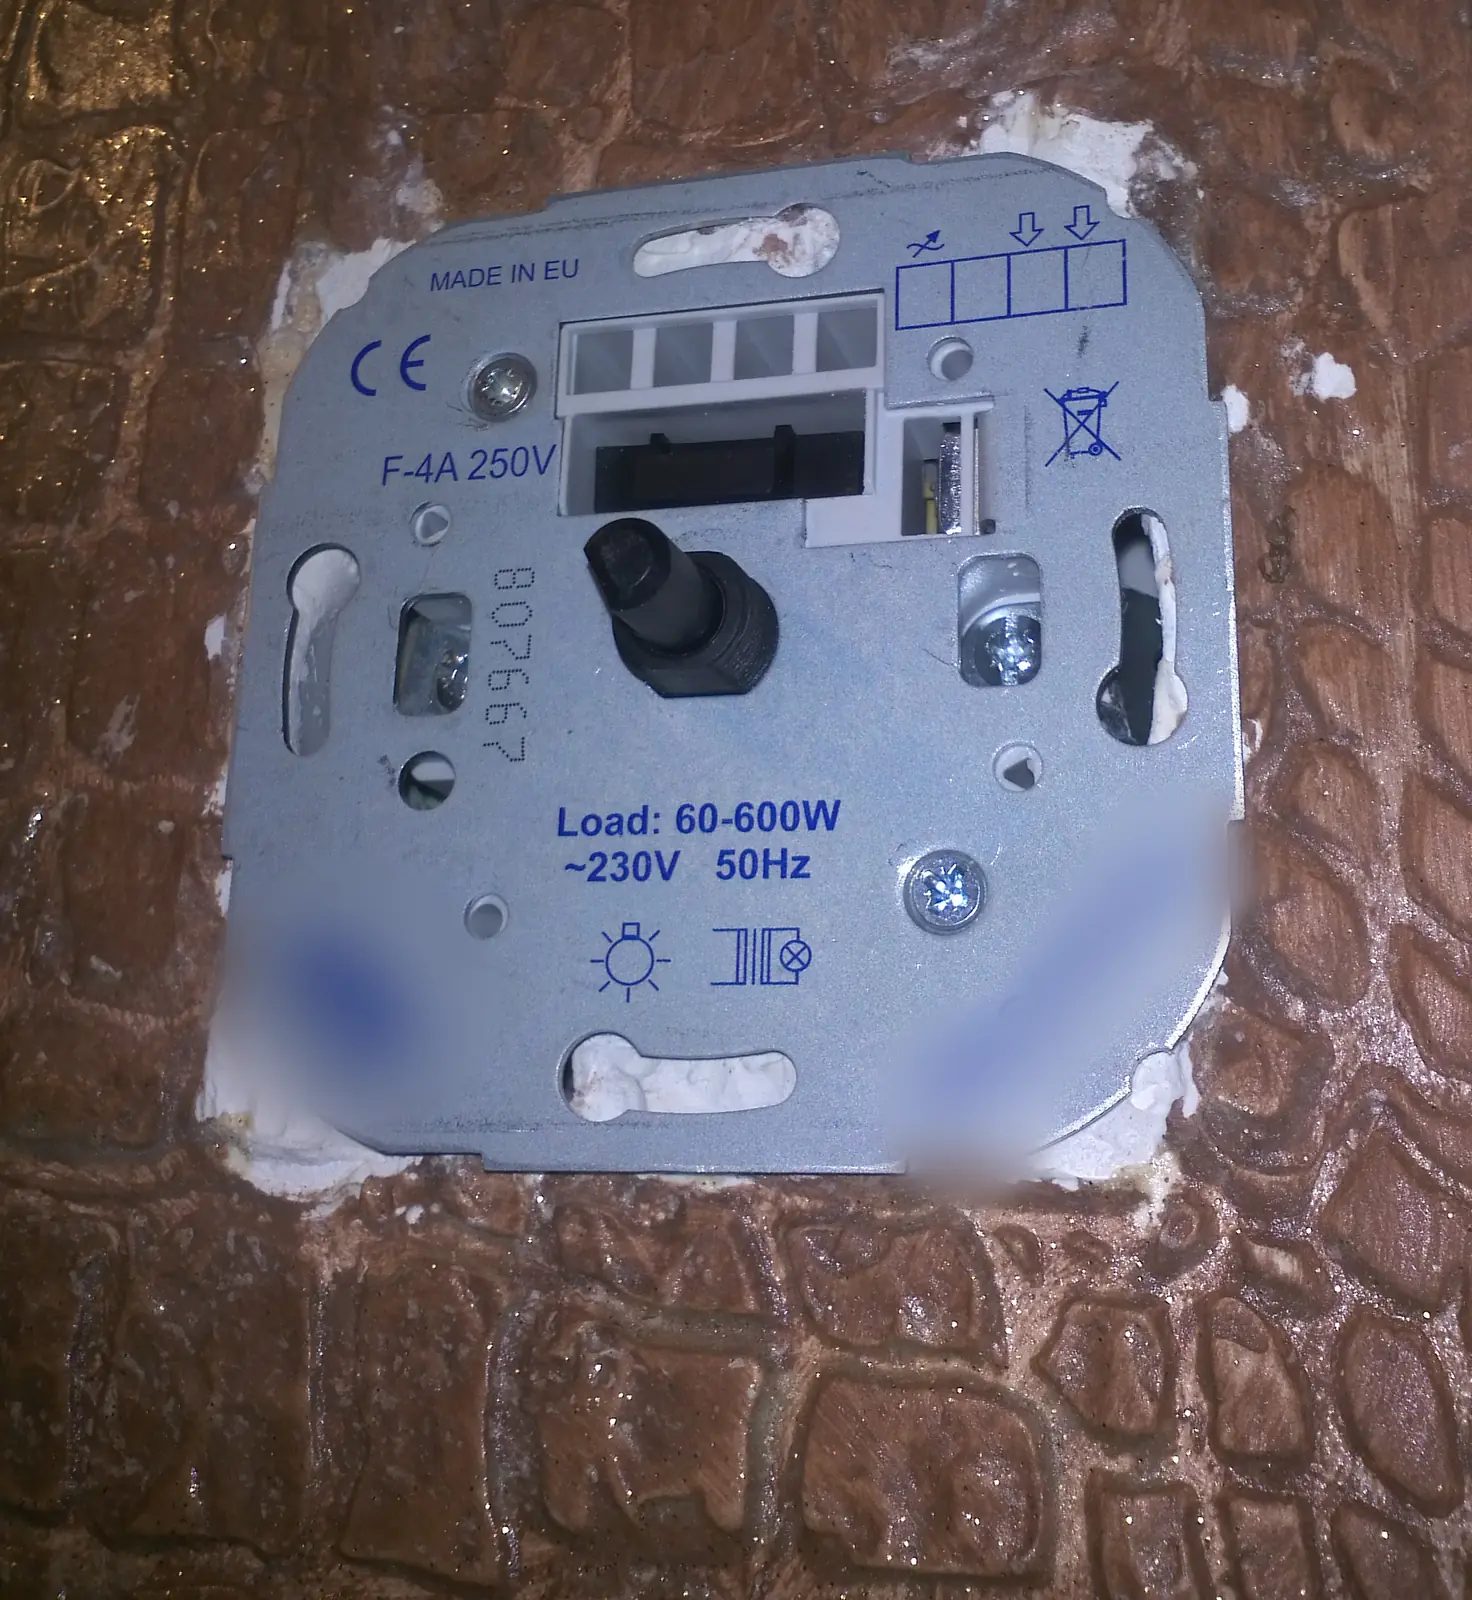
Figure 3. A dimmer mechanism in its wall box, knob removed, marked "Load: 60-600W", "~230V 50Hz" and "F-4A 250V" (its fuse), with incandescent-lamp and wire-wound-transformer symbols. There is no LED rating, and a small LED load would be below its 60 W minimum. Brand and model blurred. (Photo: Dmitry G, Wikimedia Commons, CC BY-SA 3.0; cropped from a four-panel image, markings blurred)
Things a dimmer must never control
Socket outlets. An appliance plugged into a dimmed socket can be damaged or overheat, and so can the dimmer.
Ceiling and exhaust fans. Motors need the speed controller made for that fan; a light dimmer can make them hum, overheat or fail.
Non-dimmable LED lamps and CFLs (compact fluorescent lamps). They may flicker, buzz, fail early or overheat, even with the dimmer at full.
Smart bulbs, sensor lamps and emergency fittings, unless their maker allows it, and mixed loads such as LED lamps plus a wire-wound transformer.
Step 3: Isolate and prove dead
The wall switch is not isolation: the permanent live in the box stays live.
Switch off the lighting breaker at the board (the main breaker if unsure), lock or tape it off, tag it and tell the household.
Prove your two-pole tester or multimeter on a known live source.
Remove the switch plate and test between every pair of conductors, and each conductor to earth. Boxes may hold more than one circuit.
Prove the tester again.
A non-contact voltage detector is a useful warning tool, but it is not proof that a conductor is dead.
Step 4: Remove the old switch and identify the conductors
Take a clear photo of the old switch wiring before disconnecting anything.
Unscrew the mechanism and pull it out gently.
Identify the permanent live (from the supply, often brown or red) and the switched live (to the lamps). Many installations use the same colour for both, or a blue core re-used as a switched live. Label them while you work.
If the old switch broke the neutral instead of the live, the circuit is wired incorrectly. Correct it so the dimmer breaks the line conductor; a dimmer in the neutral leaves the lamps live when "off" and may not work properly.
For a three-wire dimmer, confirm any neutral in the box belongs to the same circuit. A neutral borrowed from another circuit can cause RCD tripping and leave conductors live after you isolate what you think is the right breaker.
Step 5: Wire the dimmer
Read the dimmer's wiring diagram first. Markings vary: L or an arrow for the incoming live, and a lamp symbol, arrow or "Load" for the switched live. In a one-way circuit, use only the terminals the diagram shows.
Cut back any damaged or blackened copper and strip to the length shown on the dimmer.
Connect the permanent live to the L (input) terminal.
Connect the switched live to the load terminal.
For a three-wire dimmer, connect the neutral of the same circuit to the N terminal.
If the conductor colours do not show their function (for example a blue core used as a line conductor), mark them with brown sleeving or tape, or whatever line-conductor marking your local practice uses, at both ends (compare Figure 4).
Connect the earth to the earth terminal if the dimmer or a metal plate has one. If not, terminate the earth conductor safely in the box, ideally in a connector, so it is not loose.
Tighten every screw firmly and pull-test each conductor. Loose terminals at a dimmer cause heat and flicker.
Fold the conductors neatly into the box and fix the mechanism level. Never force a dimmer into a box that is too shallow.
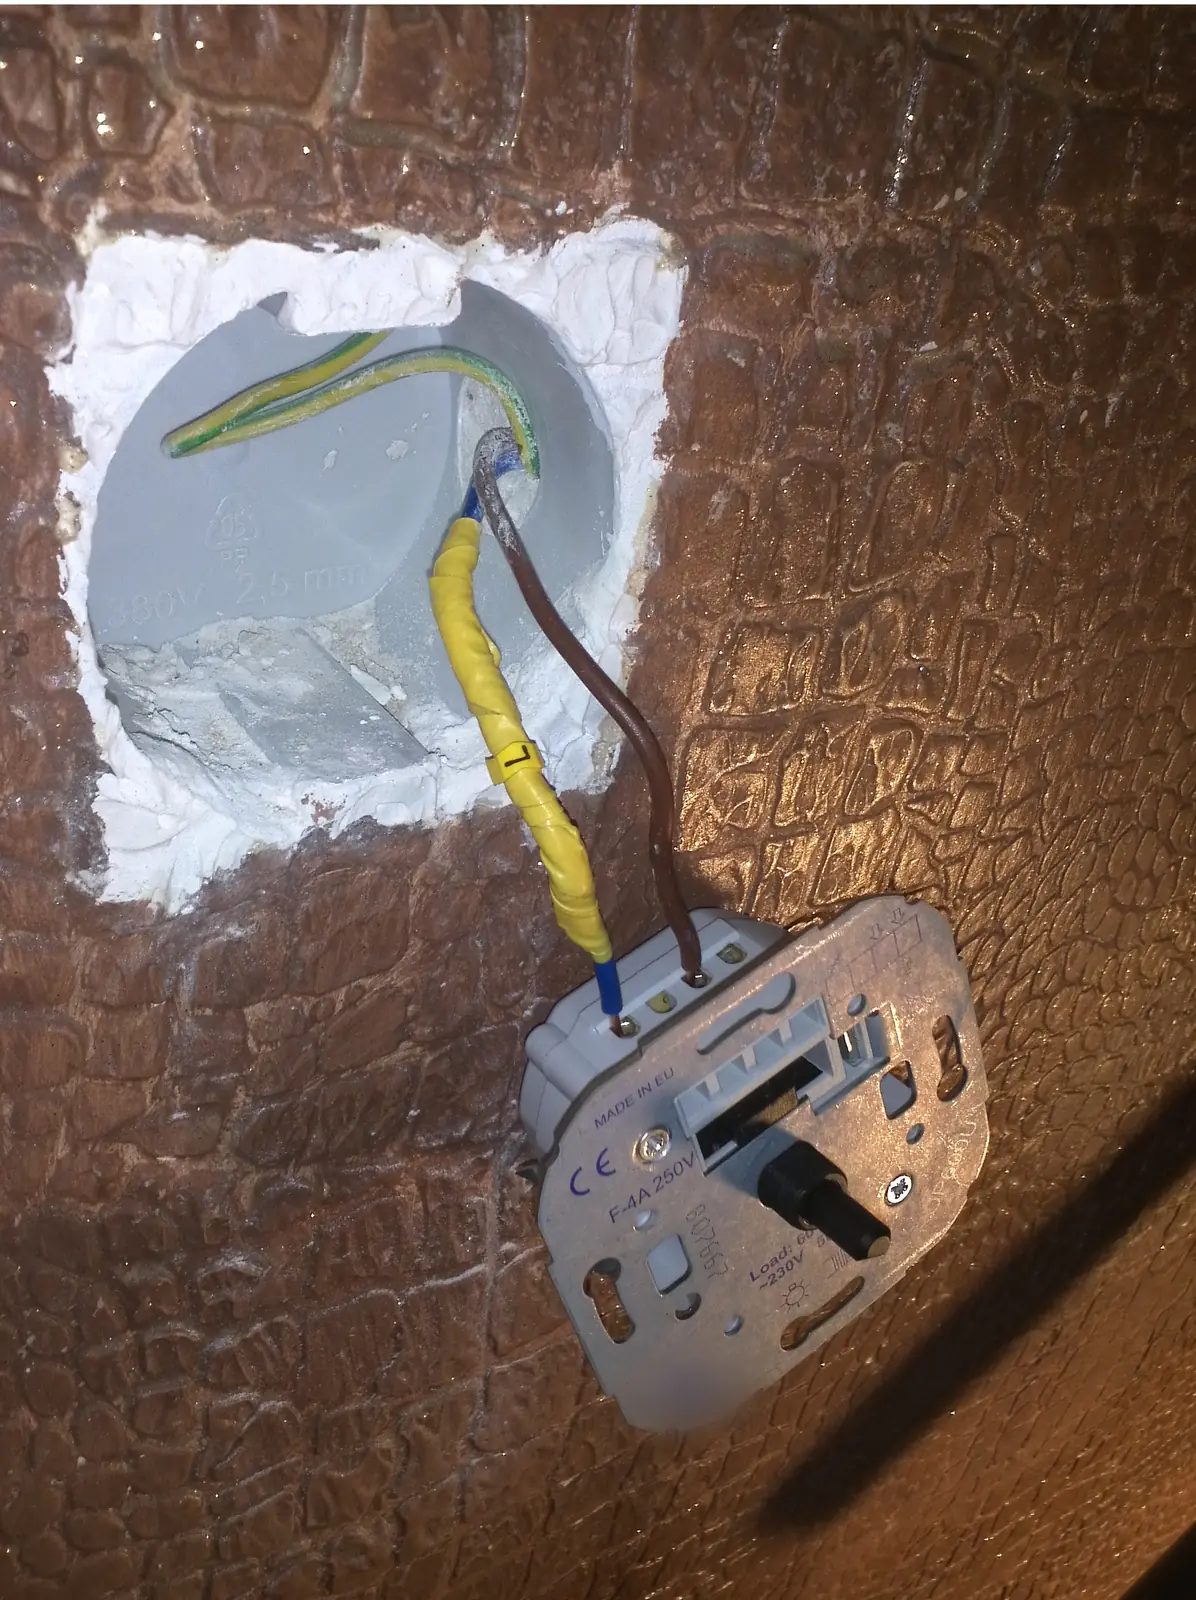
Figure 4. A dimmer wired but not yet fixed in its box (the photographer's notes stress working only with the power off): a brown conductor and a blue conductor taped yellow and tagged "L" go into the terminals; the earth sits at the back. Brown sleeving would be clearer, because yellow can be confused with earth. Logo blurred. (Photo: Dmitry G, Wikimedia Commons, CC BY-SA 3.0; cropped, logo blurred)
Step 6: Power up, test and set the dimmer
Fit the lamps you plan to use permanently. Remove the lock and tag, restore power and stay at the switch.
Turn the dimmer to full, then switch off and on several times. The lamps should start every time with no delay.
Turn slowly from full to minimum and back. Watch for flicker, steps, buzzing and lamps that switch off before the end of the range.
If the dimmer has a low-end trim or minimum level setting, adjust it now following the leaflet. Set it so the lamps stay stable and still start reliably at the lowest setting.
If the dimmer has a mode selector (leading/trailing edge), use the setting recommended by the lamp or driver maker.
After a while at a medium setting, feel the plate. Warm is normal; hot means overloaded, unsuitable or poorly ventilated.
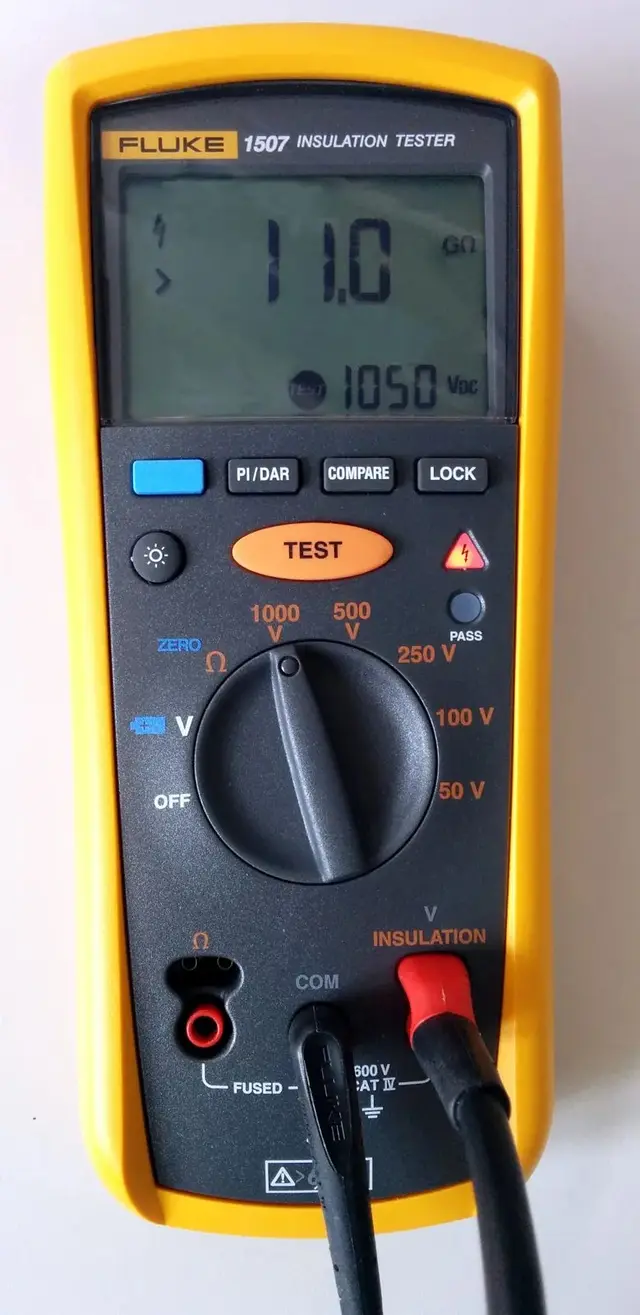
Note on insulation testing: the electronics in dimmers can be damaged by insulation resistance testers. Before an insulation resistance test on the circuit, disconnect or bypass the dimmer as its manufacturer instructs.
Troubleshooting: flicker, buzzing, ghosting and limited dimming
Most problems come from an incompatible combination, a load outside the dimmer's limits, or a poor connection. Isolate again before any check inside the box.
Symptom | Likely causes | What to do |
|---|---|---|
Flicker at all settings | Non-dimmable lamp; wrong dimmer type; loose terminal; mixed lamp models | Confirm every lamp is dimmable; try a trailing-edge or listed dimmer; isolate and re-tighten terminals; use one lamp model throughout |
Flicker or pulsing only at low settings | Load below minimum; low-end trim set too low | Raise the trim setting; add load; use a dimmer with a lower minimum or a three-wire dimmer |
Lamps glow faintly when off ("ghosting") | Two-wire dimmer passing its standby current through the lamps; load below minimum | Three-wire dimmer with neutral; approved load-correction device; dimmer with lower minimum |
Lamps won't start at a low setting ("pop-on") or go out before minimum ("drop-out") | Low-end trim too low; driver needs more power to start or cannot follow a very short waveform | Raise the low-end trim until the lowest position starts and stays lit |
Lamps dim very little | Lamp's dimming range limited; wrong mode | Check the lamp specification; try the other mode; use listed lamps |
Buzzing from the dimmer | Leading-edge dimmer with an LED load; overload; dimmer choke humming | Use a trailing-edge or LED-rated dimmer; reduce the load; some faint noise at certain settings can be normal, loud buzzing is not |
Buzzing from the lamps | Driver reacting to the steep switching edge of a leading-edge dimmer | Switch to trailing-edge mode or dimmer; use lamps listed as compatible |
Dimmer or plate hot; dimmer fails early | Over the LED rating; no derating in a multi-gang plate; shallow or metal box | Reduce the load or split it over two dimmers; follow derating rules; fit a deeper box |
For reference only. If any symptom comes with a burning smell, discoloured plastic or tripping breakers, isolate the circuit and investigate before using it again.
A phone camera can help when you suspect flicker: look for dark bands on the screen (Figure 5). It is only a comparison tool; some banding can appear even with lamps that look steady, so compare settings rather than treating any banding as a fault.
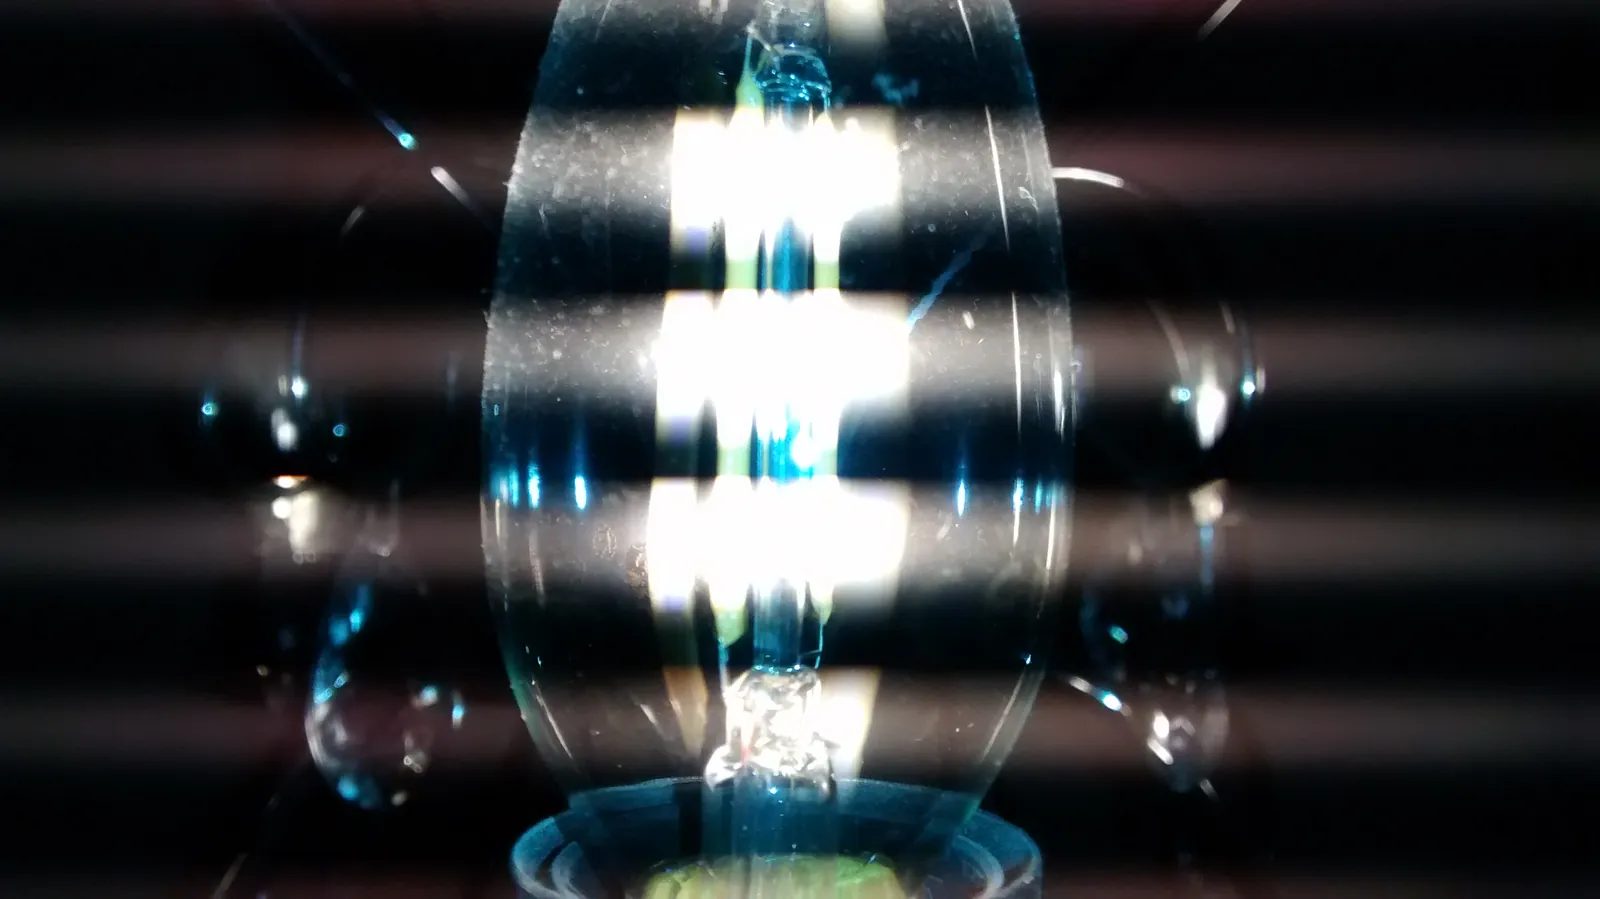
Figure 5. A lit dimmable filament LED lamp seen through a digital camera: the dark bands, invisible to the eye, come from rapid variation in light output. A camera can reveal flicker this way, but only as a rough comparison. (Photo: Hans Haase, Wikimedia Commons, CC BY-SA 4.0)
On ghosting: in a dimmer circuit the usual cause is the dimmer itself, because a two-wire dimmer keeps a tiny current flowing through the lamps to power its electronics when "off". Ghosting with ordinary switches (neutral switching, induced voltage on long cables) is covered in our separate article on LED lights glowing when switched off.
Worked example: dimming a living-room chandelier
Situation. A client has a chandelier with four E27 LED lamps of 9 W each, marked "dimmable". It is controlled by a one-way switch in a two-gang modular plate; the other gang controls a ceiling fan. The switch box contains a brown permanent live, a brown switched live to the chandelier, the fan's switched live and an earth. There is no neutral. The client has bought a rotary dimmer marked "Load: 60–600W", R, L.
Analysis.
Load: 4 × 9 W = 36 W.
36 W is below the 60 W minimum, and the dimmer is R, L (leading-edge) with no LED rating: expect flicker and ghosting. Do not install it.
The fan gang stays an ordinary switch.
No neutral, so a two-wire dimmer is needed.
Selection. Choose a trailing-edge or universal LED dimmer module that fits the same plate system. For this exercise, imagine its datasheet says it accepts LED loads from a stated low minimum up to an LED maximum well above 36 W, with derating when fitted next to another device in the same plate. Check the 36 W load against both limits after derating. If the lamps' maker publishes a compatibility list, confirm the dimmer is on it.
Installation. Isolate every circuit in the box, prove dead, photograph, and replace only the chandelier gang: permanent live to L, switched live to the load terminal. Leave the fan switch as it is.
Testing. Check starting at full and minimum, set the low-end trim, check the plate temperature and tell the client that replacement lamps must be dimmable, ideally the same model.
Safety checklist
Dimmer controls lighting only: no sockets, no fans, no appliances.
Every lamp or driver marked dimmable with a compatible method; no CFLs or non-dimmable LEDs.
Dimmer type (leading, trailing, universal) matches the load; compatibility lists checked where available.
Total load between the dimmer's minimum and its LED maximum, after derating.
Isolated at the board, locked or taped off and tagged; tester proved before and after; every conductor tested.
Switch and dimmer break the line conductor, never the neutral.
No neutral borrowed from another circuit for a three-wire dimmer.
Re-identified conductors marked at both ends; earth terminated safely.
Terminals tight and pull-tested; dimmer not forced into a shallow box.
Dimmer disconnected or bypassed before insulation resistance testing.
Tested over the full range; plate warm at most, never hot.
Frequently Asked Questions
Can I use the old incandescent dimmer with new LED bulbs?
Usually not reliably. Older dimmers are often leading-edge types with a high minimum load, so small LED loads tend to flicker, buzz or glow when off. If it has no LED rating, replace it.
Why does my dimmer say 400 W, but the leaflet says only a much smaller LED load?
LED drivers draw short peaks of current that stress the dimmer far more than a resistive bulb of the same wattage. The headline figure is for incandescent loads; for LED, always use the LED rating or the stated maximum number of LED lamps, and derate when the leaflet requires it.
Is it safe to put a dimmer on a socket so a lamp can be dimmed?
No. Anything could be plugged into that socket, including appliances that can be damaged or overheat on a dimmed supply. For a dimmable plug-in lamp, choose a lamp with its own built-in or in-cord dimmer.
Can I dim lights that are controlled from two places?
Yes, but never with two ordinary dimmers. Use a two-way dimmer at one position and a two-way switch at the other, or a multi-location system with the maker's matching units.
Do I need a neutral for an LED dimmer?
Not always. Two-wire dimmers work without a neutral, but they depend on meeting the minimum load. Three-wire dimmers need a neutral from the same circuit and usually handle very small LED loads better.
Practice Exercises
Exercise 1: Read the markings. For five dimmers or leaflets, write the type, R/L/C markings, minimum load, LED maximum and any derating rule.
Exercise 2: Load calculation. A bedroom has six 5 W dimmable LED lamps. A dimmer leaflet gives a minimum load of 10 W and an LED maximum of 100 W with 20% derating when installed in a two-gang plate (these are example figures for practice). Is the load within limits? Show your working.
Exercise 3: Wiring on a rig. On a training rig under supervision, isolate and prove dead, replace a one-way switch with a two-wire dimmer, have your trainer check it, then test the full dimming range and set the low-end trim.
Exercise 4: Fault diagnosis. Your trainer sets up a non-dimmable lamp, a load below the minimum and a loose terminal. Describe each symptom and find the cause, isolating before any hands-on check.
Exercise 5: Client conversation. A client wants dimmers on the bedroom ceiling fan and the bedside-lamp socket. Write how you would explain why not, and what you would offer instead.