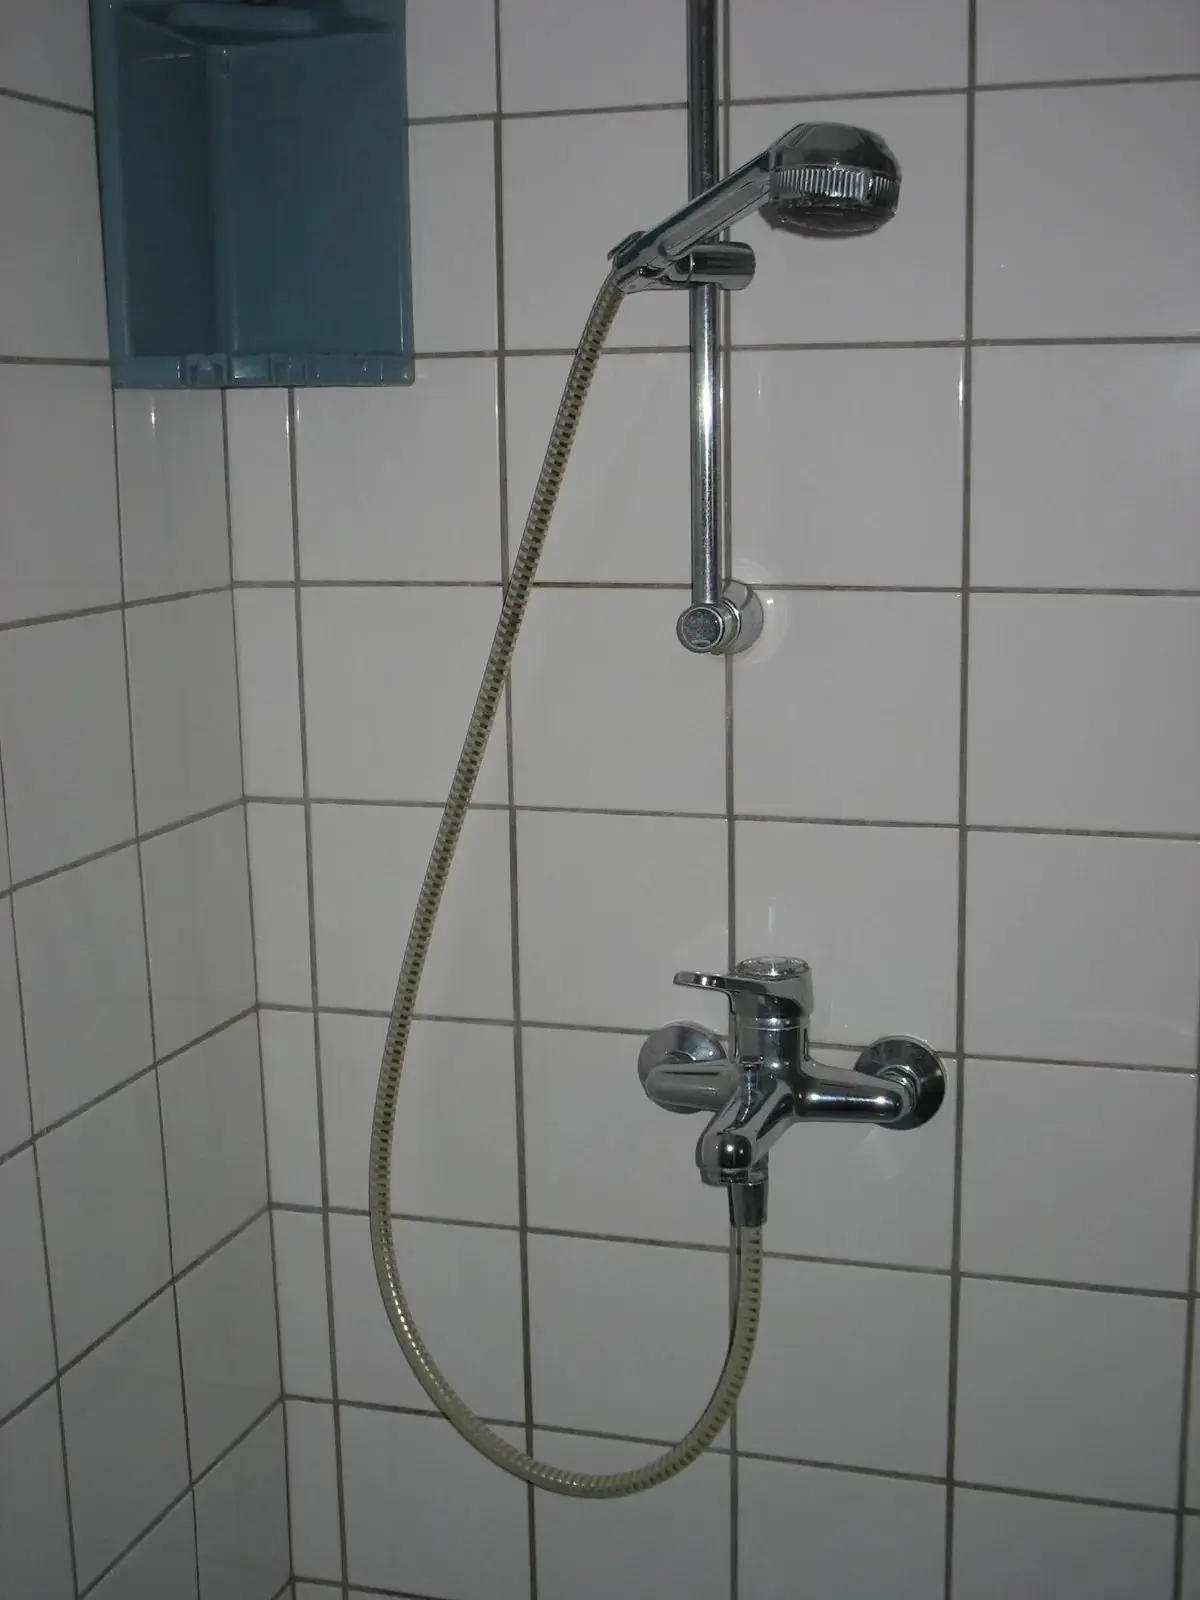
A client has bought a new chrome shower set and wants it fitted this afternoon. Another is renovating a bathroom and asks you to "leave the pipes ready for the shower" before the tiler arrives. A third has an old two-handle mixer that leaks from every joint and wants a modern single-lever one in its place. All three jobs come down to the same skill: getting two wall outlets in the right place, then mounting an exposed shower mixer on its eccentric unions so that it sits level, does not leak, and delivers hot water on the correct side.
This guide covers checking and setting the wall outlets, fitting the unions and mixer, the rail or shower column, and testing.
Scope of this guide. For trainee and working residential plumbers, and homeowners who want to understand the job before hiring someone. It covers exposed wall-mounted mixers ("củ sen" with "chân sen lệch tâm") fed by two pipes in the wall, as found in most Vietnamese homes. Concealed (in-wall) valves are a different job and are only mentioned briefly. Distances, heights and adjustment ranges below are for reference only: the installation sheet of the mixer you are fitting always takes priority. If you are learning, work under the supervision of an experienced plumber.
How an exposed shower mixer is put together
From the wall outwards:
Two wall outlets. The hot and cold pipes (usually PPR in Vietnam) end in female threaded fittings, typically PPR elbows with a brass insert ("cút ren trong"), set at the finished wall surface. They belong to the pipework, not to the mixer.
Two eccentric S-unions. One end screws into the outlet; the offset other end carries the mixer nut. Turning a union moves the mixer inlet sideways and up or down, so the mixer can match outlets that are not perfectly spaced or level.
Two cover plates that slide over the unions and hide the wall thread and tile cut.
The mixer body, held on the unions by two nuts sealed with flat washers, with a ceramic-disc cartridge (single-lever), two headworks (two-handle) or a thermostatic cartridge inside.
Outlets and accessories: a bottom outlet for the hose, sometimes a bath spout and diverter, a top outlet on shower columns, and the hose, hand shower and holder or slide rail.
On most sets sold in Vietnam the outlets, unions and hose connections are 1/2-inch British pipe size (G1/2). That is the usual case, not a guarantee; compare the new unions with the wall outlets before you start.
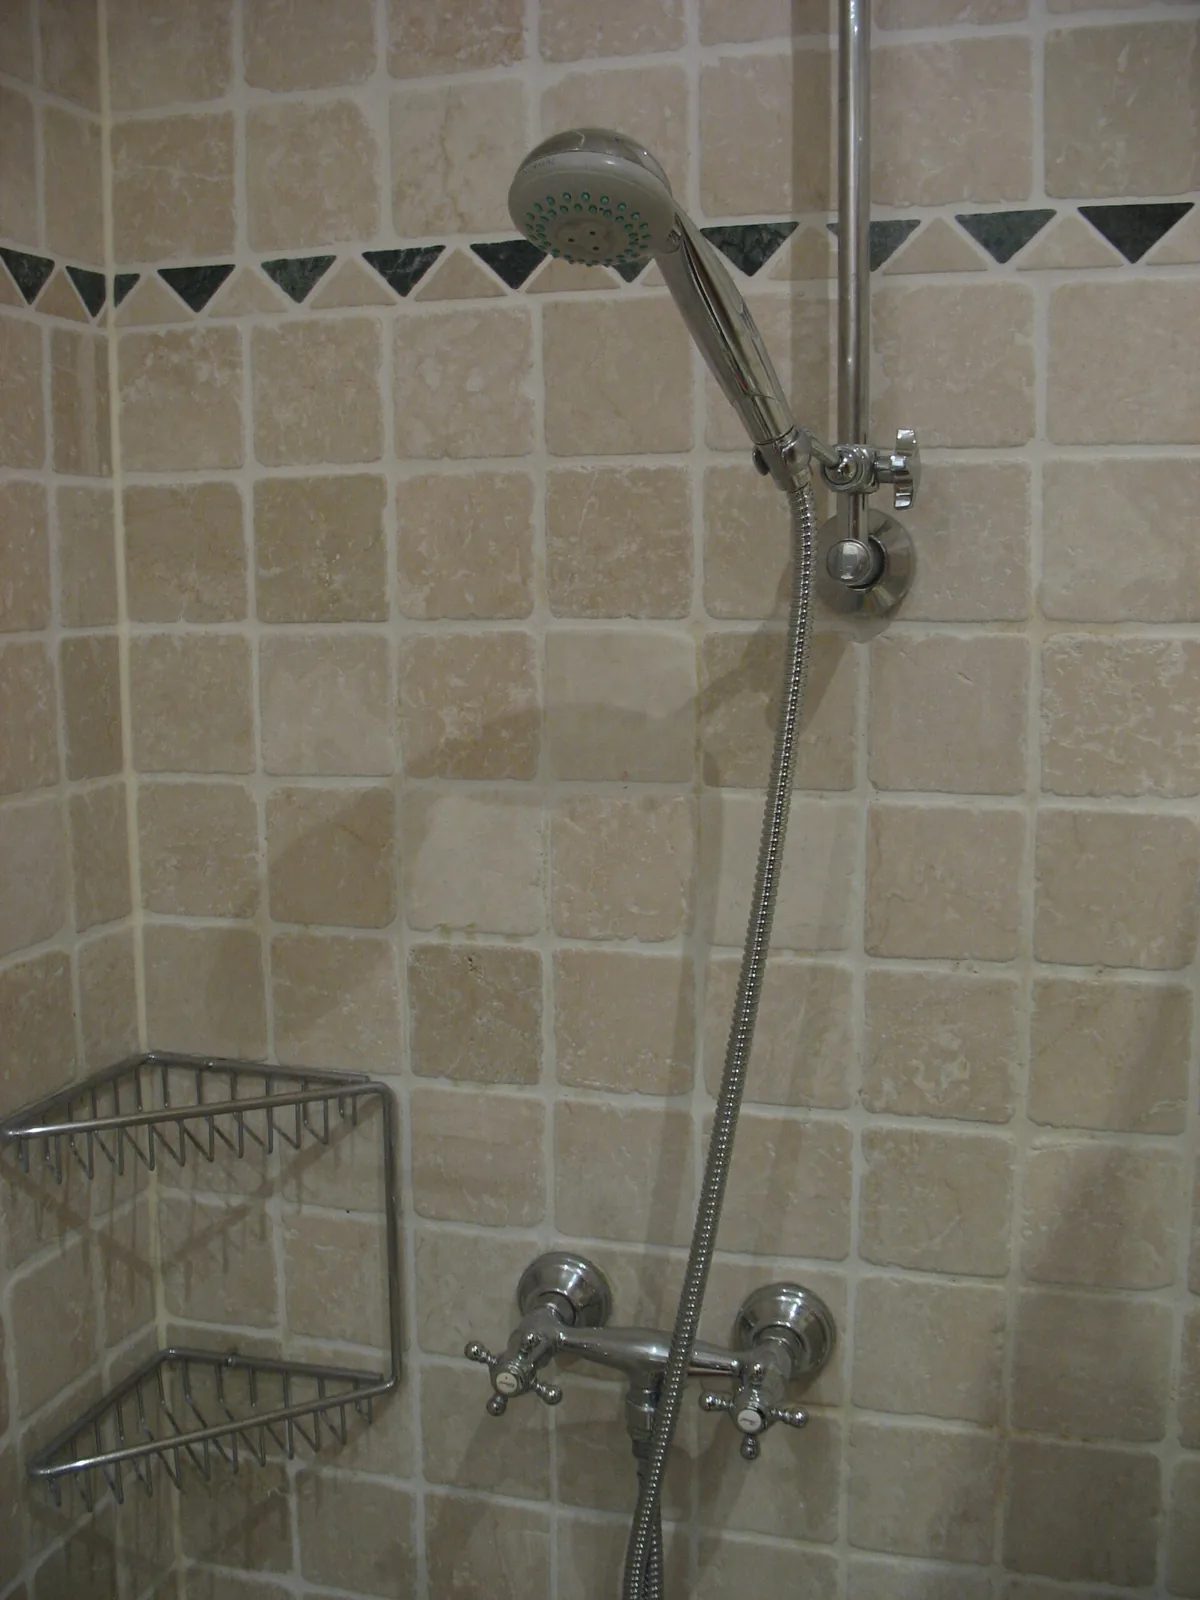
Figure 1. An exposed two-handle shower mixer on a stone-tiled wall. The round chrome cover plates at each end hide the eccentric unions and the wall outlets; the hose runs from the bottom outlet to a hand shower on a slide rail with its own wall bracket. (Photo: Miguel Andrade, Wikimedia Commons, public domain)
Which mixer type?
Single-lever mixer: one lever for flow and temperature; the most common type in Vietnamese homes.
Two-handle mixer: separate hot and cold handles; simple and robust, but the user balances the temperature by hand.
Thermostatic bar mixer: a temperature dial and a flow control; the cartridge holds the set temperature when pressure changes. It is the most sensitive type to install.
Shower column ("sen cây"): an exposed mixer, usually thermostatic, with a riser pipe to an overhead shower plus a hand shower. It needs a mixer with a top outlet and a solid wall for the upper bracket.
If the shower is fed by an instantaneous electric water heater with its own controls, check both the heater and mixer manuals before adding a mixer.
Step 1: Check the wall before you buy or fit anything
1. Centre distance between the outlets
Many exposed mixers are designed for outlets about 150 mm apart, and the eccentric unions typically allow adjustment of roughly ±10–20 mm around that figure, depending on the product (for reference; check the installation sheet). Outside that range, the mixer will not fit without different unions or moving the outlets.
2. Height and level
Both outlets should be at the same height. A few millimetres can be taken up by the unions; a large difference leaves the mixer crooked or the unions at awkward angles.
As a reference only, many installers place a shower-only mixer roughly 1.0–1.2 m above the finished floor. On a shower column, the mixer height also fixes the overhead shower height.
3. Depth (projection) of the outlets
The face of each outlet should sit at, or very close to, the finished tile surface. If an outlet is buried deep behind the tile, the union cannot reach far enough into the thread or the cover plate will not cover the hole. If it sticks out well beyond the tile, the cover plate cannot sit flat against the wall. Some union sets include extensions or longer covers; check before you assume it will work.
4. Hot on the left
The usual convention is hot on the left, cold on the right as you face the mixer, and mixers are built for it. Confirm which outlet is hot before fitting anything. If the pipes are reversed, see the FAQ below.
Step 2: New bathrooms: set the outlets before tiling
On a new build or renovation, the best time to get the shower right is before the tiler arrives.
Confirm the mixer model with the client first, or at least the centre distance and whether it is a shower column. Ask for the installation sheet.
Fix the two outlets firmly to the wall structure or chase so they cannot move when someone screws a union in later. A loose outlet eventually cracks the pipe or the tile.
Set them square to the wall, level with each other, and at the agreed centres. Many plumbers screw a spare pair of unions or a plastic setting bar onto the outlets while the chase is filled, to hold the spacing.
Set the depth for the finished surface. Ask the tiler how thick the tile plus adhesive will be, and set the outlet face to that line, not to the bare wall.
Plug and pressure test both lines before the chase is filled and before tiling. The method and test pressure follow the pipe maker's guidance and the project specification; see our guide to installing hot and cold supply pipes and pressure testing before plastering.
Photograph the pipe routes with a tape measure in the shot, give the photos to the client, and leave the test plugs in during tiling so grout cannot get into the outlets.
Step 3: Tools and materials
The complete mixer set (check the box list: unions, cover plates, washers, fixings), an adjustable spanner with a cloth to protect the chrome, PTFE tape, a spirit level and tape measure, masking tape, a drill with tile and masonry bits, wall plugs and stainless screws, a pipe and cable detector, spare G1/2 flat washers, a bucket and towels, and a cover for the floor drain.
Step 4: Shut off, make safe and remove the old mixer
Close the supply at the bathroom branch valve, or the rooftop tank outlet valve or main valve after the meter. On the hot side, also close the water heater's cold inlet valve.
Switch off the electric storage water heater ("bình nóng lạnh") at its circuit breaker (230 V/50 Hz in Vietnam) before opening its water lines.
Let the hot water cool, then open the old mixer to release pressure and drain the lines.
Remove the old mixer by undoing the two nuts with a padded spanner while supporting the body, then slide off the cover plates and unscrew the old unions.
Inspect the outlets for cracks, stripped threads, brass inserts that turn in the plastic, and signs of a long-term leak such as stained grout, loose tiles or a damp wall below.
Clean the outlet threads, picking out old tape and hemp without damaging the thread. Fibres left behind are a common cause of slow leaks.
If an outlet is cracked or its insert spins, stop. That is a pipework repair behind the tile; a new mixer would only hide it for a while.
Step 5: Flush the pipes before fitting
Debris kills new mixers. Grit from the rooftop tank, plastic swarf from PPR work and flakes of old tape can lodge in a ceramic cartridge or a thermostatic cartridge's filters and cause dripping, weak flow or poor temperature control within days.
Hold a bucket against the wall, open the supply briefly to each outlet in turn until the water runs clean, then close it again. On new builds, run both lines well.
Step 6: Fit the eccentric unions
Sealing the union threads
The union's wall thread makes the seal, so it needs sealing. Wrap PTFE tape on the male thread of the union, clockwise when you look at the end of the thread, so screwing it in tightens the tape instead of unwinding it. Start one or two threads back from the end, lay the tape flat and stretched into the threads, and keep strands out of the bore. Our PTFE tape guide covers the method in detail. If the unions come with pre-applied sealant or an O-ring, follow the maker's instructions instead.
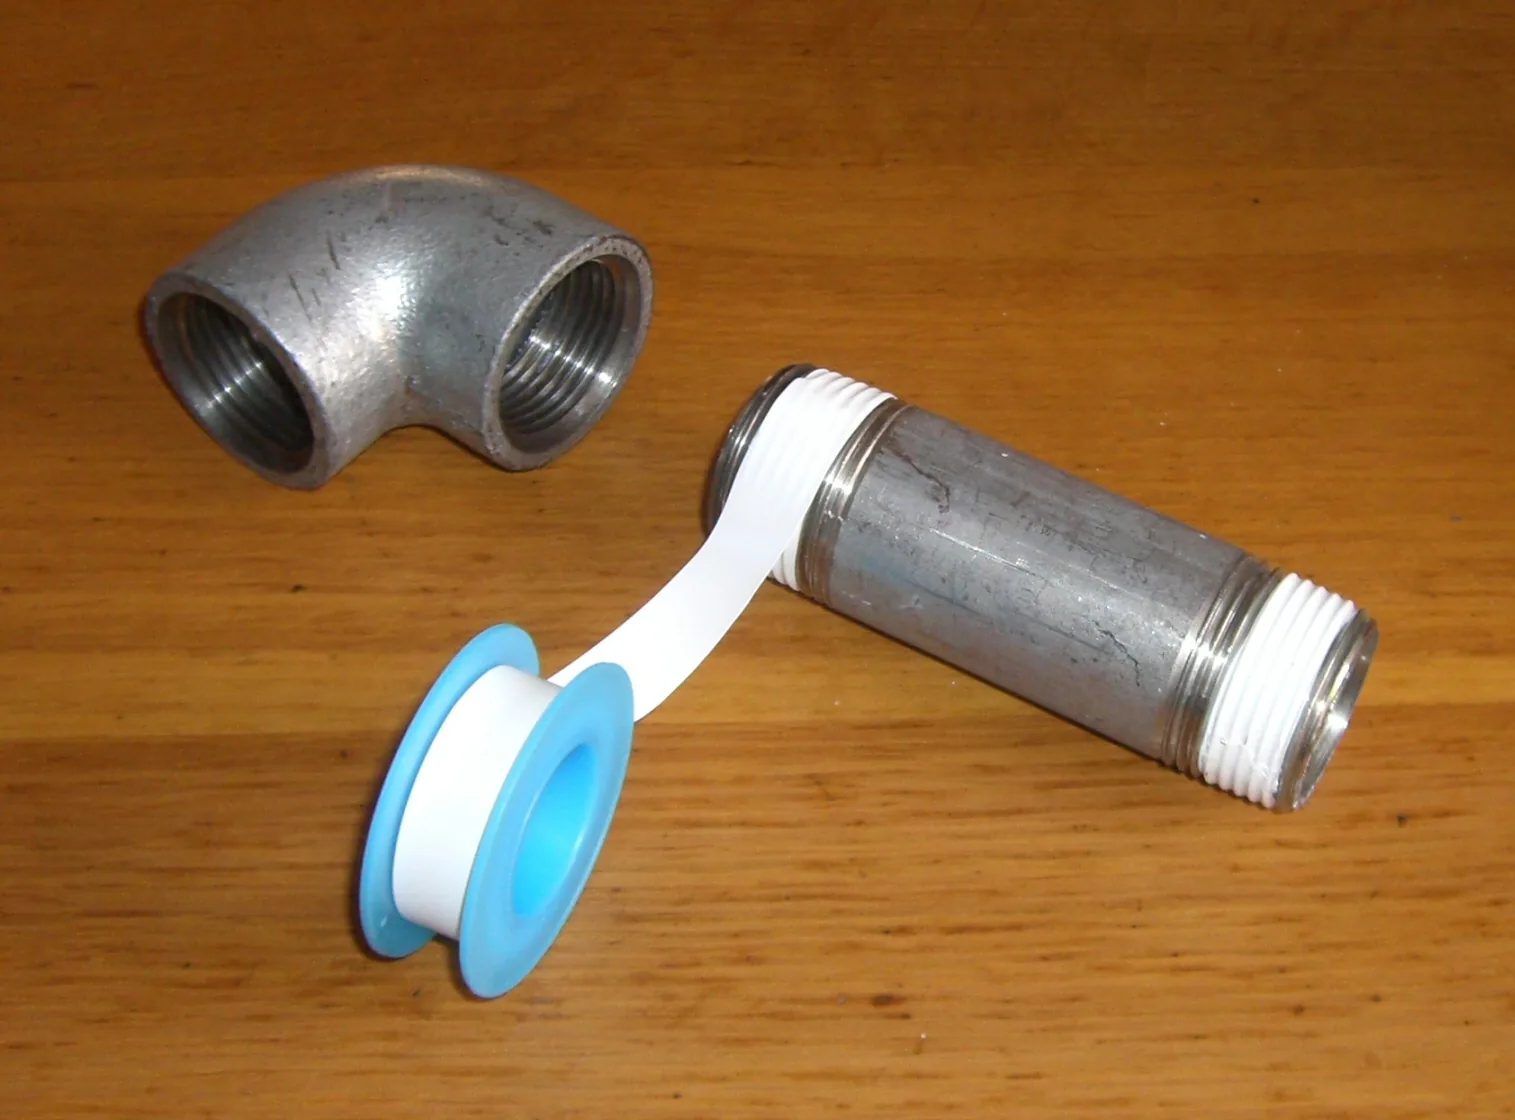
Figure 2. PTFE tape wrapped on the male threads of a steel nipple, next to an elbow. The tape lies flat and stretched into the threads; the same method is used on the wall-side thread of an eccentric union before it is screwed into the outlet. (Photo: Miya.m, Wikimedia Commons, CC BY-SA 3.0)
Screw in and set the unions
Screw each union in by hand, then a little further with a spanner on the hex or a hex key inside.
Turn both offset ends the same way and offer up the mixer body, without washers, to check the spacing.
Adjust both unions forward (tightening) until they line up with the mixer inlets and stick out by the same distance from the wall. Measure each one.
Never back off a taped union more than a very small amount to reach the right angle. Backing out loosens the tape and causes slow leaks behind the cover plate. If you overshoot, take it out, re-tape and try again.
Check that both union ends are at the same height with a spirit level.
Fit the cover plates
Slide the cover plates on before the mixer. They should sit flat against the tile and hide the hole. If a plate rocks or cannot reach the wall, the outlet depth or union length is wrong; fix it now rather than forcing it.
Step 7: Mount the mixer body
Leave the inlet filters and non-return valves in the mixer inlets, if fitted, unless the instructions say otherwise. They protect the cartridge and help stop hot and cold crossing over.
Fit the flat washers supplied into the two mixer nuts. No PTFE tape here: the washer seals against the end of the union, not on the thread.
Offer up the mixer, hot on the left, and start both nuts by hand. If a nut will not start easily, stop; the spacing is out or it is cross-threading.
Tighten the nuts evenly, a little on each side in turn, with a padded spanner, until the mixer pulls straight and both washers are compressed equally. Firm is enough; over-tightening splits washers and cracks decorative nuts.
Check level on the body. If it is off, slacken the nuts, adjust the unions slightly forward and retighten.
Thermostatic mixers: extra checks
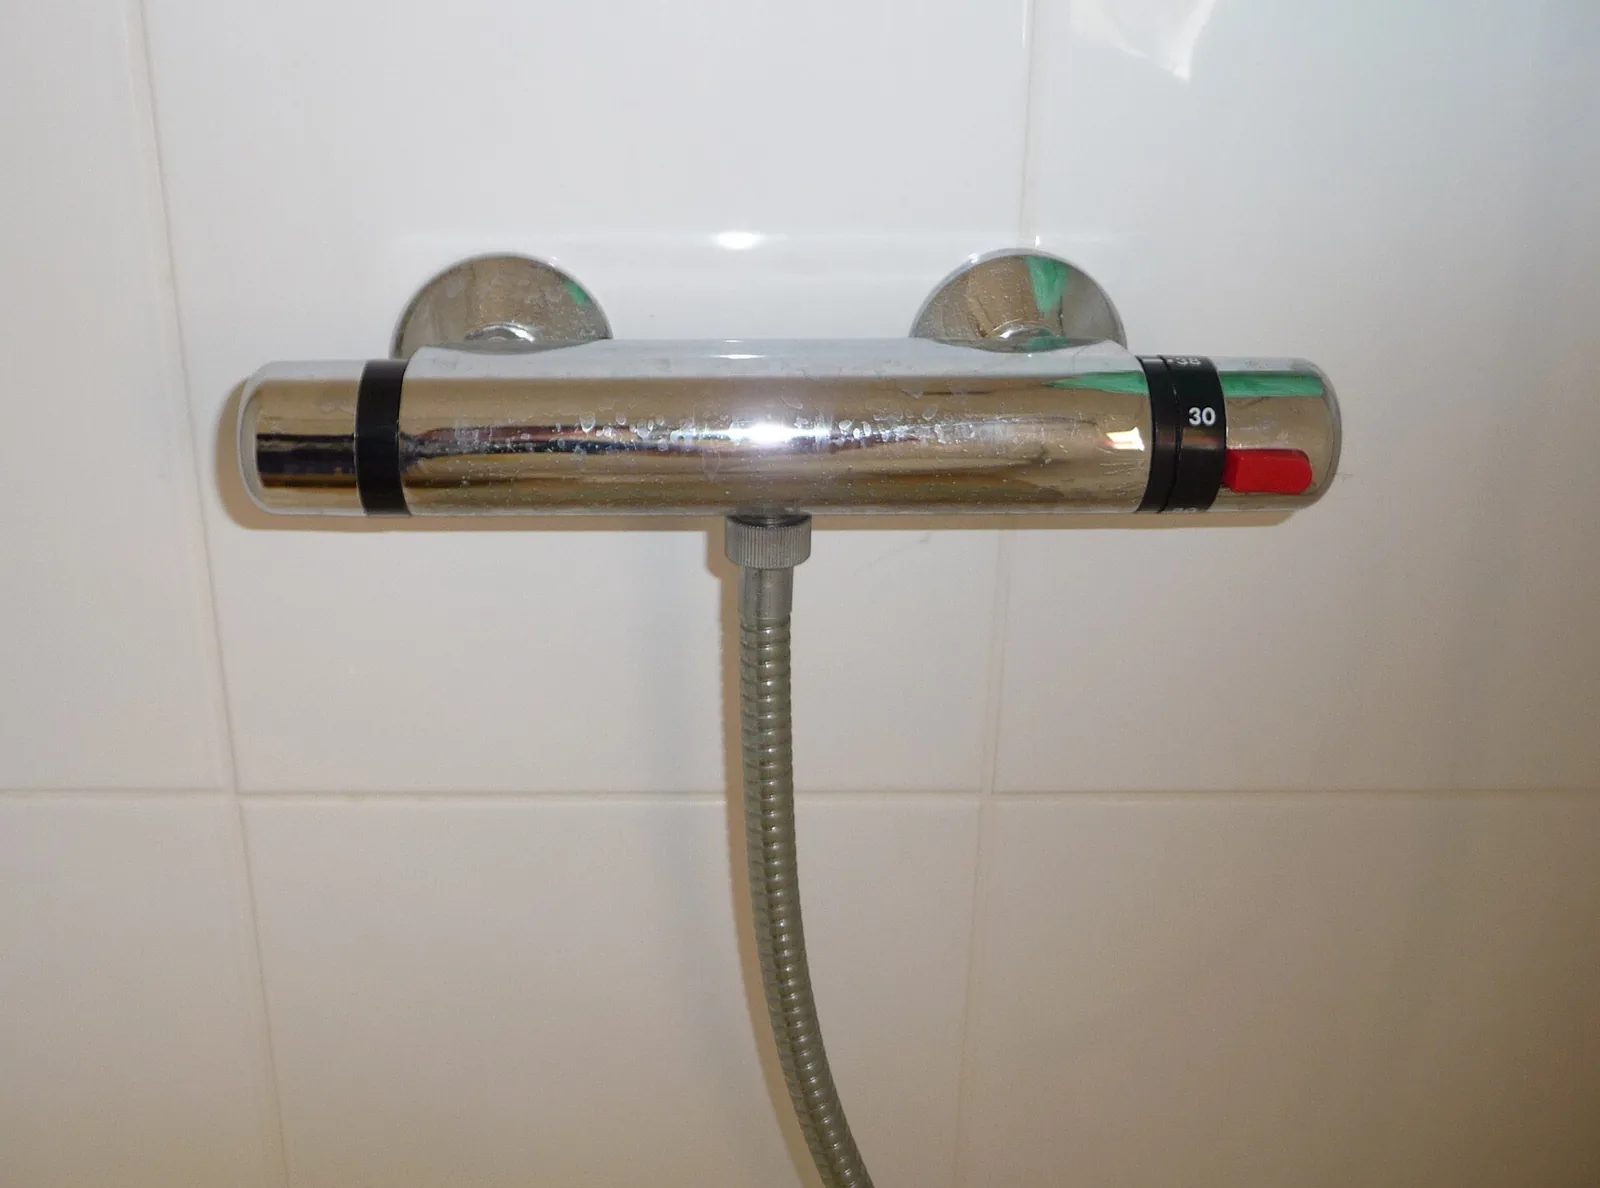
Figure 3. A thermostatic bar mixer on a white-tiled wall, mounted on two unions behind round cover plates. The right-hand dial has a temperature scale and a red button; on many models a button like this must be pressed to turn the dial past the temperature limit. The hose leaves from the bottom outlet. (Photo: Sevela.p, Wikimedia Commons, CC BY-SA 3.0)
Orientation: most thermostatic bar mixers expect hot on the left. Some have a reversible cartridge for reversed pipes; others will not work properly. Check before buying.
Pressure balance: they work best when hot and cold are at similar pressure. In a townhouse where the storage heater and the mixer's cold side are fed from the same source (both from the rooftop tank, or both after the same booster pump), this is usually the case. If one side is pumped and the other gravity-fed, the mixer may struggle.
Low head on top floors: a shower just below the rooftop tank may have too little pressure for some thermostatic mixers. The installation sheet gives the minimum; if the site cannot meet it, discuss a booster pump or a different mixer before fitting.
Temperature limit: many models have a button on the dial that must be pressed to go past a set temperature. Show the client how it works and leave the factory setting unless the maker gives a calibration procedure.
Step 8: Fit the hose, the holder or the rail
Hose and hand shower
Hose nuts also seal with flat washers, not tape. Tighten by hand plus a small turn; plastic hand-shower threads crack easily under a metal nut.
Slide rail or wall bracket
Find the pipes first. Pipes from the outlets often run straight up or down in the wall, and a shower column's riser sits directly above the mixer. Use the pre-tiling photos and a pipe and cable detector, and never drill directly above or below the outlets without proof the area is clear.
Think about cables too. A heater supply or light may run near the top of the rail. If in doubt, switch off that circuit, and use power tools on an RCD-protected socket.
Mark through masking tape, drill with a tile bit at low speed and no hammer action until you are through the tile, then switch to a masonry bit.
Use wall plugs that suit the wall and stainless screws, and fix the rail plumb.
Shower column
Fit the mixer first, level, with the top outlet pointing straight up. Fit the riser into the top outlet with its washer or O-ring, hold it plumb, and mark the upper bracket through masking tape. Check that spot with the detector, then drill, plug and fix the bracket and fit the overhead shower.
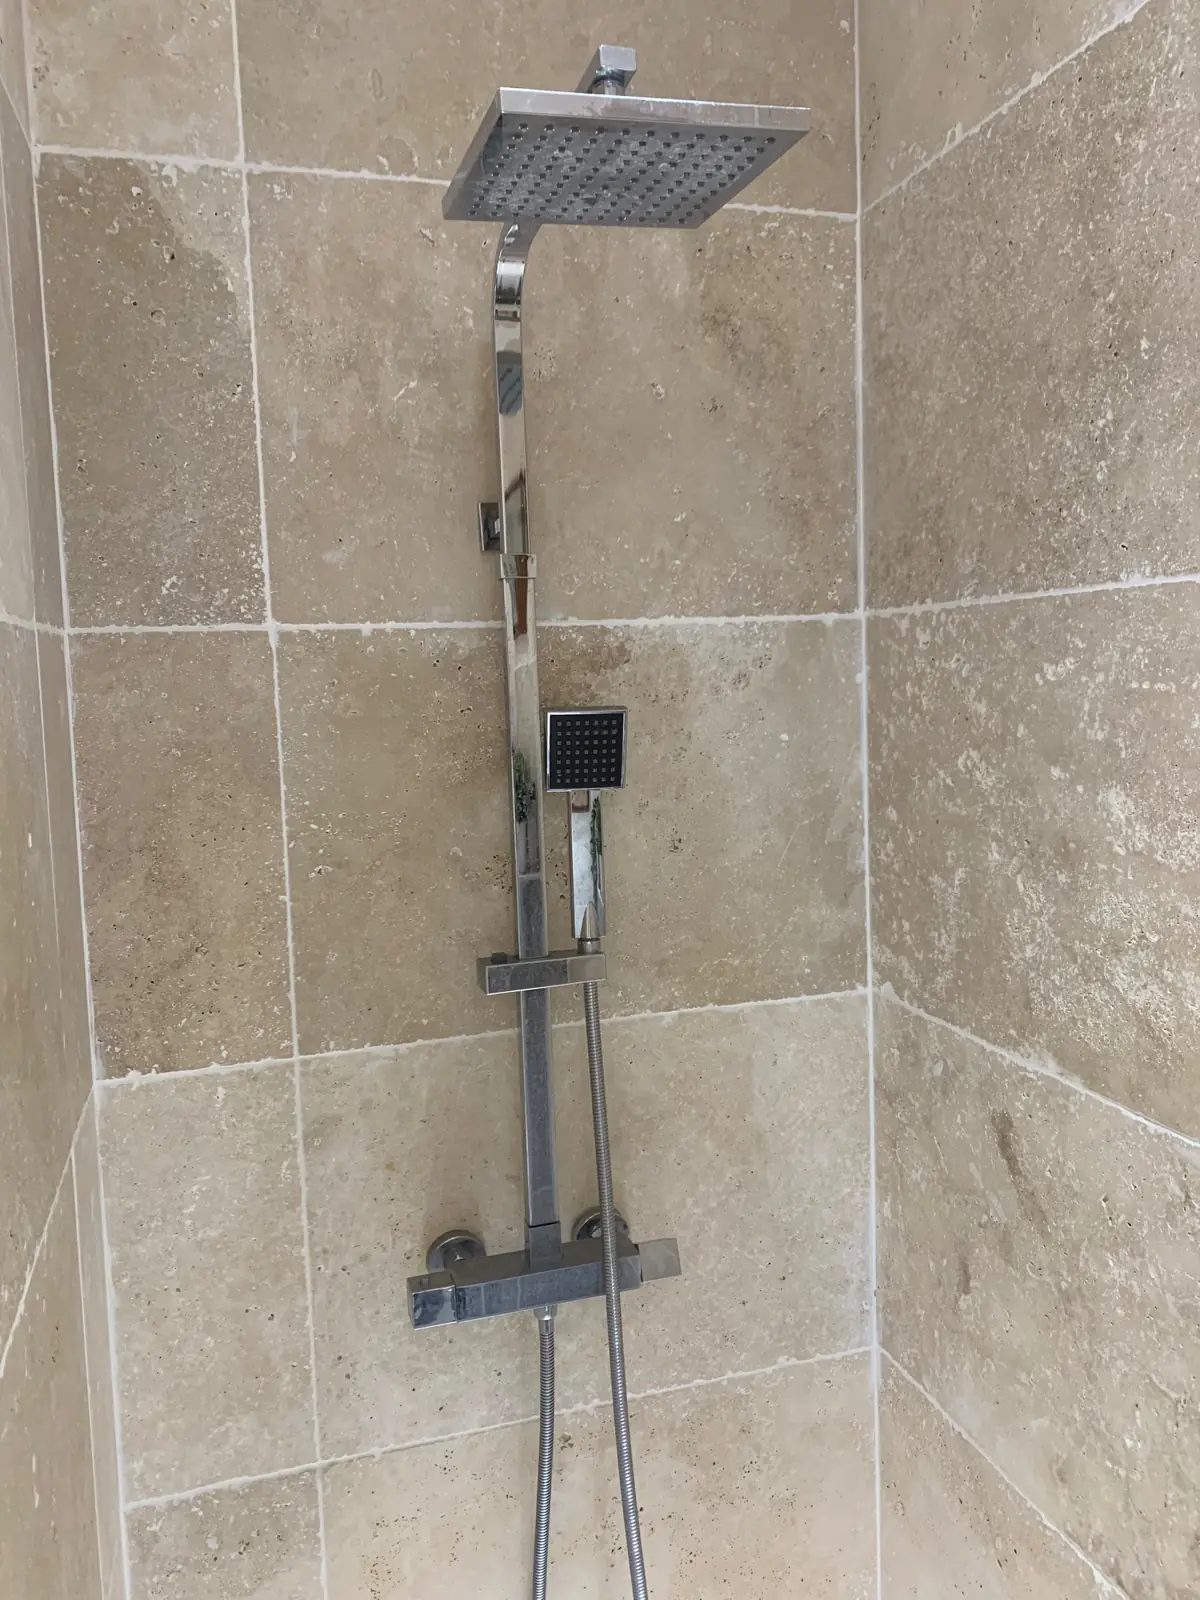
Figure 4. A shower column: a square thermostatic mixer at the bottom feeds a riser pipe to an overhead rain shower, with a hand shower on a holder on the riser. The riser is fixed to the wall well above the mixer, so that drilling area must be checked for pipes and cables first. (Photo: Msilva9, Wikimedia Commons, CC BY-SA 4.0)
Step 9: Test, commission and hand over
Close the mixer, then open the supply valves slowly. Opening quickly can push debris into the new cartridge and causes pressure surges.
Check every joint dry first, then wet: wrap dry tissue around each union where it meets the wall, each mixer nut and each hose nut. Tissue shows a slow weep that is invisible on wet chrome.
Run the shower on full cold, then full hot, and in each diverter position. Check that hot comes from the correct side of the lever or dial and that the flow is as strong as before.
Close the mixer and watch the shower head and spout for a couple of minutes. A few drops as the hose drains is normal; a continuous drip means debris on the cartridge or a faulty cartridge.
Switch the water heater back on at the breaker only after its lines are full and the heater's valves are open, then test the hot side again once it has heated.
Check again later, or ask the client to check below the cover plates the next day, and show them how the mixer works and where the shut-off valves are.
Many installers do not seal the cover plates with silicone at all. If the client wants them sealed, leave the bottom edge open so that any leak behind the plate shows quickly instead of running into the wall.
Practical examples from Vietnamese homes
Example 1: Replacing an old two-handle mixer in an apartment
The old mixer leaked at both unions. After removing it, the plumber measured the outlets at about 140 mm centres and 3 mm out of level, both within the new single-lever mixer's adjustment. But one brass insert turned slightly in its PPR fitting under the spanner. He stopped, explained that the outlet had to be replaced behind the tile, and with building management's approval cut out one tile, replaced and pressure tested the fitting, and only then fitted the new mixer. Without that check, the new mixer would soon have been leaking into the wall.
Example 2: A new townhouse bathroom with a shower column
The owner chose a thermostatic shower column before tiling. The plumber read its installation sheet, set the outlets at 150 mm centres at the height that put the overhead shower where the owner wanted it, set their depth to the tile line agreed with the tiler, then pressure tested and photographed both lines. Because hot was confirmed on the left before the chase was filled, the mixer worked first time after flushing and fitting.
Reference table: problems at fit-up
Problem | Likely cause | What to do |
|---|---|---|
Mixer will not reach both unions | Outlet centres outside the unions' adjustment range | Check the range on the installation sheet; longer or different unions may help; otherwise the outlets must be moved |
Mixer sits crooked | Outlets at different heights; unions turned unevenly | Re-set both unions forward; if the height difference is large, correct the outlets |
Cover plate will not sit flat | Outlet sticks out too far, or tile cut too small or uneven | Check projection; use the maker's extension or cover options; correct the tile cut |
Cover plate does not reach the wall | Outlet set too deep | Union extension if the maker offers one; otherwise reset the outlet |
Hot and cold reversed | Pipes connected the wrong way round in the wall | See FAQ; thermostatic mixers need the correct orientation or a reversible cartridge |
Leak around the union at the wall | Thread not sealed, union backed off, old tape left in the thread, cracked outlet | Remove, clean, re-tape, set by turning forward; replace a damaged outlet |
Leak at a mixer nut | Washer missing, twisted or pinched; nuts tightened unevenly | Shut off, refit or replace the washer, tighten evenly |
Weak flow after fitting | Inlet filters blocked by debris, supply valve not fully open | Shut off, clean the inlet filters, flush the lines |
Thermostatic mixer will not get hot or cold enough | Reversed supplies, unbalanced pressure, debris | Check orientation and pressures; clean filters |
Shower head drips continuously | Debris on the cartridge; faulty cartridge | Flush and clean; replace the cartridge under warranty if needed |
Safety checklist
Switch off the electric water heater at its breaker before opening any hot-water joint, and only switch it back on when it is full of water.
Let hot water cool before opening the hot side; water from a storage heater can scald.
Find pipes and cables before drilling, especially above and below the outlets and at the top of a shower column. Use the pre-tiling photos and a detector.
Use power tools on an RCD-protected socket, keep cables and the drill out of standing water, and do not stand in water while drilling.
Show the client the temperature-limit button on a thermostatic mixer and explain the scald risk for children and elderly users.
In apartments, ask building management before cutting tiles or working on pipes in a shared riser area.
Frequently Asked Questions
Do I need PTFE tape on the shower mixer unions?
On the thread that screws into the wall outlet, yes: that joint is sealed by the thread, so it needs PTFE tape or the sealant the maker recommends. The mixer nuts and hose nuts are different: they seal with flat washers, so no tape is needed there.
What is the standard distance between shower mixer outlets?
Many exposed mixers are made for outlets about 150 mm apart, with unions adjusting roughly 10–20 mm either way (for reference; ranges vary, so check the installation sheet).
Hot and cold are reversed in the wall. Can I just fit the mixer anyway?
A two-handle or single-lever mixer will work, but hot will be on the side users do not expect, which is a scald risk. A thermostatic mixer usually will not work properly unless it has a reversible cartridge. The proper fix is to swap the connections in the wall; at minimum, warn the client clearly.
Can a thermostatic mixer work with a rooftop tank?
Often yes, if hot and cold come from the same source and the pressure at the shower is above the mixer's stated minimum. On floors just below the tank it may be too low, so check before recommending one.
How high should a shower mixer be?
Roughly 1.0–1.2 m above the finished floor is common for a shower-only mixer (for reference). Agree it with the client; for a shower column, follow its instructions, because the riser length fixes the overhead shower height.
Is an exposed or concealed shower valve better?
An exposed mixer is cheaper, easier to install and replace, and its joints are easy to inspect. A concealed valve looks cleaner, but its body is built into the wall before tiling and a fault behind the tile is harder to reach.
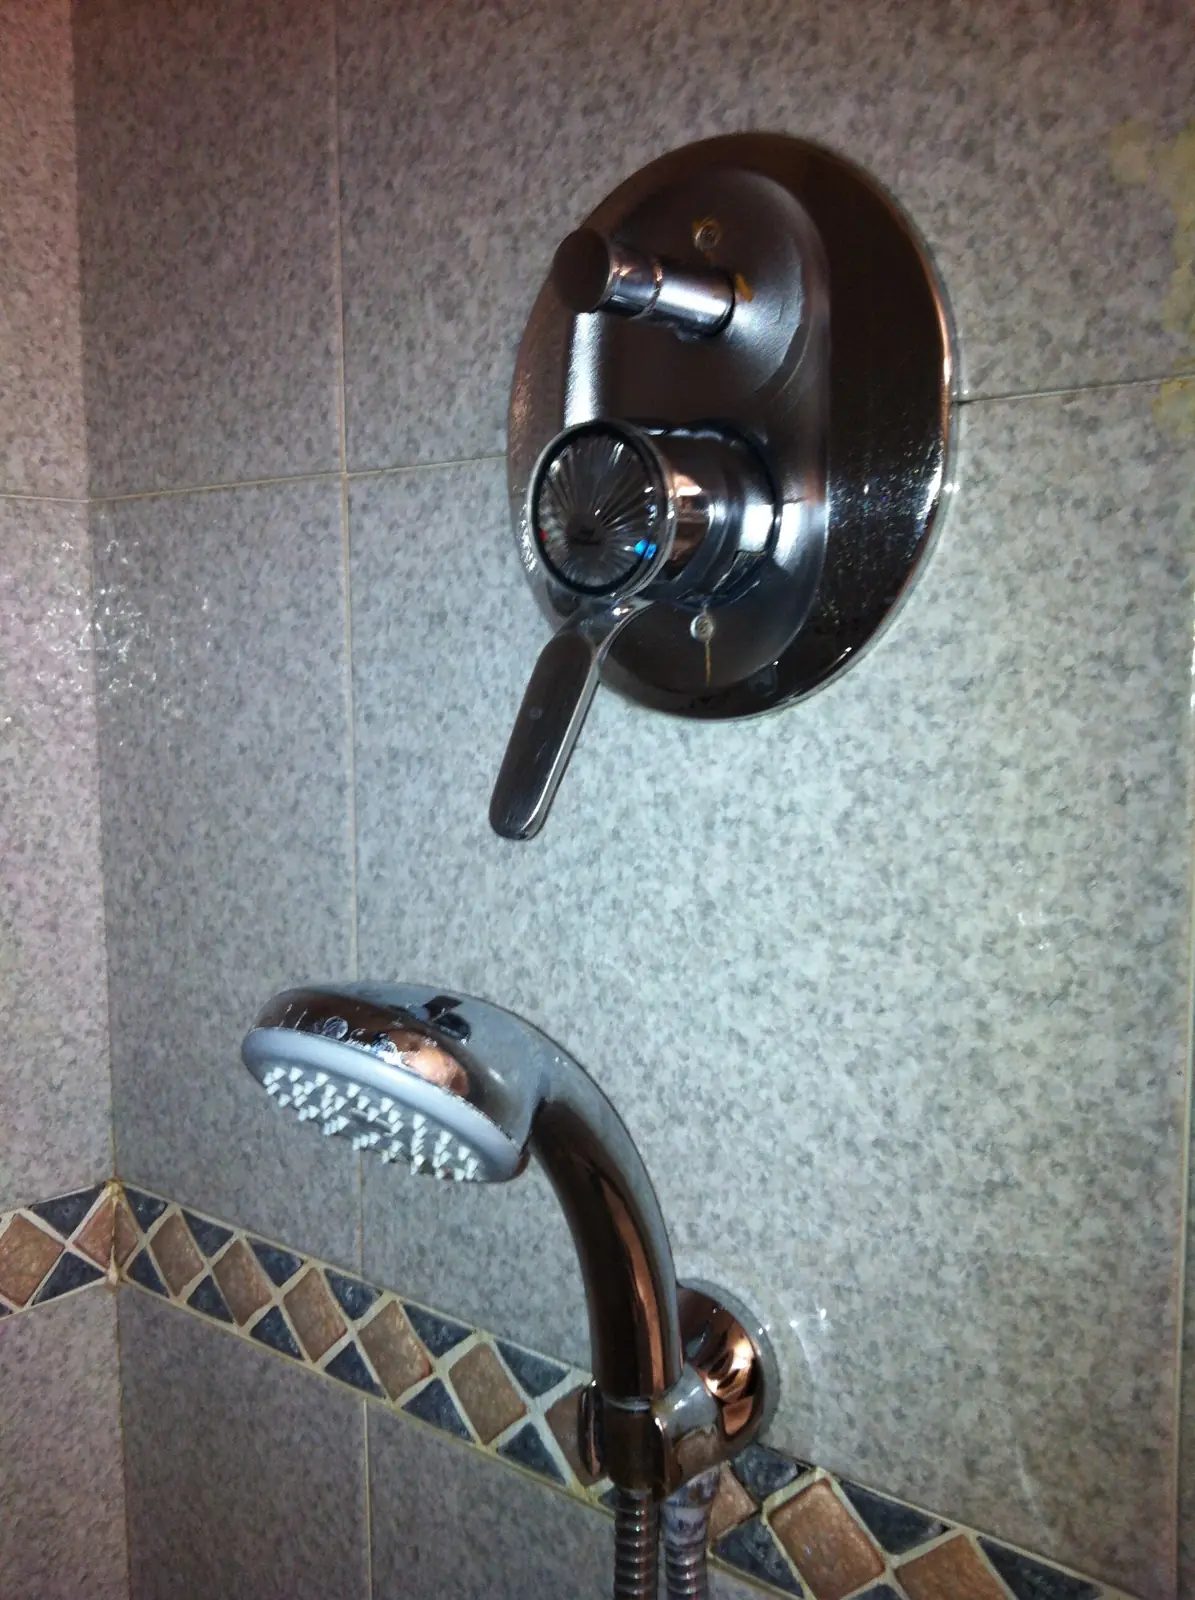
Figure 5. For comparison, a concealed shower valve: only a round cover plate with a lever and a diverter knob shows, while the valve body sits inside the wall. This type is set into the wall before tiling and is a different job from the exposed mixer in this guide. (Photo: Miguel Andrade, Wikimedia Commons, CC0)
Practice Exercises
Measure and decide. On a practice board or an existing bathroom, measure the centres, level difference and projection of a pair of shower outlets. Write down whether a mixer with 150 mm centres and ±15 mm adjustment would fit, and why.
Set outlets for tiling. Fix two threaded outlets on a practice wall at 150 mm centres, level and square, set for a tile plus adhesive thickness of your choice. Ask a colleague to check them with a level and a tape.
Union practice. Tape two unions and set them in outlets held in a vice so both stick out by the same distance and line up with a mixer body, without ever backing off. Repeat until you can do it in one attempt.
Thermostatic check. A client in a 4-storey townhouse wants a thermostatic shower column on the top floor, one floor below the rooftop tank, with no pump on that line. List what you would check on the installation sheet and what options you would offer.
Diagnose. "The new mixer works, but the next day there is a damp patch on the tile under the left cover plate." Describe your checks in order and the most likely cause.