A small leaking weld inside a wall can lift the paint, cause mould at the foot of the wall and force the homeowner to break out a whole area of freshly laid tiles. The only way to sleep well at night is to pressure test the pipework before plastering and to have the readings to prove it.
By the end of this lesson, you will be able to: lay out and run the hot and cold supply for a bathroom with a main stop valve and branch valves; set the outlet fittings flush with the tile face, exactly 150 mm apart; work out the working pressure from the tank height or the pump cut-out pressure in order to choose the test pressure; run a two-stage pressure test and read the pressure graph to tell "pipe expansion" from a "real leak"; and write a test record with a reading log before you allow plastering. This lesson follows the PPR pipe welding step — there you made individual joints, here you assemble them into a complete system and prove the whole system is watertight.
Understand the house water supply before you run pipe
The path of water from source to fixture
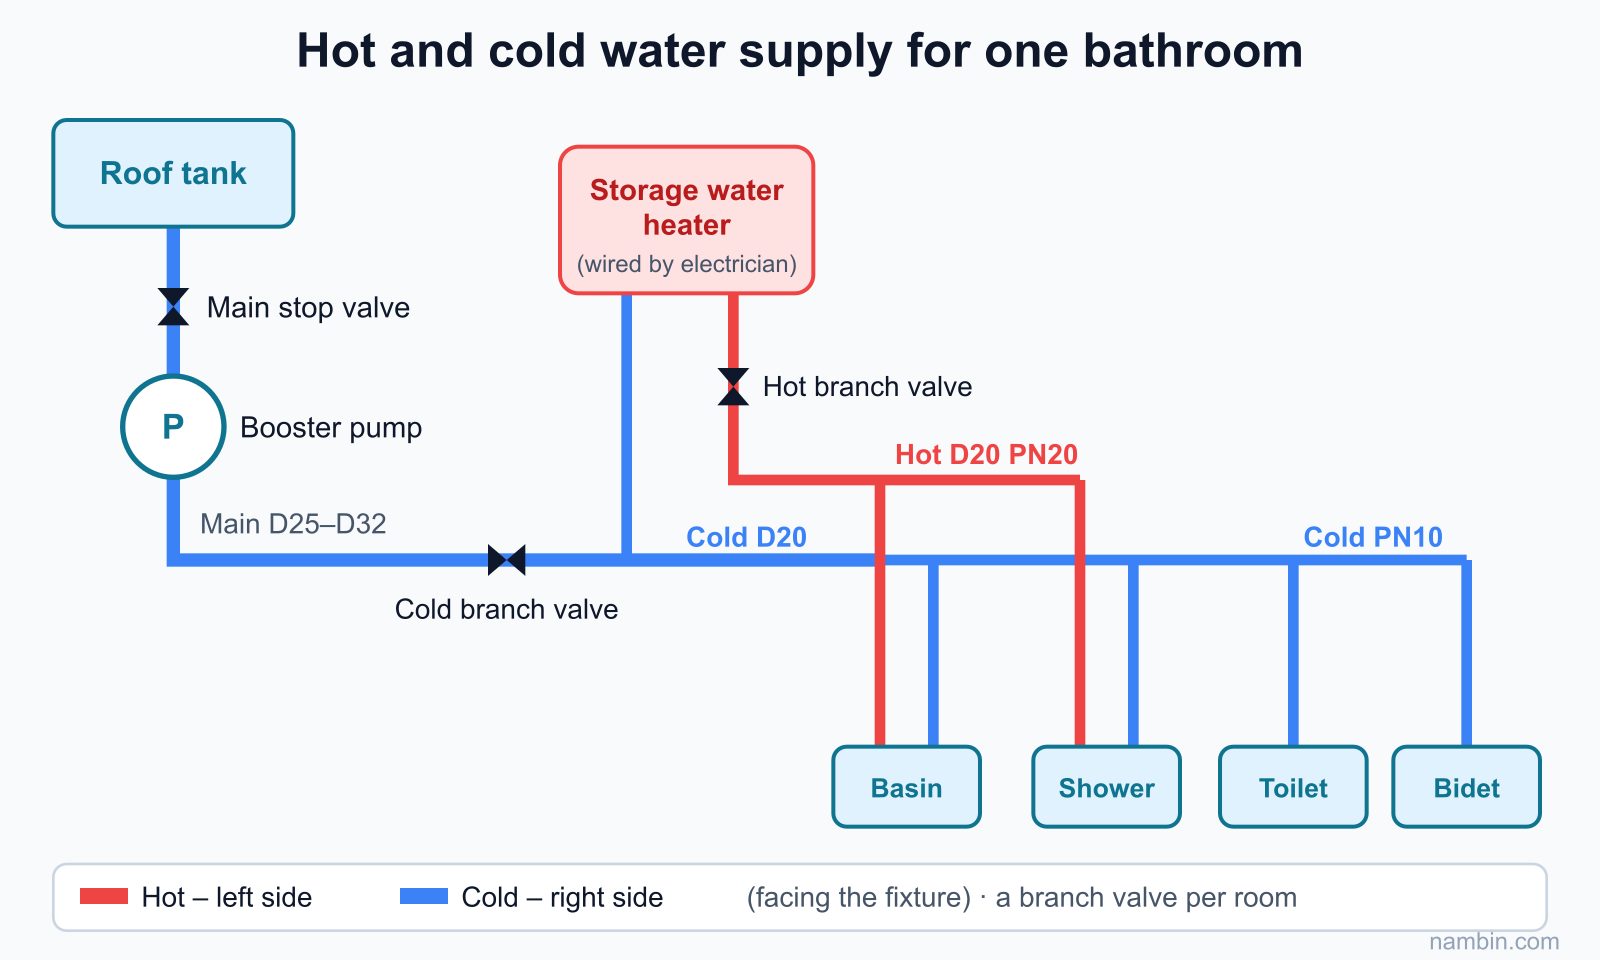
A house water supply usually starts at a roof tank or a water meter, goes through a main stop valve, a booster pump (if fitted), and then branches into each room. Hot water runs from an electric storage water heater or a central water heater along its own separate route.
- Main pipe and branch pipes: the main pipe is larger so it can deliver enough flow when several outlets are used at once; the branch pipes to each fixture are smaller. Exact sizes come from the drawings; Vietnamese town houses commonly use a D25–D32 main and D20 branches (D is the outside diameter in mm).
- Hot pipe and cold pipe: the hot pipe has to withstand higher temperature and pressure (PPR rated PN20 or above), while the cold pipe is usually PN10. Never use cold-rated pipe on the hot line just because "they look the same".
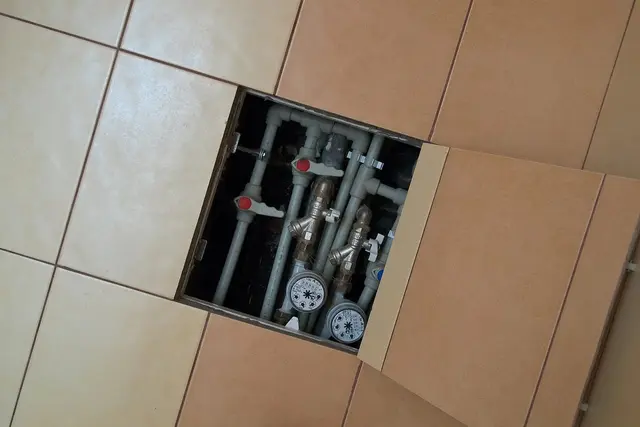
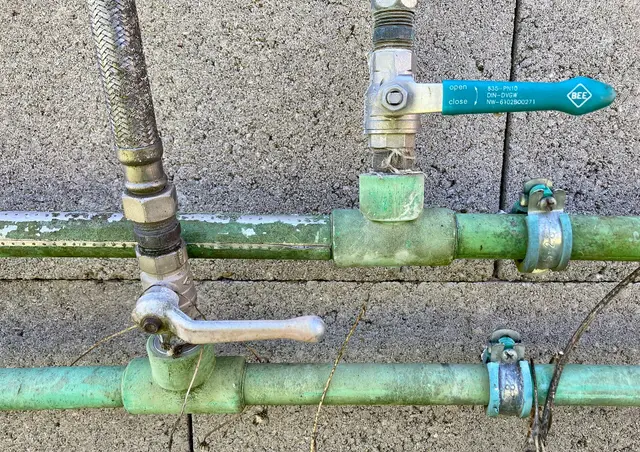
- Stop valves: at minimum, a main stop valve for the whole house and a branch valve for each bathroom, so that repairing one room does not mean cutting water to the entire house.
- Position convention: standing facing the fixture, hot is on the left and cold is on the right. Keep to this convention so mixer taps and showers work the right way round.
What is the working pressure: a quick estimate from tank height
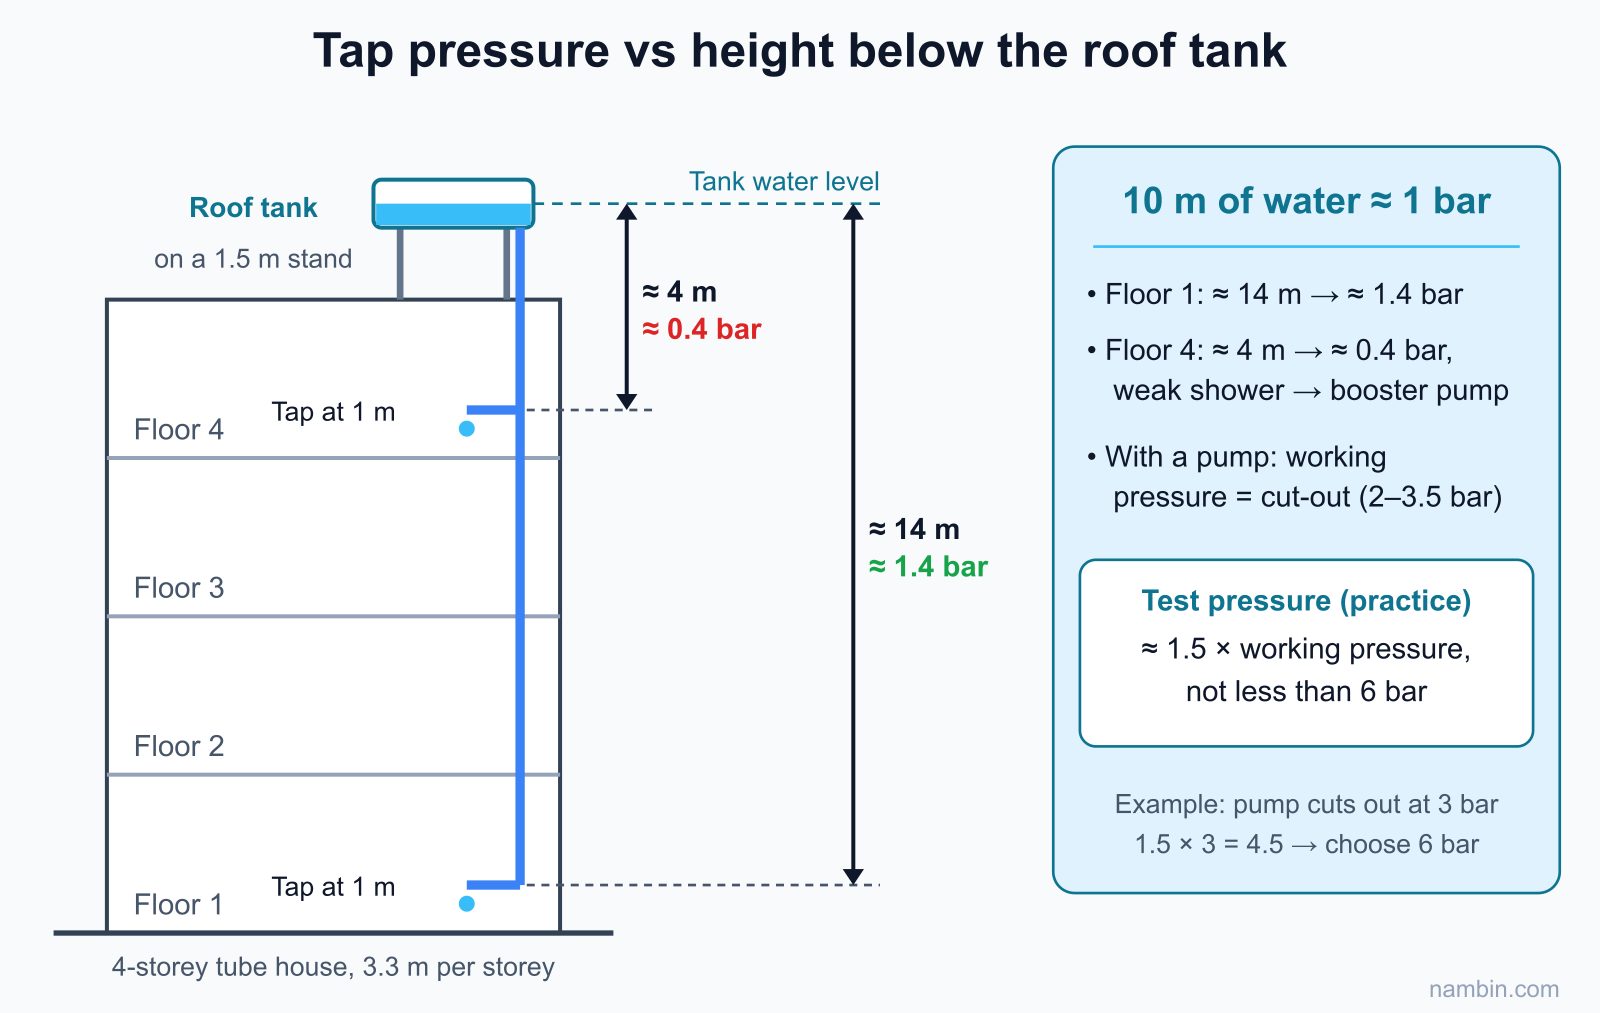
To choose a test pressure, you first need to know the working pressure. An easy rule to remember: every 10 m of water height difference produces about 1 bar (roughly 1 kgf/cm²). In a house fed by gravity from a roof tank, the pressure at a tap is approximately the height difference from the water surface in the tank down to that tap, divided by 10.
- A 4-storey tube house, each storey 3.3 m high, tank on a 1.5 m stand on the roof terrace: the water surface in the tank is about 15 m above the ground floor. A ground-floor tap mounted 1 m high is therefore about 14 m below the water surface → roughly 1.4 bar.
- A 4th-floor tap (floor level at 9.9 m, tap 1 m high) is only about 4 m below the water surface → roughly 0.4 bar; an overhead shower head mounted higher is weaker still. A storage water heater may deliver only a trickle, so a booster pump is usually added for the upper floors.
- When there is a booster pump, take the working pressure as the pump cut-out pressure (typically set between 2 and 3.5 bar for houses). This is the figure you use to calculate the test pressure.
Understanding this calculation helps you explain to the homeowner why the upper floors have weak water flow, and why the pipework must withstand a pressure well above the working pressure during the test.
How hot pipe differs from cold pipe
PPR plastic softens and expands in length when it gets hot. At the same pressure, a pipe carrying water at 60–70 °C is under a much heavier load than a cold-water pipe, which is why the hot line uses thicker-walled pipe (PN20 or above). Hot pipe also expands noticeably along its length — a straight run a few metres long can grow by several millimetres when hot water flows — so clip it more closely and avoid fixing both ends of a very long straight run rigidly without a change of direction that lets the pipe "breathe".
Running the hot and cold supply pipes
Tools and materials
Prepare: a PPR welding machine with heads of the right size, pipe cutters, a tape measure, a marker, a wall chaser (groove cutter), pipe clips, PTFE tape, a hand pressure test pump with gauge, and threaded plugs for all outlet fittings. Add: a spirit level or laser level to set heights, a wall scanner (if available) to avoid old electrical cables, safety glasses and a dust mask when chasing walls.
Steps for running the pipe
- Mark the pipe route and outlets: take the outlet heights from the catalogue of the fixtures the homeowner has chosen. Mark runs that are vertical or level; avoid diagonal runs and never share a chase with electrical cable.
- Cut the chases: deep enough for a layer of mortar to cover the pipe. Keep the hot pipe a little apart from the cold pipe so heat does not transfer between them.
- Weld and fit the pipe: weld according to the temperature–time table from the previous step. Let each welded section cool naturally; do not bend or adjust a joint while it is still hot.
- Fix the pipe: use pipe clips at the spacing given by the manufacturer; hot pipe needs closer clips because its thermal expansion is greater.
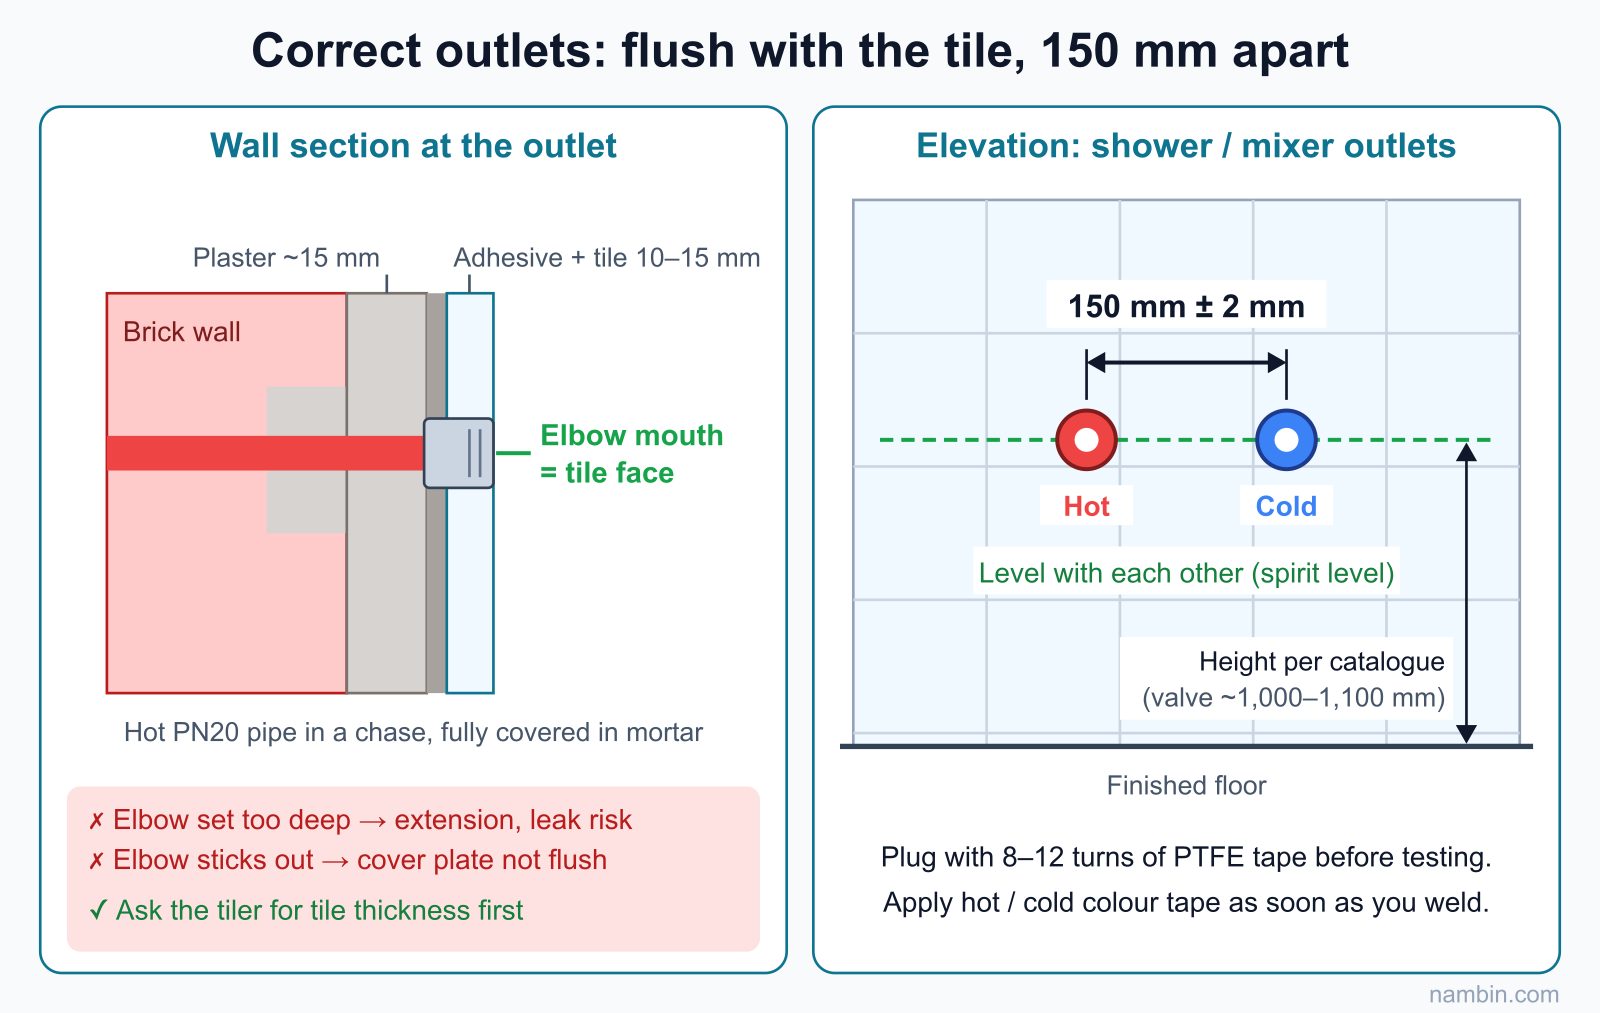
- Fit the outlets: set the female threaded elbows flush with the planned finished wall face; the two outlets for a shower or mixer tap are spaced according to the catalogue (usually 150 mm) and level with each other.
- Fit the valves: place the main and branch valves where they are easy to operate and can be opened up for inspection; mark them hot and cold.
- Plug the outlets: screw a plug wrapped with PTFE tape into every outlet in preparation for the pressure test.
Wall chases, spacing and the finished wall face
- Work out the finished wall face: raw brick wall + plaster (usually about 1.5 cm) + tile adhesive and tile (usually about 1–1.5 cm). The mouth of the threaded outlet must sit exactly at the tile face, not at the raw wall face. Ask the tiler for the tile thickness before fixing the outlets.
- Limit long horizontal chases: horizontal chases weaken a wall more than vertical ones, especially a 110 mm brick wall. Prefer to run horizontally under the floor or above the ceiling, then drop vertically to the point of use.
- Electrical and water lines: never share a chase; where they must cross, the water line should be below the electrical line, so that if it leaks, water does not run along the cable conduit.
- Record the route: photograph the pipe route with a tape measure stretched alongside before plastering, so that a future tradesperson drilling to hang a shelf does not hit the pipe.
Pressure testing: how to do it and how to read the result
Reference test parameters
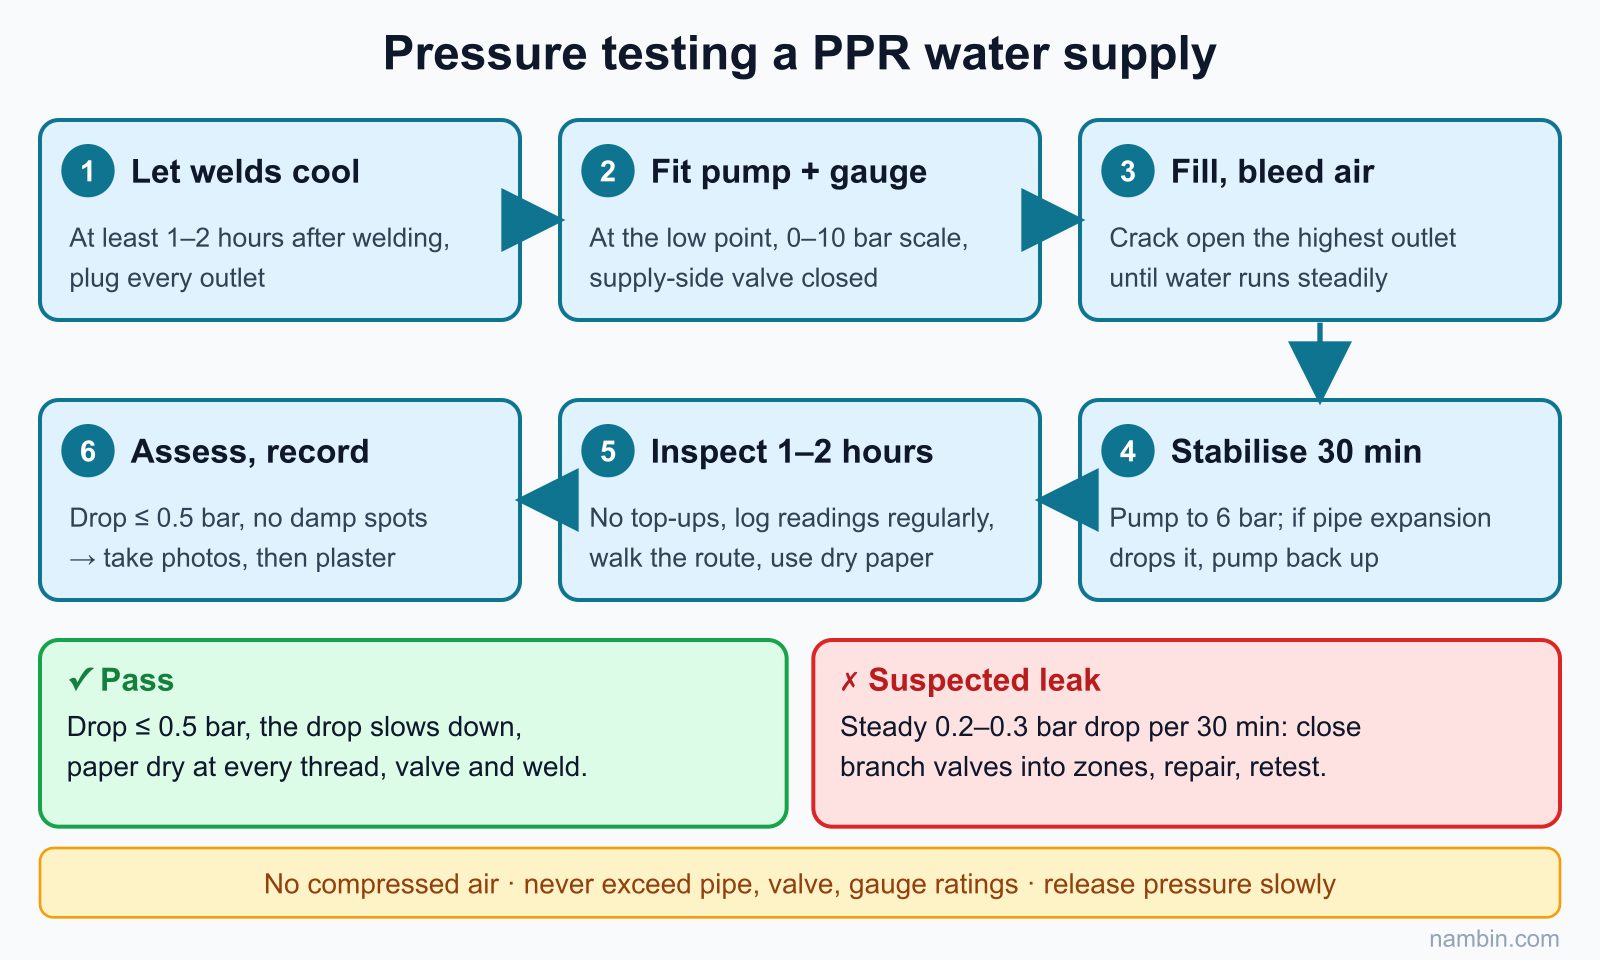
The purpose of a pressure test is to apply a pressure higher than the real working pressure for a period of time, so that weak joints reveal themselves while they are still visible. The exact pressure and duration should follow the design documents, the client's requirements and the pipe manufacturer's instructions. The table below shows common reference practice for houses using PPR pipe:
| Parameter | Reference value | Reason |
|---|---|---|
| When to test | After the welds have fully cooled, usually wait at least 1–2 hours | A warm weld has not reached full strength |
| Test pressure | About 1.5 times the working pressure, usually not less than 6 bar | Enough margin to expose weak joints |
| Stabilisation stage | Hold for about 30 minutes, pump back up if it drops | Plastic pipe expands slightly under pressure |
| Inspection stage | Hold for another 1–2 hours (longer on large projects) | Reveals slow leaks |
| Pass criterion | Pressure does not drop more than allowed (usually ≤ 0.5 bar) and no trace of water | As required by the design |
Test steps
- Connect the test pump and gauge at the low point of the system, and close the valve connecting to the tank or supply.
- Fill with water slowly, cracking open the outlet at the highest point to bleed out all the air. Air left in the pipe makes the gauge needle fluctuate and gives false readings.
- Pump up to the test pressure, hold the stabilisation stage, and pump back up if it drops.
- Note the start time and reading, then hold for the inspection period. While waiting, walk the whole route and check every weld, outlet and valve by eye and by hand.
- At the end, note the final reading. If it passes, keep the pipe under pressure during plastering (where possible), so that a plasterer who accidentally drives a nail or drill into the pipe notices immediately.
- Write the test record: date and time, start and end pressure, witnesses, photos of the gauge and of the pipe route before plastering.
Why a slight drop in the first 30 minutes is normal
PPR pipe is plastic: under pressure it bulges very slightly and "creeps" during the first minutes. The volume inside the pipe increases a little, so the pressure falls even though not a single drop of water escapes. That is why there is a stabilisation stage with pumping back up. After this stage, if the pressure keeps falling steadily over time, there is almost certainly a leak. Conversely, a pressure rise in the middle of the session is usually caused by sunshine warming the water in the pipe, not by the "pipe getting better".
When the pressure drops: how to find the leak
- Walk the whole route again, wipe dry and place dry paper at the outlet threads, plugs and valve bodies — these are the most common leak points, usually not the welds.
- If you still find nothing, close the branch valves to divide the system into zones, and test each zone separately to see which one loses pressure.
- Check the welds in the suspect zone: a weld with insufficient insertion depth, or a weld bead that is uneven around the pipe or misaligned, is the number one suspect.
- After the repair, wait for the new weld to cool and test again from the start; do not add on the time from the previous test.
Safety: Never pressure test water pipes with compressed air — compressed air stores a lot of energy, and a failed joint can fire a fitting off and injure someone. Do not raise the pressure above the rating of the pipe, valves and gauge. When releasing pressure, open the valve slowly and point the outlet away from your face and from electrical equipment. When testing in a room that already has cables waiting, cover the electrical boxes and temporary sockets, and switch off the area's power if there is a risk of water spraying into them.
Worked example: pressure testing a 3rd-floor bathroom in a tube house
The situation and choosing the test pressure
The 3rd-floor bathroom of a 4-storey tube house has a washbasin, a shower, a toilet and a bidet spray. The cold line is D20 from a D25 riser; the hot line is D20 PN20 from a storage water heater installed in the same room. The house has a booster pump set to cut out at about 3 bar.
- Working pressure is taken as 3 bar.
- 1.5 × 3 = 4.5 bar, lower than the customary minimum of 6 bar → choose a test pressure of 6 bar.
- Check the ratings: PN10 pipe has a nominal pressure rating of 10 bar at normal temperature, and the valves and gauge have a 0–10 bar scale → 6 bar is within limits, and the needle sits near the middle of the scale where it is easy to read.
Reading log
| Time | Reading (bar) | Notes |
|---|---|---|
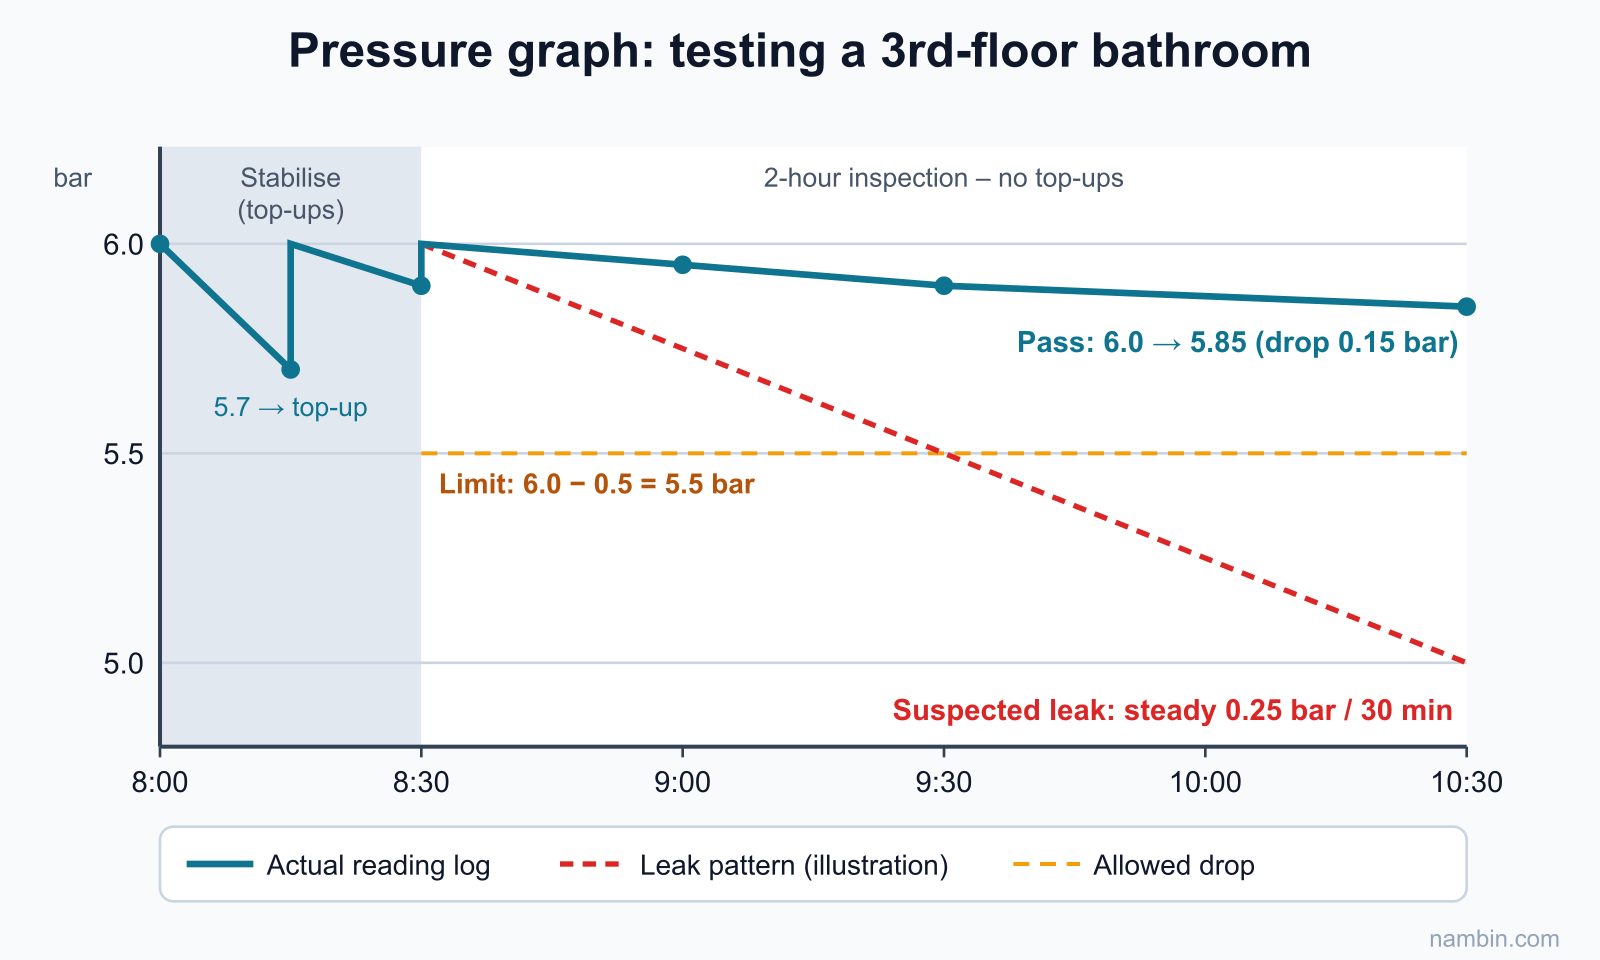
| 8:00 | 6.0 | Air bled at the shower outlet, stabilisation starts |
| 8:15 | 5.7 | Drop due to pipe expansion, pumped back to 6.0 |
| 8:30 | 5.9 | Pumped back to 6.0, end of stabilisation stage |
| 9:00 | 5.95 | Visual check of the whole route, dry |
| 9:30 | 5.9 | Overcast, temperature stable |
| 10:30 | 5.85 | End; dry paper placed at all outlets: dry |
Reading the result
During the 2-hour inspection (8:30–10:30), the pressure fell from 6.0 to 5.85 bar, a drop of 0.15 bar — less than the 0.5 bar allowed, with no trace of water. Conclusion: pass. The drop slows down (0.05 bar per half hour, then only 0.05 bar during the whole final hour), which is a sign of a pipe settling, not a leak. If the readings had fallen steadily by 0.2–0.3 bar every half hour, you would have to stop and look for the leak using the steps above, even though the total drop had not yet crossed the limit.
Common mistakes that spoil the test or cause leaks later
- Not bleeding the air: the pressure goes up and down erratically, making you think there is a leak when there is none, or hiding a real leak.
- Testing while welds are still hot: a weld may pass during the test but be weak in the long run.
- A gauge with too large a scale: on a 0–60 bar gauge a small drop is hard to see; choose a gauge whose scale suits the test pressure.
- Ignoring temperature effects: sun on exposed pipe raises the pressure, cooling in the evening lowers it. Note the conditions during the test and test when the temperature is stable.
- Outlets misaligned or sticking out of the wall: fitting the tap then needs an extension piece, which leaks easily. Check heights and flushness before testing.
- Plastering before there is a test record: if a leak appears later, you have no evidence of your workmanship.
- Hot and cold swapped: the sign is a shower that runs hot when turned to the cold side. Cause: the two lines were not colour-marked while running the pipe. Prevention: apply coloured tape or write on the pipe as soon as you weld, and check again before plastering.
- Too much PTFE tape on the plugs: this can crack the plastic threaded elbow, causing a leak exactly where the tap will go later. Wrap just enough, usually about 8–12 turns in the direction of the thread.
Coordinating with plasterers and electricians, and handover documents
Before and during plastering
- Tell the plasterer where the pipe runs, especially the horizontal sections; ask them not to nail or screw in the marked zones.
- Keep the pipe under pressure during plastering if the homeowner agrees: if someone drills into it, water sprays out immediately and it can be fixed before tiling.
- Check the outlets again after plastering: the elbow mouths are not filled with mortar and the plugs are intact.
Handover documents for the homeowner
- A pressure test record with the reading log and a signature, or a confirming text message, from the homeowner or witness.
- Photos of the pipe route with a tape measure, and photos of the gauge at the start and end of the inspection stage.
- A simple diagram of the main and branch valve positions, distinguishing the hot and cold lines.
Frequently asked questions
Without a test pump, can I use the house booster pump to test?
A booster pump only reaches its own cut-out pressure, which is usually lower than the required test pressure, and it automatically tops up water when the pressure drops, which hides leaks. Use a hand test pump with its own gauge and stop valve.
How long after the test can plastering start?
Once the test has passed and the record is written, plastering can start. If the homeowner wants more certainty, you can keep the pressure overnight and read it again the next morning, noting the temperature at both times.
Do I need to test the hot and cold lines separately?
It is best to test both and record them separately. You can temporarily join the two lines to test them together, but when the pressure drops it will be hard to know which line is leaking, so for rooms with many fixtures, keep them separate.
Can I test with hot water?
Common practice for houses is to test with water at normal temperature. Testing with hot water makes the pressure change as the water cools and the result becomes hard to read, unless the design specifically requires it.
The homeowner wants to leave out the branch valves to save money. Is that acceptable?
Explain that without branch valves, every repair to one tap means cutting off water to the whole house, and during a pressure test you cannot divide the system into zones to find a leak. The cost of a small valve is very low compared with the risk later on.
Checklist and exercises
Checklist before allowing plastering
- The right pipe type for hot and cold; hot on the left, cold on the right.
- A main stop valve and a branch valve for each room, easy to operate.
- Outlets at the right height and spacing, flush with the finished wall face.
- Air bled, pressure held for the full time, readings meet the requirements.
- A test record and photos of the pipe route before plastering.
Practical exercises
- On a practice frame, run a hot and cold supply for a washbasin and shower with branch valves. Pressure test according to the table above, record a reading every 15 minutes and write a sample test record.
- Calculate the working pressure at the ground-floor and 4th-floor taps of a house you know, then choose the test pressure.
Self-assessment criteria
- The two shower outlets are exactly 150 mm apart (error no more than 2 mm) and level by spirit level.
- The pressure drop during the inspection stage is ≤ 0.5 bar, with no damp spots on the dry paper.
- The reading log has every 15-minute mark, with notes on temperature and each top-up.
- You can explain in your own words why the pressure drops in the first 30 minutes without a leak.
Next step in the roadmap
Once the supply system holds pressure, the next step is Drainage, falls and odour prevention: drain pipes are not under pressure, but the wrong fall or a missing trap leads to blockages and bad smells. Supply and drainage meet in the Installing sanitary fixtures step, where you connect taps, showers and toilets to the outlets you have just made. Keep the pressure test record from your exercise — it is also part of your portfolio for the final assessment of the roadmap.