A PPR (polypropylene random copolymer) joint welded correctly can last as long as the house. A rushed joint usually does not leak straight away — it leaks a few months later, after the walls have been plastered and the tiles laid. By then, fixing one joint means breaking open a whole section of wall.
By the end of this lesson, you will be able to:
- Explain why a socket-fusion joint is strong and the three factors that decide it: temperature, time and depth.
- Weld PPR from Ø20 to Ø63 following a 7-step procedure, looking up the correct heating time and welding depth.
- Calculate the cutting length of pipe between two fittings, measuring either face-to-face or centre-to-centre.
- Read the melt bead to tell a good joint from the 6 mistakes that cause leaks, and solvent-cement uPVC drain pipe so it seals with no glue build-up.
How a heat-fusion joint works
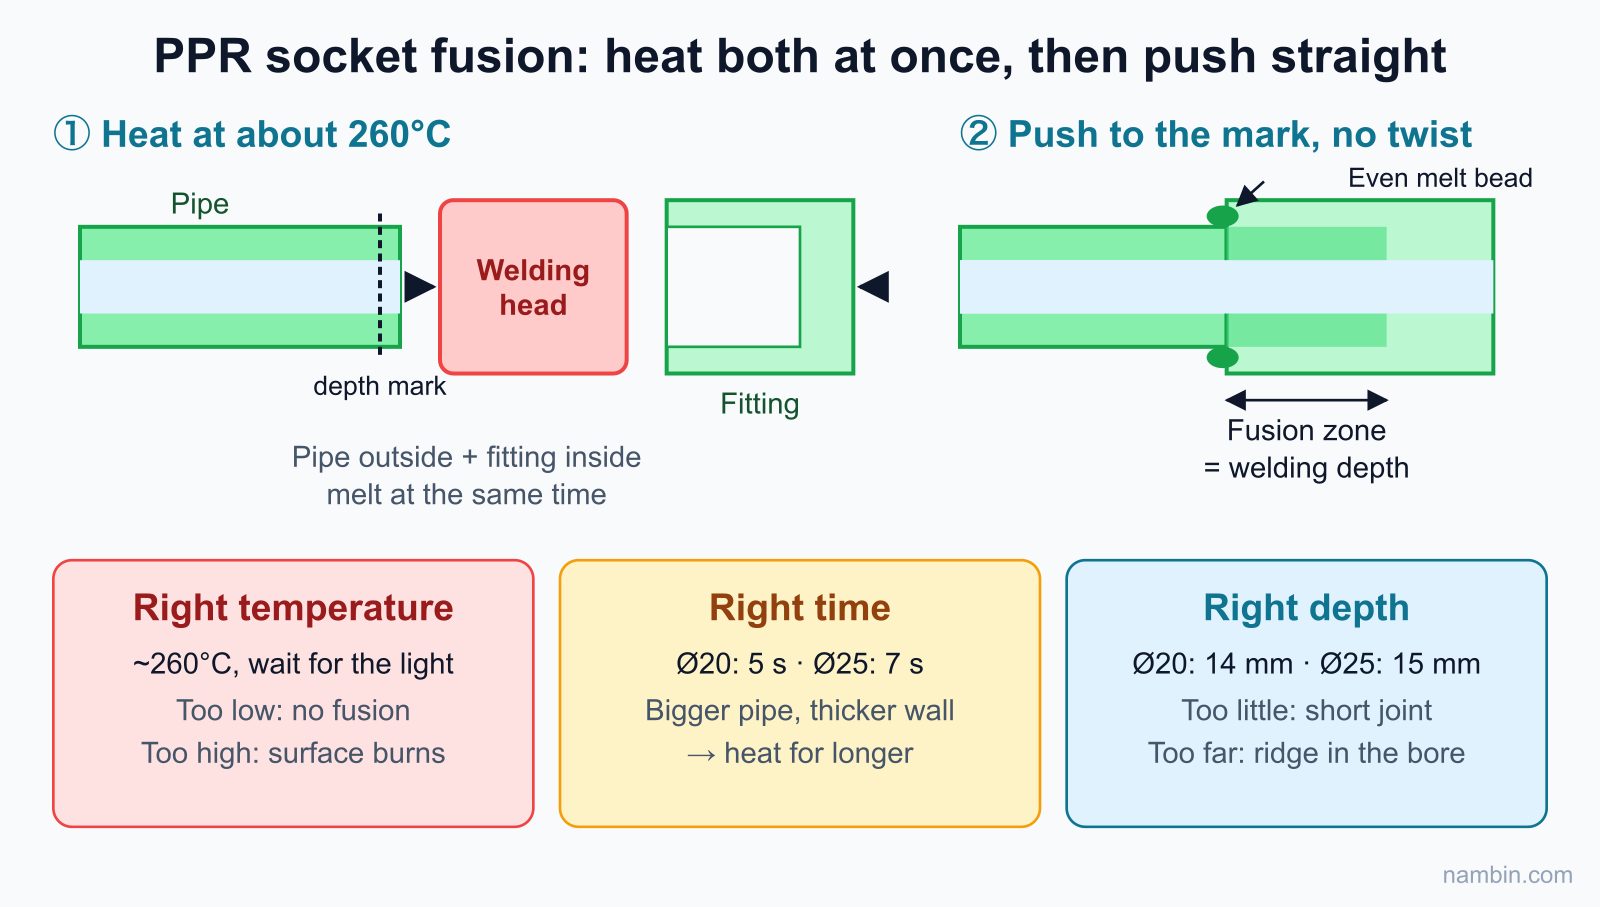
The welding machine heats the outside of the pipe end and the inside of the fitting at the same time until the plastic becomes soft and molten (about 260°C). When they are pressed together, the two layers of plastic merge into one piece. For a strong joint you need all three factors: the right temperature, the right time and the right depth. Too little heat and the plastic does not merge; too much heat and the plastic flows too far, narrowing the bore of the pipe.
Why it is called "socket fusion"
The type of welding used for PPR in houses is called socket fusion: the pipe end is pushed into the socket of the fitting. The pipe's outside diameter is slightly larger than the fitting's inside diameter, so when both are soft, pressing them together creates an interference fit — the plastic is compressed tightly and the molecules on both sides interlock. That is why a correct joint is even stronger than the pipe wall itself, and also why you need to push with some force rather than having it slide in easily.
How the three factors relate
- Temperature decides whether the plastic reaches the molten state at all. If the head is too cool (the machine has not warmed up long enough, or the supply voltage is low), only the surface softens however long you heat.
- Time decides how thick the molten layer is. The bigger the pipe and the thicker its wall, the longer it needs.
- Depth decides the area that fuses. Push too little and the joint is short; push too far and plastic is forced into the bore, creating an internal ridge.
What a good joint looks like from outside
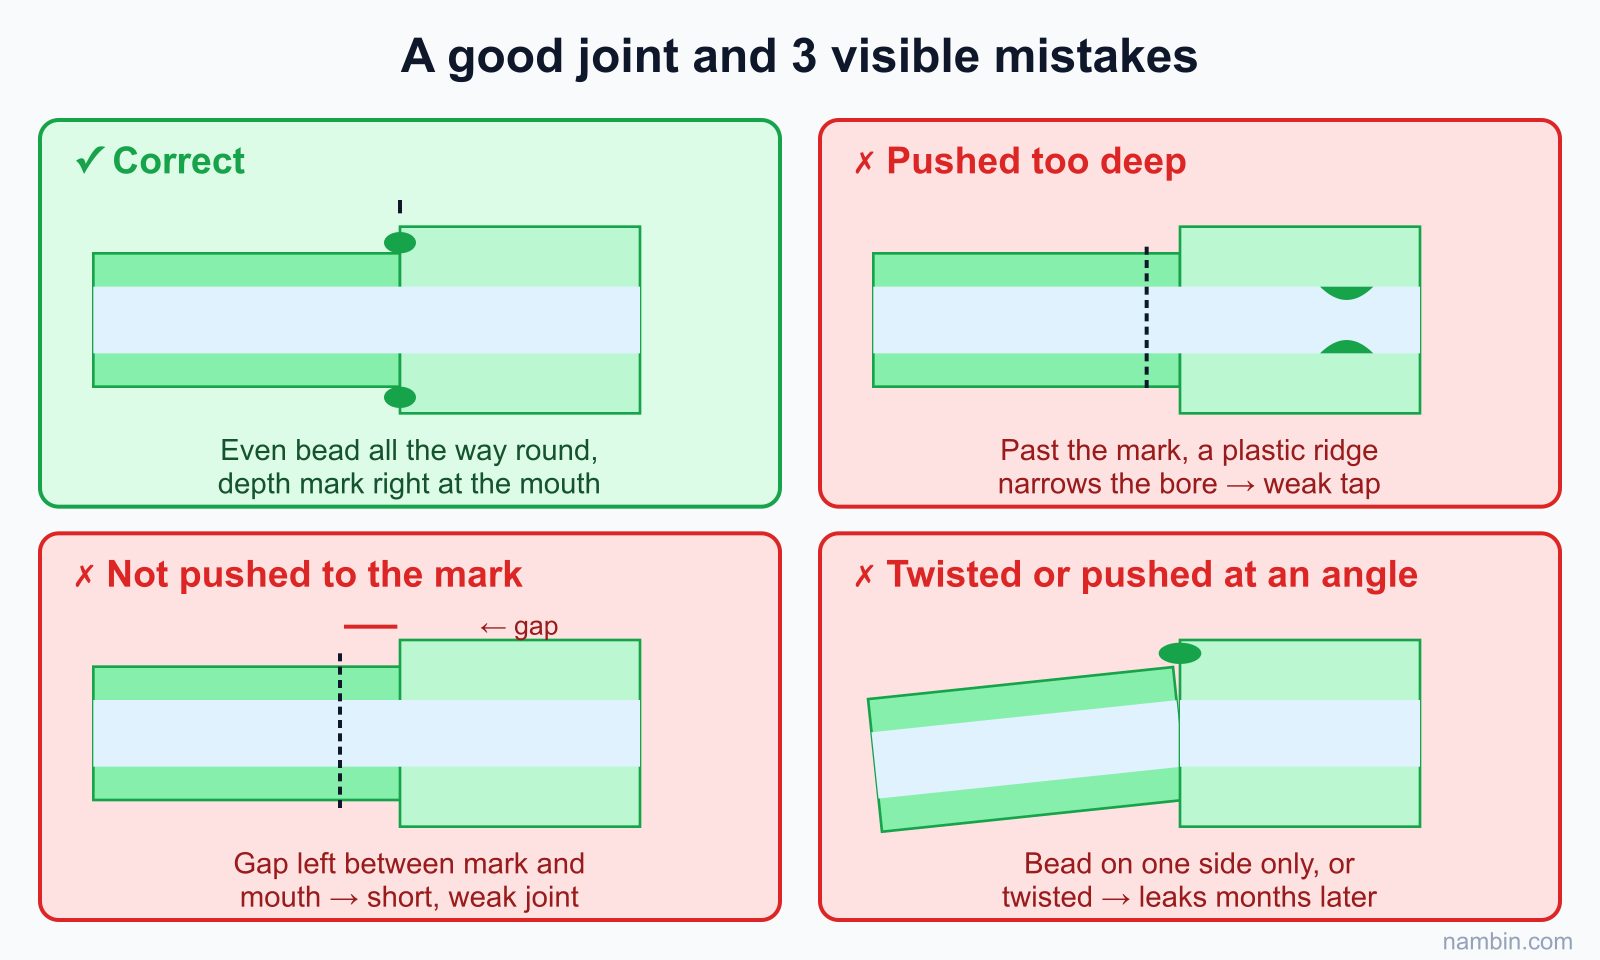
After pressing, an even melt bead forms around the mouth of the fitting — one continuous ring with no breaks. No bead, or a bead on only one side, usually means too little heat, too little depth or a pipe pushed in at an angle. A very large bead with runny, sagging plastic usually means overheating or heating for too long.
Preparing tools and the welding machine
Tools you need
- A welding machine fitted with the correct pair of heads for the pipe size, switched on 10–15 minutes beforehand to reach a stable temperature (the indicator light changes state).
- Sharp pipe cutters, a tape measure and a marker pen.
- A clean, dry cloth to wipe the pipe ends and the welding heads.
- Clean welding heads whose non-stick coating is not peeling.
- A stand for the machine and heat-resistant gloves; for pipes of 40 mm and above, have a helper or a welding bench that clamps the pipe.
Fitting the heads and checking the temperature
Fit the pair of heads (a male head for the fitting, a female head for the pipe) while the machine is still cold, and tighten them with the supplied hex key so they sit flat against the heating plate. A loose head heats unevenly. If the machine has a temperature dial, set it to about 260°C. If you have a surface thermometer, check the real temperature at the head; many machines display the right number, but old or dirty heads are not hot enough.
Power supply for the machine
Common PPR welding machines draw from a few hundred to about 2000 W depending on pipe size. An extension lead that is too thin or too long causes a voltage drop, and the head never reaches temperature even though the indicator light is on. Use an outlet protected by an RCD (residual current device), an extension lead of adequate cross-section, and fully unwind any cable reel so it does not overheat.
The 7-step procedure
The seven steps below apply to every socket-fusion joint, from a Ø20 coupler to a Ø63 tee. The only thing that changes between pipe sizes is the time and depth figures in the table further down.
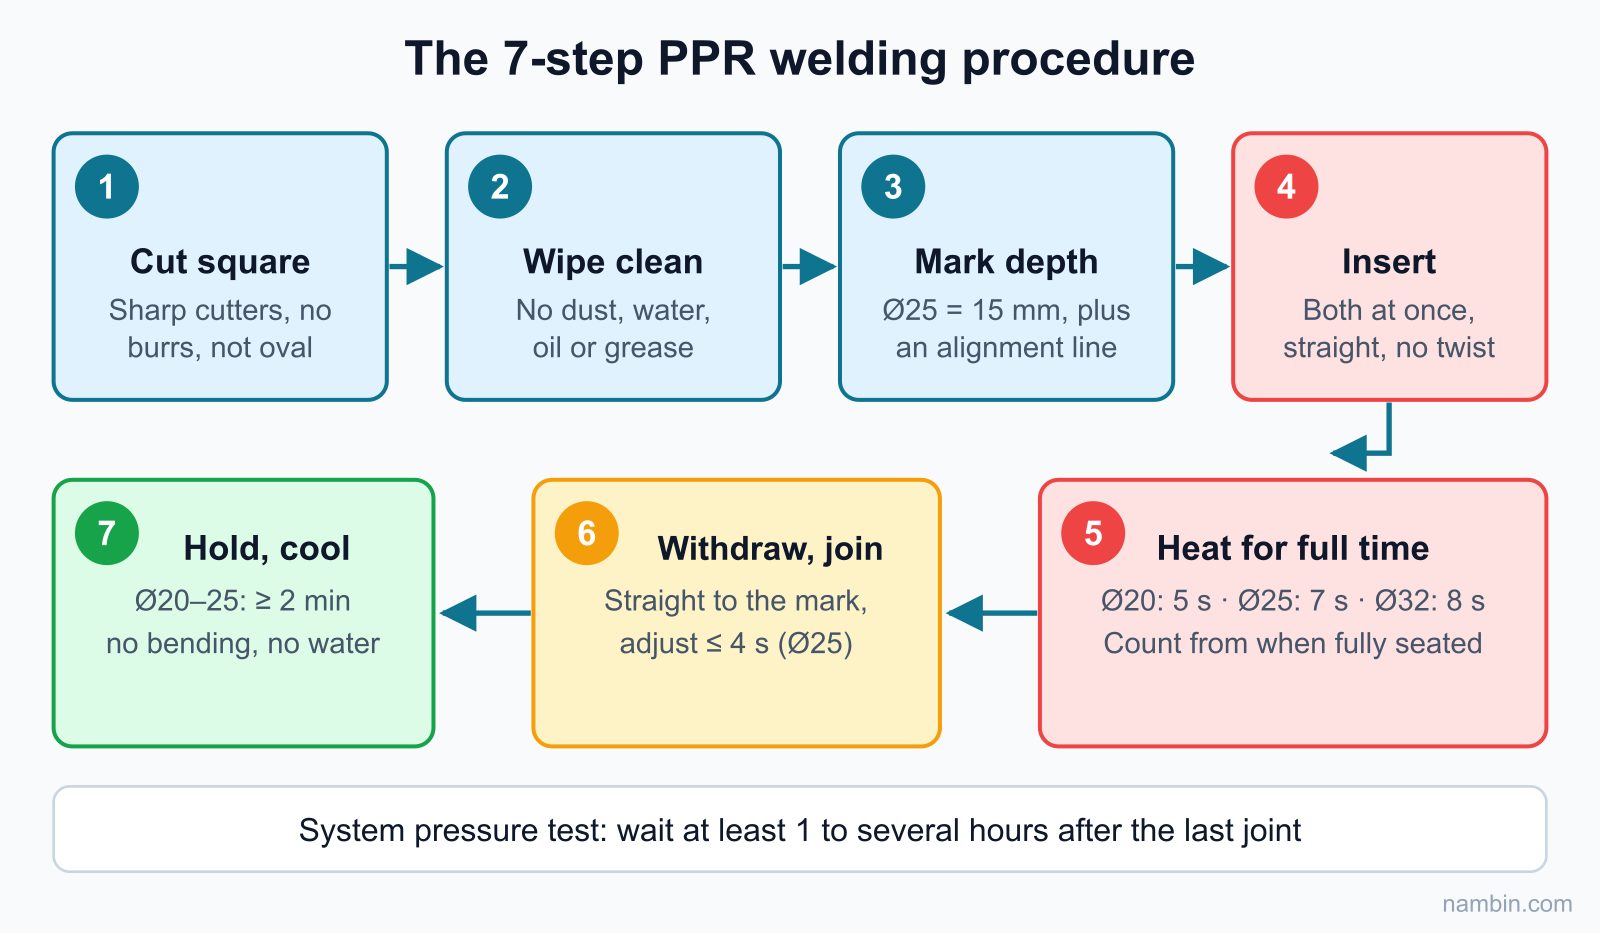
- Cut the pipe square with proper pipe cutters, leaving no burrs. An angled cut leaves one side of the joint short of depth.
- Wipe clean the pipe end and the inside of the fitting: no dust, water, oil or grease.
- Mark the welding depth on the pipe, equal to the socket depth of the fitting (see the depth column in the table below).
- Insert the pipe and the fitting onto the heads at the same time, pushing straight without twisting. The pipe goes in up to the mark; the fitting goes fully onto its head.
- Hold for the full heating time from the table below. The time counts from when the pipe and fitting are in position, not while you are still pushing.
- Withdraw and join immediately: push the pipe into the fitting up to the mark, in a straight line, without twisting. You can adjust the angle slightly in the first few seconds.
- Hold it still and let it cool. Do not bend it, and do not let water through until the joint has cooled completely.
Cutting and marking tips
Squeeze the pipe cutters firmly in one go, turning the pipe slightly if the blade sticks. Blunt cutters squash the pipe into an oval — a misshapen pipe end does not seat evenly on the head. After cutting, look at the cut face: it must be round, flat and square. Draw the depth mark as a ring around the pipe, or at least as two marks on opposite sides, so you can see both sides while joining.
Technique when joining
Pull the pipe and the fitting off the machine at the same time, quickly but without jerking. Push straight in one movement to the mark; never push, pull back and push again. With elbows and tees, decide the direction of the branch first (draw a straight line along the pipe and the fitting as an alignment guide), because after joining you only have a few seconds for a very small angle correction and you must not twist.
Welding order for an assembly
In tight spots such as service shafts, close to the ceiling or in wall corners, weld an assembly on the floor first (for example: tee + two short lengths of pipe + elbow), let it cool, then lift it into place and make the last joint where it is easy to work. Do not try to force the machine into a narrow gap — the joint will be hard to keep straight and you can easily burn your hand.
Reference welding-time table
Actual times may vary with the pipe brand and the ambient temperature; follow the manufacturer's instructions first. In cold or windy weather, increase the heating time slightly. The "adjustment time" column is the maximum time after joining during which you can still correct the angle slightly; after that, do not touch the joint at all.
| Pipe diameter | Welding depth (mm) | Heating (seconds) | Adjustment time (seconds) | Cooling (minutes) |
|---|---|---|---|---|
| 20 mm | 14 | 5 | 4 | 2 |
| 25 mm | 15 | 7 | 4 | 2 |
| 32 mm | 16.5 | 8 | 6 | 4 |
| 40 mm | 18 | 12 | 6 | 4 |
| 50 mm | 20 | 18 | 6 | 4 |
| 63 mm | 24 | 24 | 8 | 6 |
Note: "cooling" in the table is the minimum time before any force is applied to the joint (bending, connecting further pieces). Before pressure-testing the whole system, wait longer — plumbers usually allow at least one to several hours after the last joint, or follow the pipe manufacturer's instructions.
Worked example: calculating the cutting length between two fittings
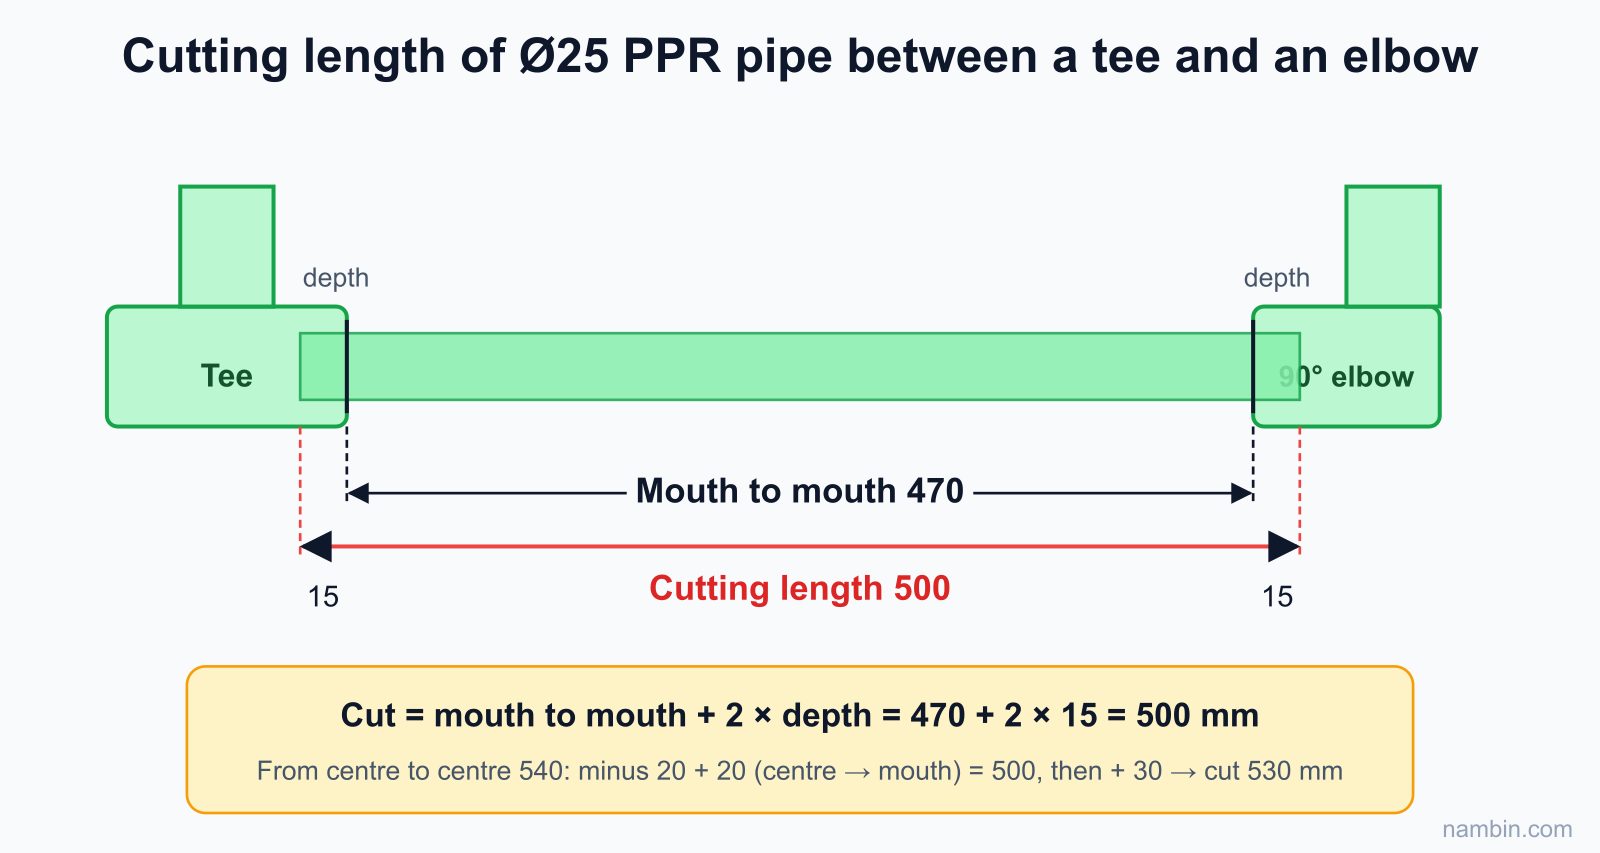
Situation: you are running a 25 mm PPR cold-water branch in the bathroom of a narrow Vietnamese tube house, and need to connect a tee on the branch line to a 90° elbow that will rise to the shower valve. You measure the distance between the two fitting mouths (outer edge of the tee mouth to outer edge of the elbow mouth): 470 mm.
Step 1: add the welding depth at both ends
The pipe must go into each fitting by the welding depth. For 25 mm pipe, the depth is about 15 mm:
Cutting length = 470 + 2 × 15 = 500 mm
Step 2: if you measure from fitting centres
Drawings usually give centre-to-centre distances. In that case you need to know the distance from the centre of each fitting to its mouth (measure it on the real fitting, because every brand is different). Suppose centre-to-centre is 540 mm, centre of tee to tee mouth is 20 mm, and centre of elbow to elbow mouth is 20 mm: the mouth-to-mouth distance is 540 − 20 − 20 = 500 mm, and the cutting length is 500 + 30 = 530 mm.
Step 3: check before welding
Dry-fit the pipe into the two fittings (cold pipe only goes in a little because of the interference fit) to check direction and position. Mark the 15 mm depth line on both ends of the pipe. After welding, measure centre-to-centre again: a few millimetres out is acceptable for pipe buried in a wall; if it is a whole centimetre out, it is usually because of pushing too far or missing the mark, and you need to review your technique.
A good habit: for a long run with many fittings, make a table of every section (position, measured distance, cutting length) before cutting. Cutting a piece too short means throwing it away and adding a coupler — wasting material and adding one more joint that could leak.
6 mistakes that make joints leak
Each mistake below comes with the signs that help you spot it and how to avoid it. Once you suspect a joint, the only reliable fix is to cut that joint out and re-weld with a new fitting — no building up with extra plastic, no blowtorch, no tape wrapped around the outside.
Handling mistakes
- Twisting the pipe while joining: breaks up the plastic layers as they merge, leaving a leak path. Sign: the melt bead is twisted and uneven. Prevention: draw an alignment line before welding.
- Pushing too deep: plastic is forced into the bore, forming a ridge that reduces flow and can block small pipes. Sign: the pipe has gone past the mark, and the tap at the end of the run is unusually weak.
- Not pushing to the mark: the joint is short and handles pressure poorly. Sign: you can still see a gap between the mark and the fitting mouth.
Material and environment mistakes
- Dirty welding heads: burnt plastic sticking to the head makes the joint uneven. Wipe the heads while hot with a dry cotton cloth (careful not to burn yourself).
- Welding a wet pipe: water turns to steam and leaves air bubbles in the joint. When repairing an old line that still holds water, drain it fully and let it dry, or temporarily plug the pipe upstream with paper or soft bread to soak up the water (it dissolves when flushed) before welding.
- Welding before the machine is hot enough: switching on and starting straight away. Always wait for the indicator light to settle.
Less common but annoying mistakes
Mixing fittings and pipe from two brands with different tolerances can make the interference fit too loose or too tight; heating too long can deform thin fittings (such as a 20 mm coupler), distorting the mouth. With unfamiliar materials, weld a test joint on an offcut and cut it lengthwise to check before doing the real work.
Safety: The welding heads are at about 260°C. Put the machine on a stable stand, unplug it when you leave the work area, and keep children away. When welding at height or in tight spaces, have someone help hold the pipe. Do not let the power cable touch the heads, and never weld while standing in water. For a burn from the welding head: cool it immediately under gently running clean water for about 15–20 minutes; do not apply toothpaste or grease; large or heavily blistered burns need a medical facility.
Solvent-cementing uPVC drain pipe
On site, on the same day you will weld PPR supply lines and glue uPVC drain lines. The two skills share the same basics — cut square, clean, mark — but differ in that uPVC is "welded" by the solvent in the cement, not by heat.
Gluing procedure
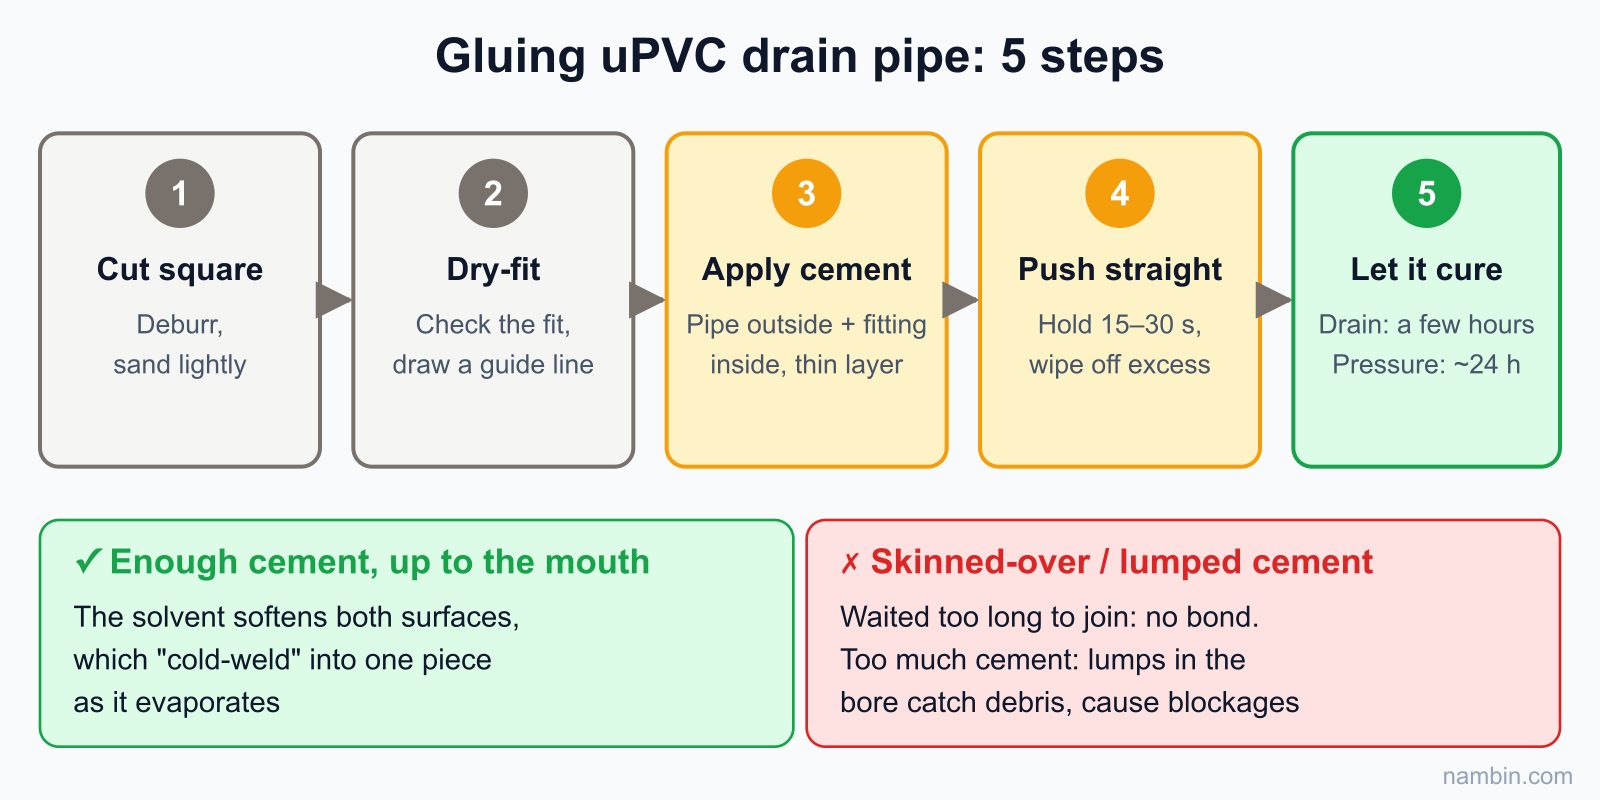
- Cut square, remove burrs, and lightly sand the pipe end and the inside of the fitting.
- Dry-fit to check the fit and direction; draw an alignment line and a depth mark.
- Brush cement evenly on the outside of the pipe end and the inside of the fitting, brushing along the axis in a thin, complete layer.
- Push straight in all the way, hold for about 15–30 seconds, and wipe off excess cement.
- Wait for the cement to cure according to the manufacturer's instructions before running water.
Why sanding and enough cement matter
uPVC cement is not like ordinary glue: the solvent softens the plastic surfaces, and the two surfaces "cold-weld" together as the solvent evaporates. Sanding removes the glossy, oily surface layer so the solvent bites evenly. Too little cement leaves voids; too much cement runs into the bore and forms lumps that catch debris and cause blockages.
Timing and weather
From brushing the cement to joining must be quick, only a few tens of seconds — cement that has skinned over before joining will not bond. In hot, sunny or windy weather the solvent evaporates faster. Unpressurised drain lines can usually be flushed with water after a few hours; pressurised uPVC lines (cold-water supply) need longer, usually about 24 hours before pressure testing — always check the instructions printed on the cement tin.
Chemical warning: uPVC cement contains flammable solvents with toxic fumes. Work in a well-ventilated area, do not smoke or weld PPR right next to an open tin, close the lid after each use, wear gloves and keep it out of your eyes.
Inspecting and signing off joints
Visual inspection
- An even melt bead around every PPR joint, with the pipe in line with the fitting.
- The depth mark right at the fitting mouth: no gap, not pushed past.
- uPVC joints with cement evenly covering up to the mouth, no gaps.
Pressure and water testing
PPR supply lines must be pressure-tested with a pump and gauge before the walls are plastered — the full procedure, test pressures and how to read the results are in the next lesson of the roadmap. For uPVC drain lines, plug the end, pour in water to check it flows freely, and watch every glued joint for seepage.
Frequently asked questions
Does the machine have to be set to exactly 260°C? Can I set it higher to go faster?
You should not. Higher heat burns and degrades the plastic surface while the layer beneath has not yet melted; the joint looks good but does not last. Keep it at about 260°C and adjust the time to the pipe size.
If I joined it slightly off-line, can I pull it apart and weld it again?
No. Once joined, that joint is finished. If it is badly off, cut out the whole fitting with a short length of pipe and redo it. Pulling apart and re-pressing traps a layer of cooled plastic in the middle, which leaks very easily.
A PPR pipe has a small hole from being hit by a drill. Can it be patched?
There are special repair kits for small holes, but the most reliable method for a new plumber is to cut out the damaged section and reconnect it with two couplers or a repair union (only where that spot can stay accessible). Mark the pipe route on the wall before drilling so it does not happen again.
Is welding multilayer PPR with an aluminium core different?
Yes. You must use a special peeling tool to strip the outer plastic and the aluminium layer over the welding depth before heating; otherwise the aluminium stops the two plastic layers merging. Glass-fibre reinforced pipe is welded like ordinary pipe.
Is it a problem to weld PPR in the rain or in high humidity?
Humidity in the air is not a big problem, but standing water on the pipe or inside the fittings, and cold wind, are. Shelter the welding spot, dry the pipe, and increase the heating time slightly when it is windy.
Practice exercises
What to practise
- Weld 10 joints on 20 mm and 25 mm pipe (couplers, elbows, tees) on offcuts.
- Cut 2 joints lengthwise to inspect them: a good joint shows evenly merged plastic with no gaps or air bubbles.
- Record the time you take for each pipe size and compare it with the table.
- Build a practice frame: from one tee, run two branches to two elbows at given distances (for example 400 mm and 600 mm centre-to-centre), calculate the cutting lengths yourself, then weld.
- Glue a 60 mm uPVC drain assembly with a Y-branch, a 45° bend and an inspection pipe; pour water in to test it.
Self-assessment criteria
- At least 9 out of 10 joints have an even bead, are at the mark and are in line.
- The lengthwise cut shows no gaps or bubbles; the internal ridge is small and does not block a significant part of the bore.
- The practice frame is within ±5 mm centre-to-centre.
- The uPVC assembly does not seep, and there are no lumps of cement inside the bore.
- Safe working: the machine is always on its stand, the cable never touches the heads, and you do not get burnt.
Next step in the roadmap (step 3 — Installing water supply lines & pressure testing): once you can make joints to standard, you will put them together into a whole system — running hot and cold supply pipes, fitting the main and branch valves, then pressure-testing with a hand pump and gauge to prove every joint is sealed before the walls are plastered. In parallel, step 4 uses the uPVC gluing skill from this lesson to build drain lines with the correct fall and odour traps.