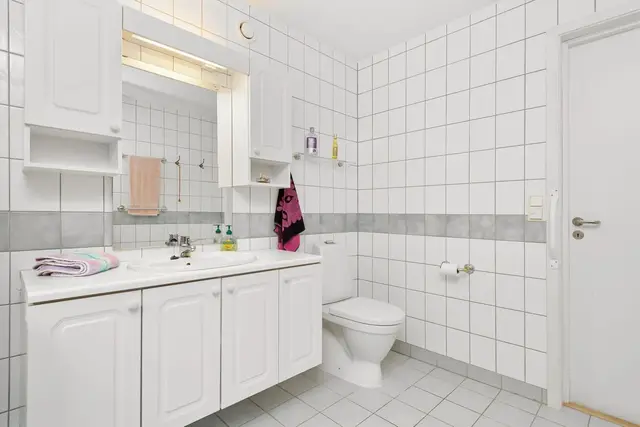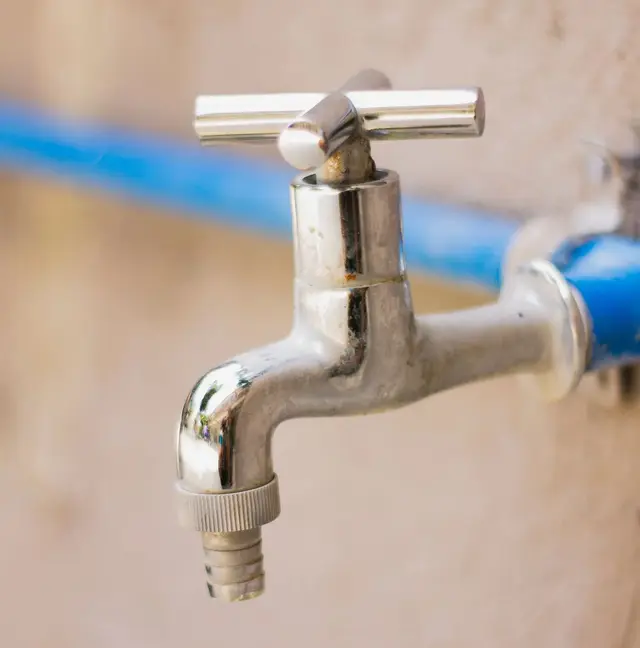
A toilet that wobbles after a month, a washbasin that drips and rots the wooden vanity, a shower mixer fitted crooked so the hand shower will not sit in its holder — customers see these faults every day and remember the plumber who installed them. This lesson shows you how to install the three most common sanitary fixtures at the right height, watertight and solid, and how to coordinate with the tilers and waterproofers so the bases of your fixtures never leak.
This step brings together two things you have already learned: supply stub-outs that have passed a pressure test, and drains laid to the right fall with odour-blocking traps.
By the end of this lesson, you will be able to:
- Compare the catalogue against the actual stub-outs and spot discrepancies before installation day, including a toilet outlet that is off by a few tens of millimetres.
- Install a toilet, washbasin, shower and kitchen tap at the right height, level and without any wobble.
- Adjust the cistern float, run a dye test and apply silicone around the toilet base correctly, so that leaks show up instead of soaking into the floor.
- Carry out a 24-hour leak check and hand over with photos and a shut-off valve plan.
At the end there is a worked installation for an apartment bathroom, a frequently asked questions section and exercises with self-assessment criteria.
Preparation: comparing the catalogue with the stub-outs
Dimensions you must check
The biggest installation mistake is not a lack of skill but failing to check in advance. Before installation day, get the catalogue for the exact model the homeowner bought and check:
- Toilet: the distance from the centre of the outlet to the finished wall (the "rough-in"; it varies by model, commonly from about 250 mm to 400 mm, with many mainstream models around 280–305 mm), whether it is a floor outlet or a wall (horizontal) outlet, and where the supply valve goes.
- Washbasin: rim height, drain hole position, wall-hung or countertop, and whether it needs a pedestal or a bracket.
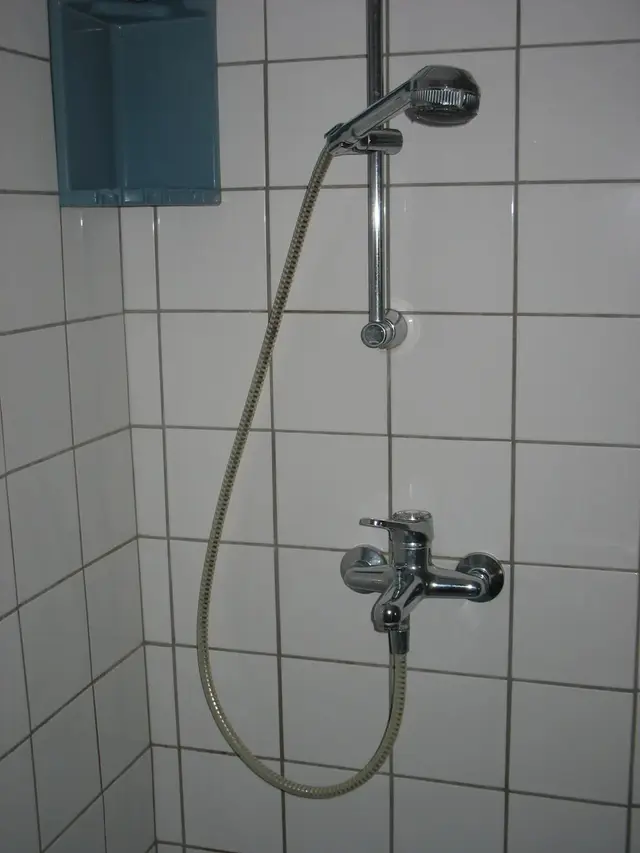
- Shower: the distance between the two mixer inlets (usually 150 mm), the length of the slide rail or shower column, and the depth of a concealed valve if there is one.
If the supply and drain stub-outs from the previous step do not match the catalogue, fix them before tiling. Do not wait until installation day and then resort to extensions and flexible hoses snaking around.
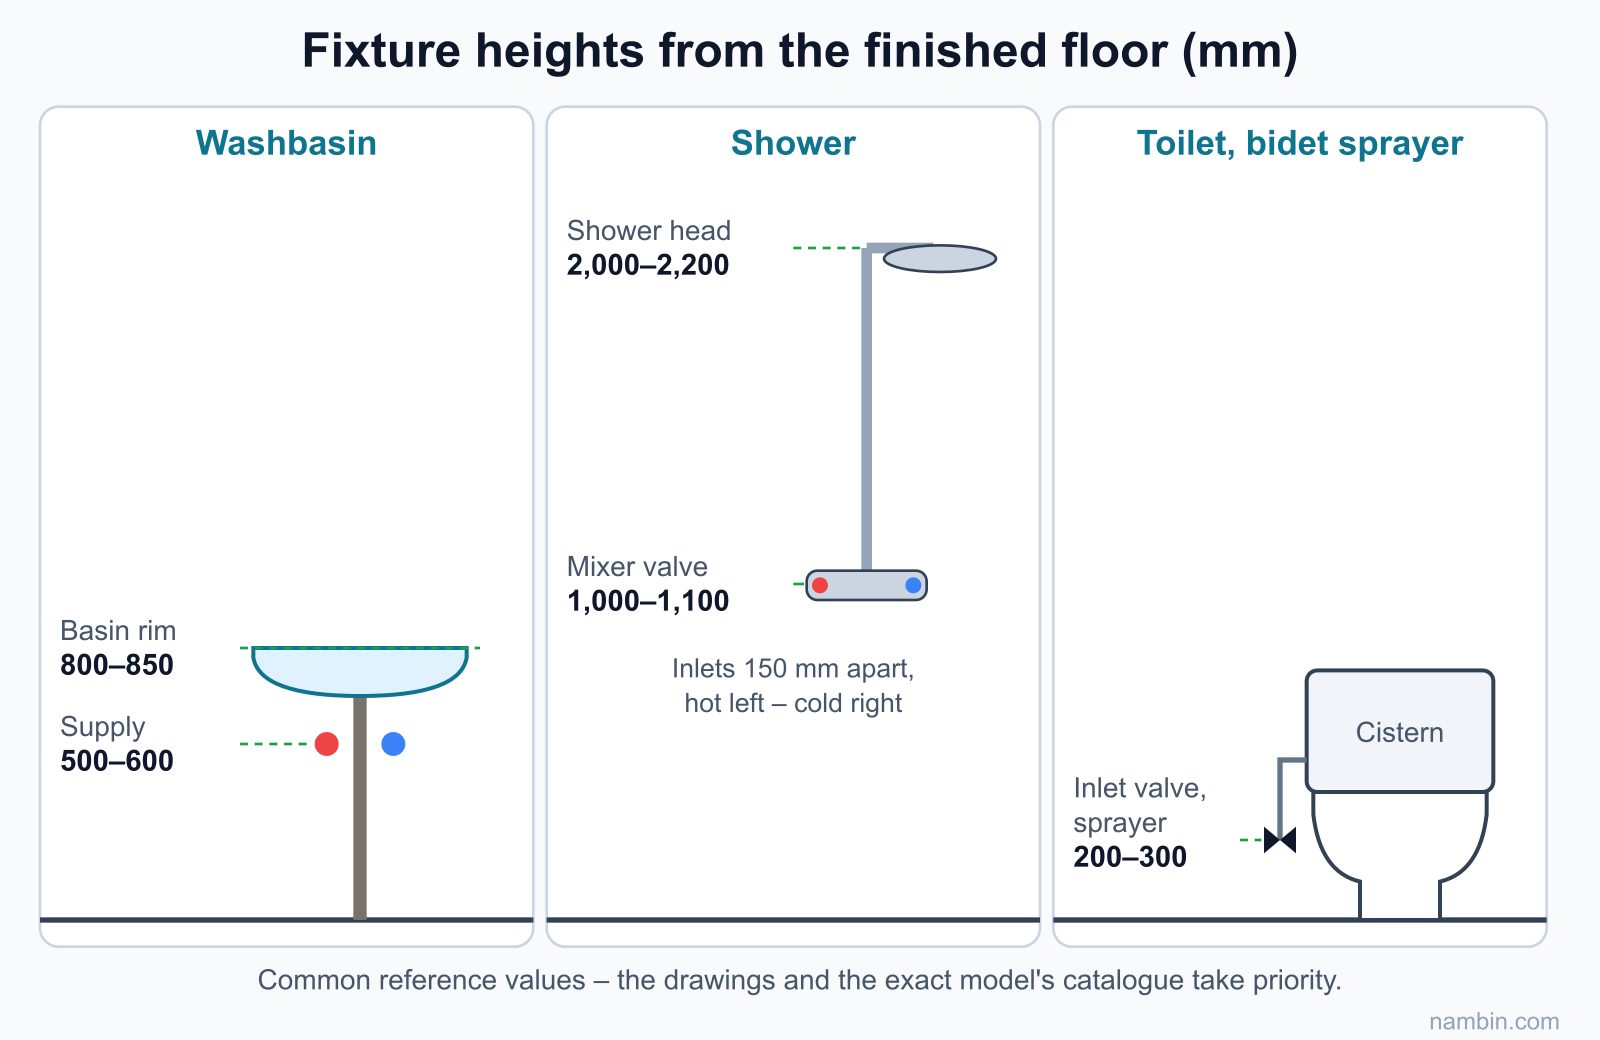
Reference heights
| Fixture | Reference height (from finished floor) | Notes |
|---|---|---|
| Washbasin rim | About 800–850 mm | Can be raised for tall users; follow the catalogue and the homeowner's wishes |
| Washbasin supply stub-outs | About 500–600 mm | Hidden behind the pedestal or vanity |
| Shower valve / mixer | About 1,000–1,100 mm | Easy to reach while standing |
| Fixed shower head | About 2,000–2,200 mm | Depends on the user's height and the ceiling |
| Toilet supply valve, bidet sprayer | About 200–300 mm | On the same side as the cistern inlet valve |
These figures are common reference values; the project drawings and catalogues always take priority (see Figure 1).
Checking the site before installation day
- Floor and wall tiling finished, grout dry: drilling into tiles that have not cured long enough can loosen them.
- Waterproofing flood-tested and signed off by the waterproofing team or the homeowner.
- Drain stub-outs: toilet and washbasin drain pipes capped since tiling, with no mortar or tile fragments inside.
- Re-measure on site: run a tape from the tile surface to the centre of the toilet drain, measure the distance between the shower inlets and the height of the washbasin stub-outs; write them in your notebook to compare with the catalogue.
- Water supply: the supply line is live and the room's branch valve works, so you can test immediately after installation.
Installing the toilet
Steps for a floor-outlet toilet
Materials: toilet outlet seal (rubber or wax ring depending on the toilet type), base fixing kit with wall plugs, flexible supply hose, angle stop valve, anti-mould silicone sealant.
- Check that the drain is clean, with no mortar or rags inside; cut the drain flush with or below the floor surface as the toilet instructions require.
- Dry-fit the toilet without the seal, align it square to the wall and the room axis, and mark the base outline and the screw holes.
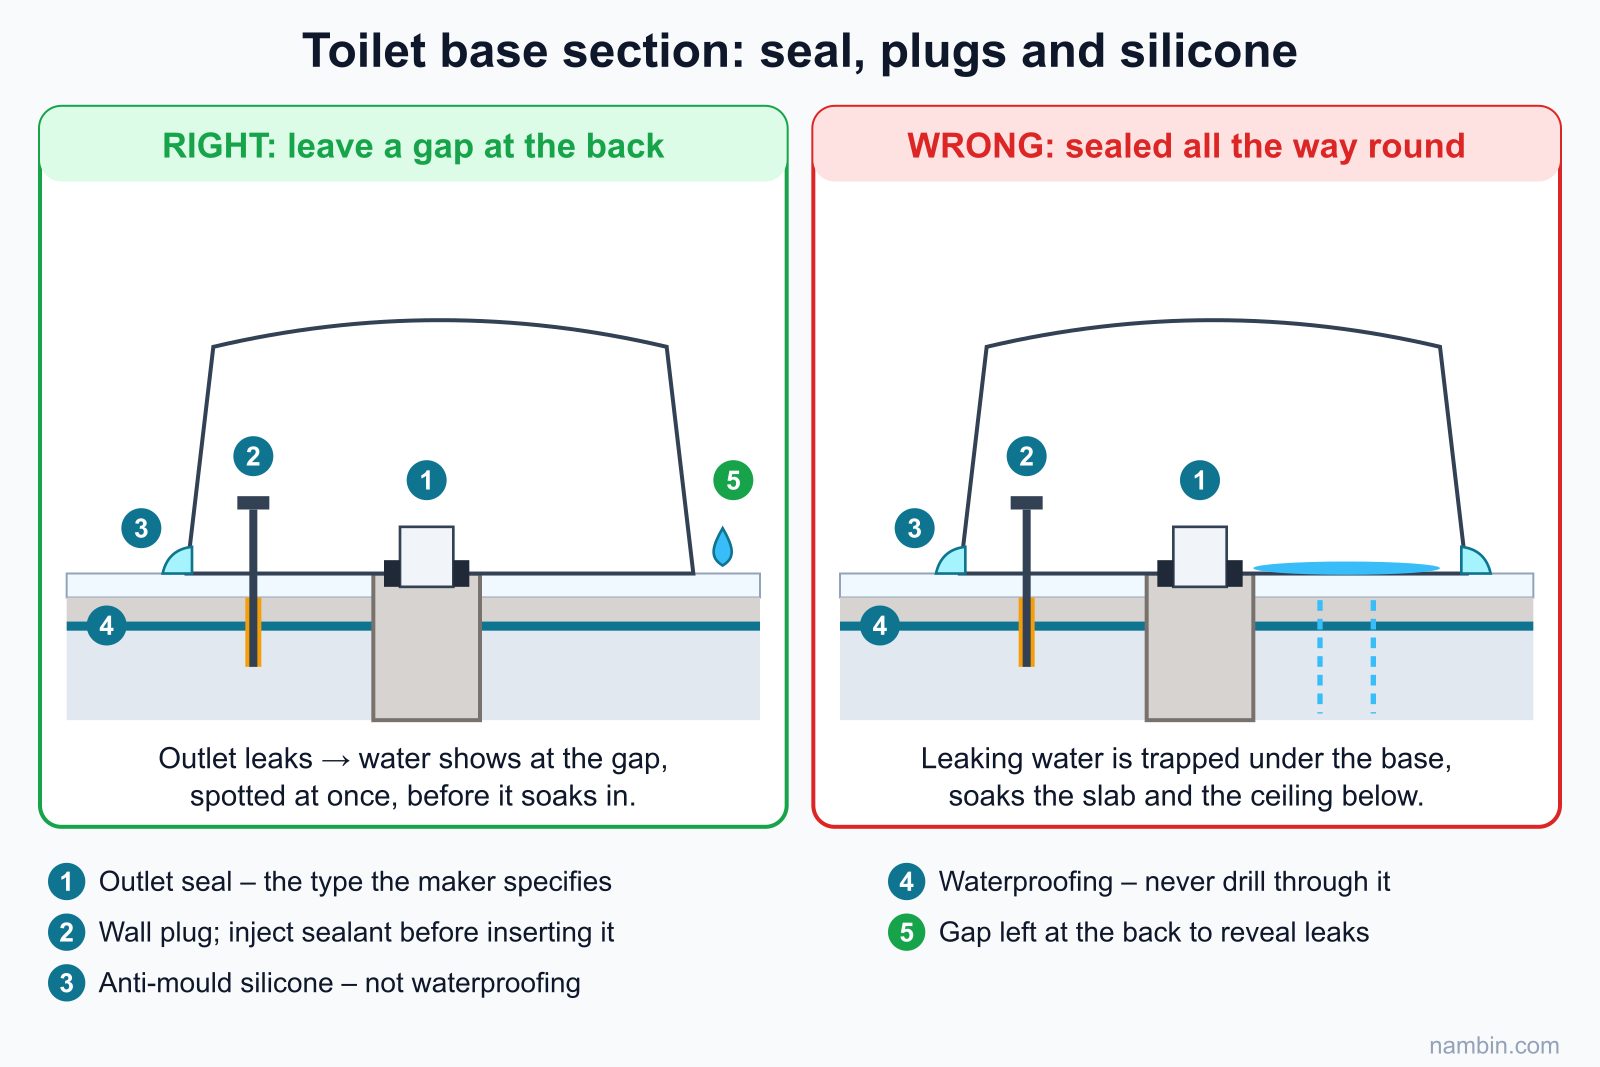
- Drill the plug holes; if the floor has a waterproofing layer, drill carefully and inject sealant into the hole before inserting the plug so water cannot seep down the hole.
- Fit the outlet seal and lower the toilet straight down onto the centre, pressing evenly; do not twist or rock it, which can shift the seal.
- Tighten the base screws just firm, alternating between the two sides. Overtightening can crack the ceramic.
- Fit the cistern, the angle stop valve and the supply hose; turn on the water and adjust the float so the water level is at the mark.
- Run silicone around the toilet base, leaving a small gap at the back so that if the outlet leaks, the water shows straight away instead of quietly soaking into the floor (see Figure 2).
Drilling floor tiles without cracking them or piercing the waterproofing
Use a drill bit made for ceramic or granite tiles and drill without hammer action until you are through the glaze; only then switch to hammer mode if you need to go into concrete. Stick a piece of masking tape over the drilling point so the bit does not wander. Mark the depth on the bit with tape and drill only as deep as the plug plus a few millimetres — drilling too deep can hit a pipe or pierce the waterproofing on a thin slab.
Adjusting the cistern and flush mechanism
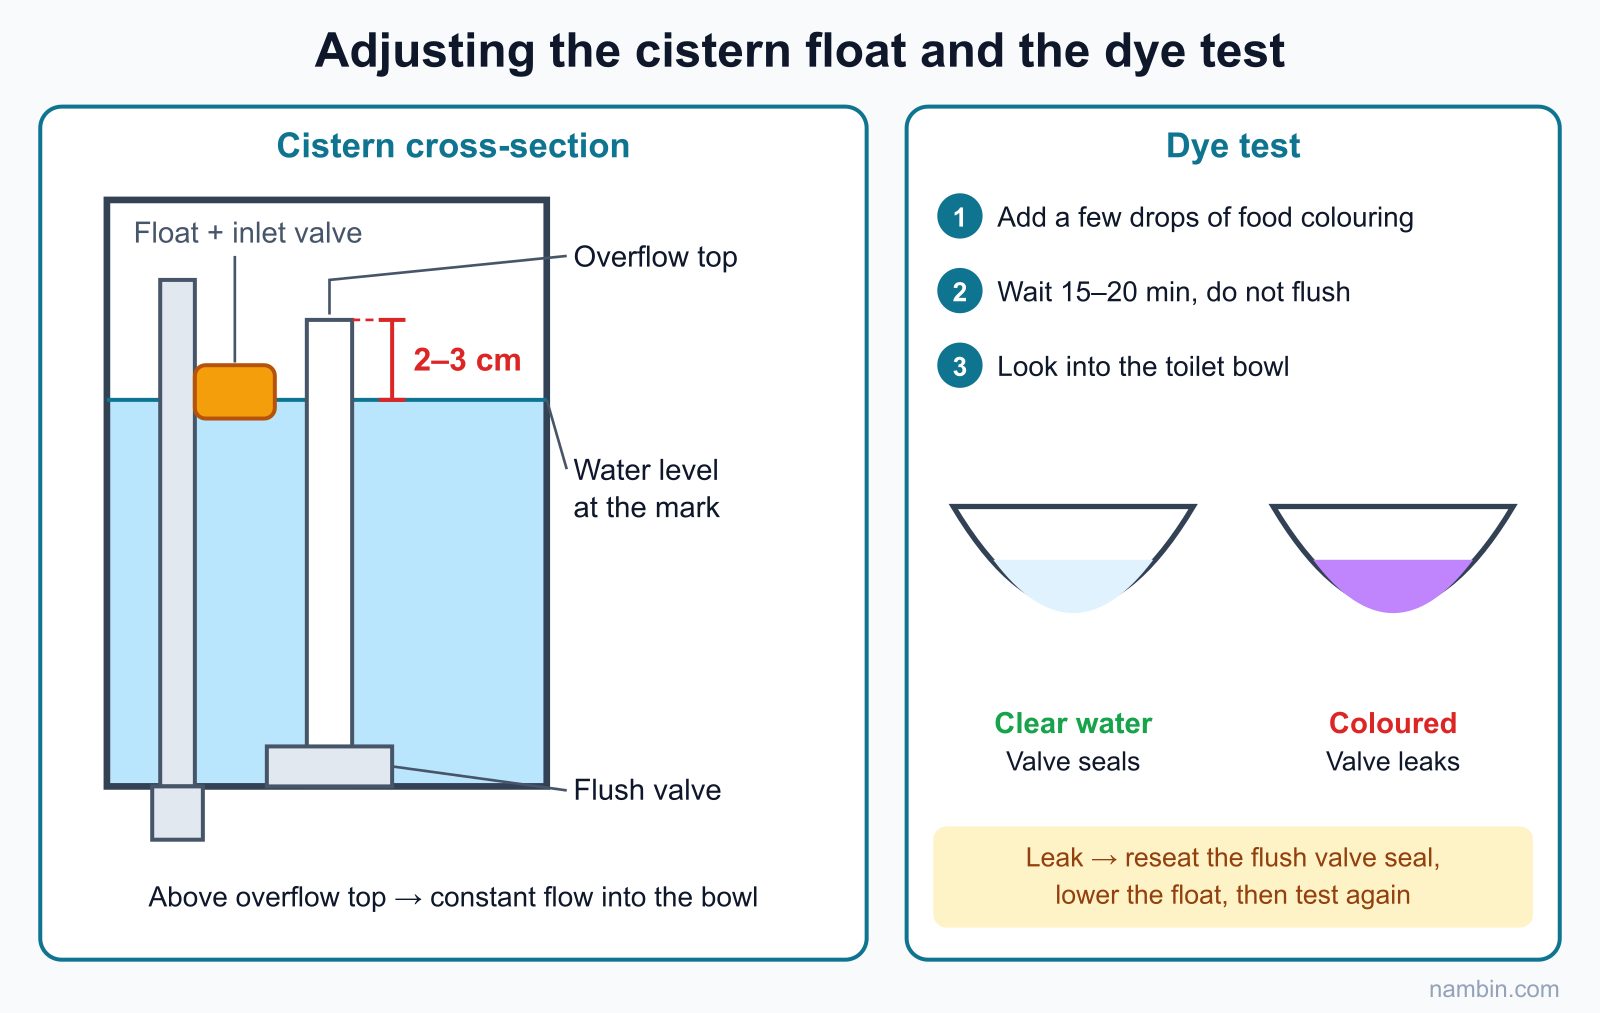
- Water level: adjust the float so the water stops at the mark inside the cistern, about 2–3 cm below the top of the overflow pipe. If the level is too high, water runs continuously down the overflow into the bowl — the customer sees the water bill go up without knowing why.
- Dual-flush button: test both the short and the full flush; the button linkage must not press against the cistern lid and hold the flush valve open.
- Dye test: put a few drops of food colouring in the cistern and wait 15–20 minutes without flushing. If colour appears in the bowl, the flush valve is leaking (see Figure 3).
Installing the washbasin, shower and kitchen tap
Washbasin
- Mark the rim height with a spirit level and mark the holes for the bracket or bolts.
- Drill, insert the plugs and fit the bracket. For a wall-hung basin, fix only into solid or reinforced walls — never into unreinforced plasterboard.
- Fit the tap and the waste onto the basin before hanging it; make sure the washers face the right way.
- Hang the basin, level it, and fit a trap connected to the drain with an odour seal; connect the supply hoses from the angle valves to the tap.
- Run silicone along the joint between the basin and the wall.
For a countertop or undermount basin, the stone top and its brackets carry the load. Cut the hole in the stone using the manufacturer's template, run sealant around the rim and let it cure as instructed before use. The waste pipe from the trap into the wall pipe must have a seal or collar that grips tightly; a gap around the pipe is a path for sewer smells that many plumbers overlook.
Shower
- Wrap PTFE tape around the mixer inlet threads in the direction of tightening — thick enough to seal but not so thick that it cracks the threaded fitting.
- Screw in the two inlet elbows and adjust them so both stick out by the same amount and are at the right spacing for the mixer body.
- Offer up the mixer, check it is level with a spirit level, then tighten the nuts; wrap a cloth around the jaws of the adjustable spanner so you do not scratch the plating.
- Fit the slide rail or shower column, checking that the drilling points do not hit pipes or cables.
- Run cold water first, then hot water slowly, and check that hot and cold are on the correct sides.
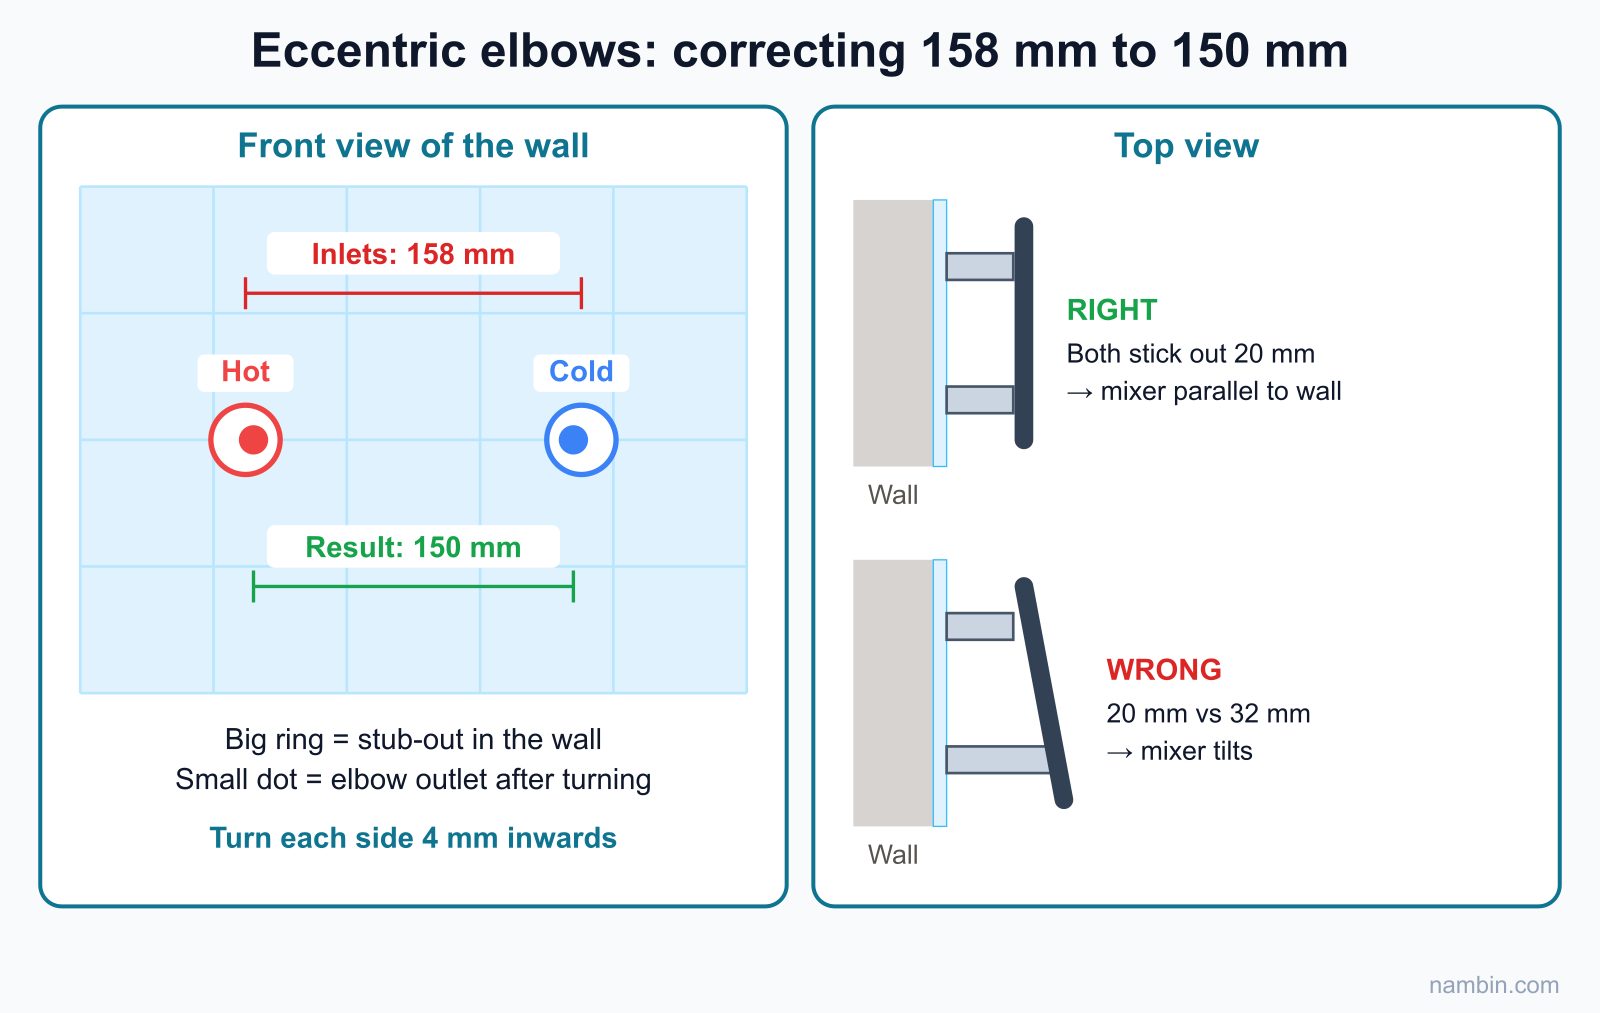
Shower inlet elbows are usually eccentric (offset): turning them moves the outlet sideways by a few millimetres, which compensates when the stub-outs are slightly off the 150 mm spacing. If the stub-outs are further off than the elbows can compensate, do not force it — the stub-outs have to be corrected. Before installing, flush water through the stub-outs for about a minute to push out debris and plastic shavings from pipe welding, so they do not jam the new mixer cartridge.
Kitchen tap
A kitchen tap is usually mounted on the sink or the worktop and fed by two flexible hoses from two angle valves inside the cabinet. Tighten the tap's base nut enough that the tap does not turn when the lever is pushed hard, and check that the hoses are not kinked when the cabinet door closes. The sink waste needs a trap and preferably a strainer basket; if the homeowner plans an under-sink water filter, leave space and a separate branch with its own valve.
Safety: Ceramic toilets are heavy and broken edges are razor sharp — carry them with two people and wear cut-resistant gloves. Before drilling walls or floors, locate pipes and cables from the as-built drawings or with a detector. When testing hot water, open it slowly and keep hot water off your skin; electrical connections for water heaters and smart toilets must be done by an electrician. When drilling in a bathroom, use a drill whose power cord is undamaged, plug it into a socket with residual current protection and keep the cord away from puddles.
Worked example: a 4 m² apartment bathroom
Measuring and spotting discrepancies
An apartment bathroom of about 4 m²; the homeowner has bought a one-piece toilet, a wall-hung washbasin and a shower column set. On-site measurements before installation day:
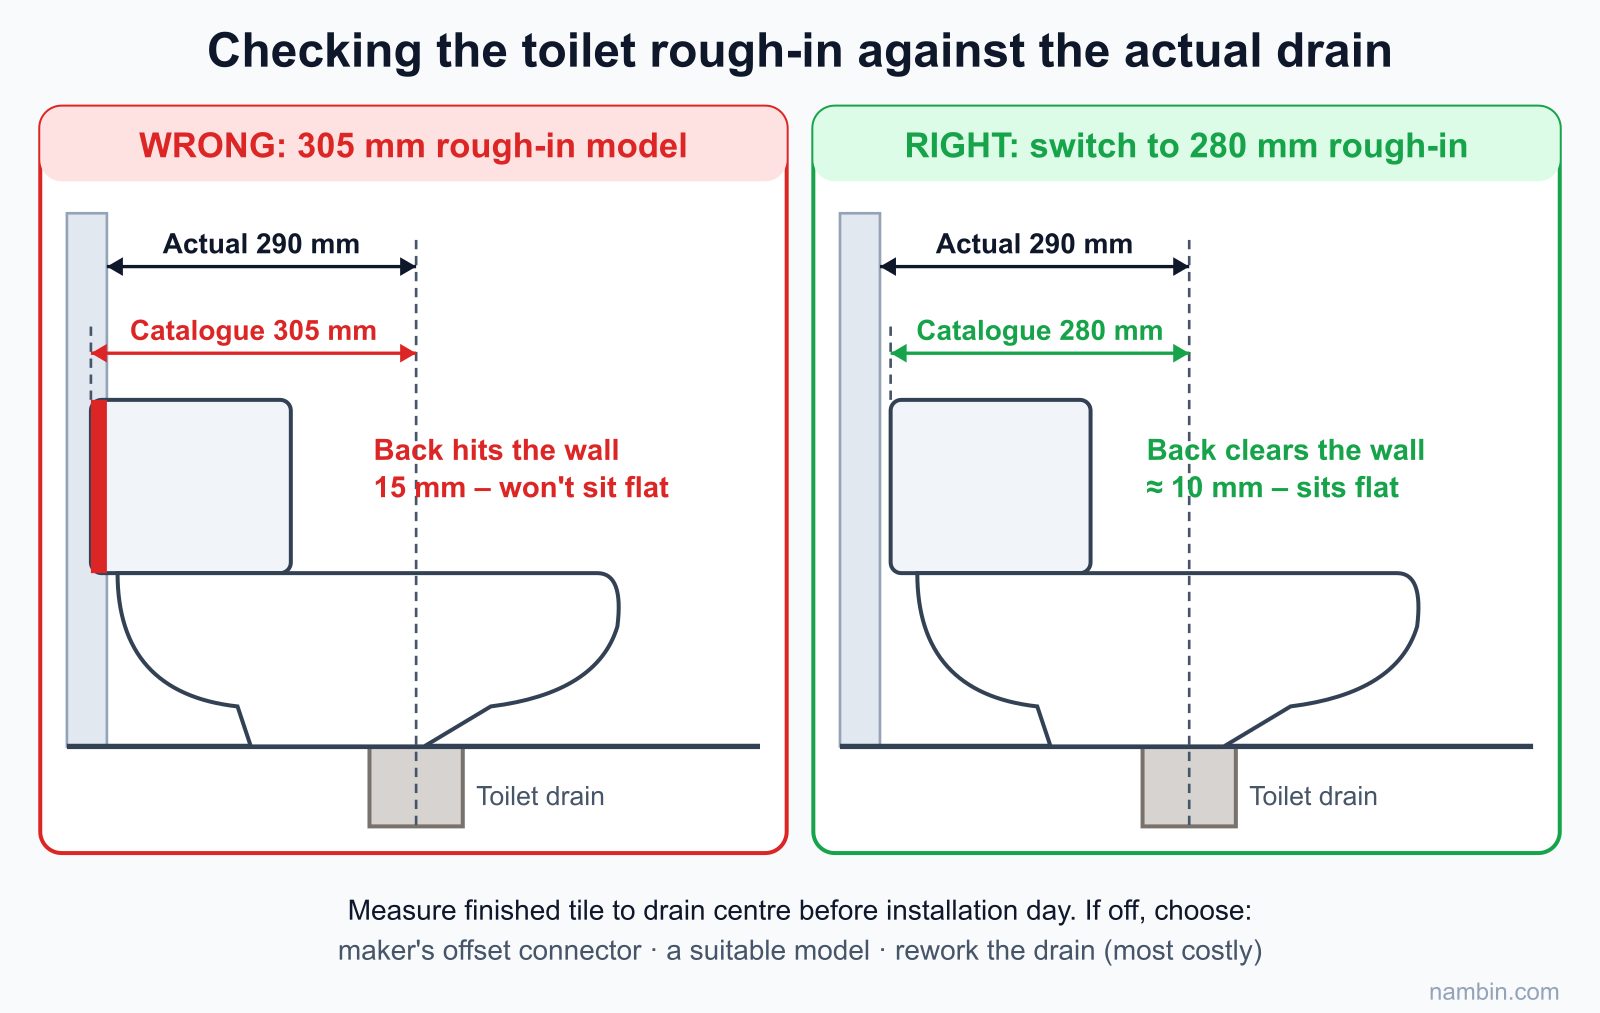
- The toilet drain centre is 290 mm from the wall tile surface; the toilet catalogue requires 305 mm. A 15 mm difference: if you install it anyway, the back of the toilet will press against the wall and it cannot sit flat.
- The two shower stub-outs are 158 mm apart; the catalogue says 150 mm. An 8 mm difference, within what eccentric elbows can compensate.
- The washbasin supply stub-outs are at 550 mm, hidden under the basin — pass.
Resolving the problems
For the toilet, you give the homeowner three options: use a purpose-made offset connector supplied by the manufacturer for that model (if one exists), switch to a model with a suitable rough-in, or break out and rework the drain — the last option is expensive and affects the waterproofing. The homeowner chooses a model with a 280 mm rough-in: on a 290 mm drain, the back of the toilet sits about 10 mm from the wall, exactly the clearance the catalogue allows. Record the decision in the job record (see Figure 4).
For the shower, turn the eccentric elbows so each side compensates 4 mm, check that both outlets stick out 20 mm from the tile surface, and only then fit the mixer (see Figure 5).
The day's sequence and the result
- Morning: flush the stub-outs, install the washbasin and tap (about 1.5 hours), install the shower (about 1 hour).
- Midday: install the toilet (about 1.5 hours), adjust the float, dye-test the cistern.
- Afternoon: apply silicone, test flushing, test hot and cold, place dry paper around the fixture bases; arrange a re-check after 24 hours.
The next day, the paper is dry at every point and the toilet does not wobble when you sit and lean to either side. Hand over with photos, a shut-off valve plan and instructions for the flush button.
Leak testing and waterproofing at fixture bases
Leak testing before handover
Installed does not mean finished. Before handing over:
- Flush the toilet 10–15 times in a row, watching the base and the cistern; check that the float does not let water overflow into the bowl.
- Fill the washbasin, let it drain for a while, and check the trap and joints with dry paper — paper detects damp faster than your eyes.
- Run the shower on both hot and cold for a few minutes and check the inlet elbows and the mixer base.
- Arrange a re-check after 24 hours where possible: wipe everything dry, place paper around the fixture bases and look again.
Your responsibility for the waterproofing layer
Floor waterproofing and the collars around pipes passing through the slab are usually done by the waterproofing team before tiling, followed by a flood test. Your job is not to drill through the waterproofing carelessly, and to tell the homeowner immediately if you find it damaged.
Silicone at the base of a fixture is not waterproofing; it only stops mopping water from running into the gap. Use anti-mould silicone for wet areas, clean off dust and let the tile surface dry before applying, tool it into a smooth even curve, and keep water off it for the curing time printed on the tube.
Common mistakes
- Toilet off-centre over the drain: the seal does not seal, dirty water leaks and it smells. Measure carefully before drilling.
- Silicone all the way round the toilet base: an internal leak goes unnoticed until the ceiling below gets damp.
- Overtightening: cracked ceramic, stripped plastic threads, torn seals.
- Forgetting the angle stop valve: when the tap fails, the whole house has to be shut off.
- Washbasin without an odour trap: sewer smells come up and the customer calls you back.
- Toilet with water constantly running into the bowl: symptom — a trickling sound and the cistern refilling non-stop. Cause — float set too high or the flush valve seal out of place. Fix — lower the water level, reseat the seal and do a dye test.
- Mixer tilted, hand shower does not sit in its holder: cause — the two inlet elbows stick out by different amounts. Fix — remove the mixer, turn the elbows until they are even, check with a spirit level before tightening.
Frequently asked questions
Which is better for the toilet outlet: a rubber seal or a wax ring?
Each suits a particular type of toilet and drain; use the type the toilet manufacturer specifies. A wax ring cannot be reused once the toilet has been lifted — every time you lift the toilet, fit a new seal.
Should I bed the toilet base in cement instead of using screws?
No. Cement makes it hard to remove the toilet for unblocking or replacing the seal, and shrinkage can crack the ceramic. Wall plugs and screws plus silicone are solid enough if the toilet is centred correctly and the floor is flat.
The floor is uneven and the toilet rocks. What should I do?
Put purpose-made plastic shims under the base at the gap, then tighten the screws and apply silicone. Never shim with wood or paper, which will rot in the damp.
How long after applying silicone can the fixtures be used?
Follow the curing time on the tube — usually a few hours for the surface and longer for a full cure. Tell the homeowner not to wet-mop around the fixture bases during that time.
After installing the shower, the hot water is weaker than the cold. Why?
The filter mesh in the inlet elbow or the mixer cartridge may be clogged with plastic shavings, the hot branch valve may not be fully open, or the pressure from the water heater may be low. Check the filter mesh first; pressure and water heaters are covered in detail in the next step.
Checklist and exercises
Handover checklist
- The catalogue was checked against the stub-outs before installation day.
- Fixtures are at the right height, level and do not wobble.
- Every supply point has an angle stop valve; hot on the left, cold on the right.
- Flushing and hot/cold have been tested, with no leaks at the re-check.
- Handover photos taken; the homeowner has been shown where the shut-off valves are.
Practical exercises
- On a training frame, install a washbasin and a shower set onto the stub-outs you made in the pressure test lesson; record the height measurements, the installation time and the water test results.
- Set and remove a toilet on a practice floor, and do a dye test on the cistern.
Self-assessment criteria (pass / not yet)
- The washbasin rim is within 5 mm of the marked height, and level in both directions.
- The shower mixer is level, both inlet elbows stick out equally, and there is no drip at the elbows after 10 minutes of hot and cold water.
- The toilet does not wobble, and the dye test shows no colour in the bowl after 20 minutes.
- Dry paper around every joint is still dry after 24 hours; the measurement record is complete.
Next step in the roadmap
Sanitary fixtures only work well with a stable water supply. The next step is water pumps, water tanks and water heaters: choosing a booster pump, fitting the float switch on the rooftop tank and connecting a water heater with a safety valve — exactly what decides whether the shower you have just installed has enough pressure and safe hot water. After that the roadmap moves on to repairing leaks, clearing blockages and finally a technical assessment with a quotation for a sample bathroom; the measurement record from today's exercise will be reused there.