Knowing how to weld pipe and fit a toilet is not enough to take on paid work: clients need a plumber who gets it right the first time, quotes clearly and stands behind the job after handover. This lesson is the last stage of the residential plumbing roadmap — a three-part assessment that lets you judge whether you are ready for real jobs.
By the end of this lesson, you will be able to:
- Check your knowledge of materials, drain falls, pressure and fixtures with 10 questions and explained answers.
- Sit a timed practical exam fitting a hot and cold basin set with a pressure test, and score yourself on a 100-point rubric.
- Survey a bathroom and prepare a supply and drainage quotation, using a sample table and 2026 reference prices.
- Run the full job cycle — intake, installation, inspection, warranty — and talk to clients clearly without causing friction.
Structure of the assessment and how passing works
Three parts, three different abilities
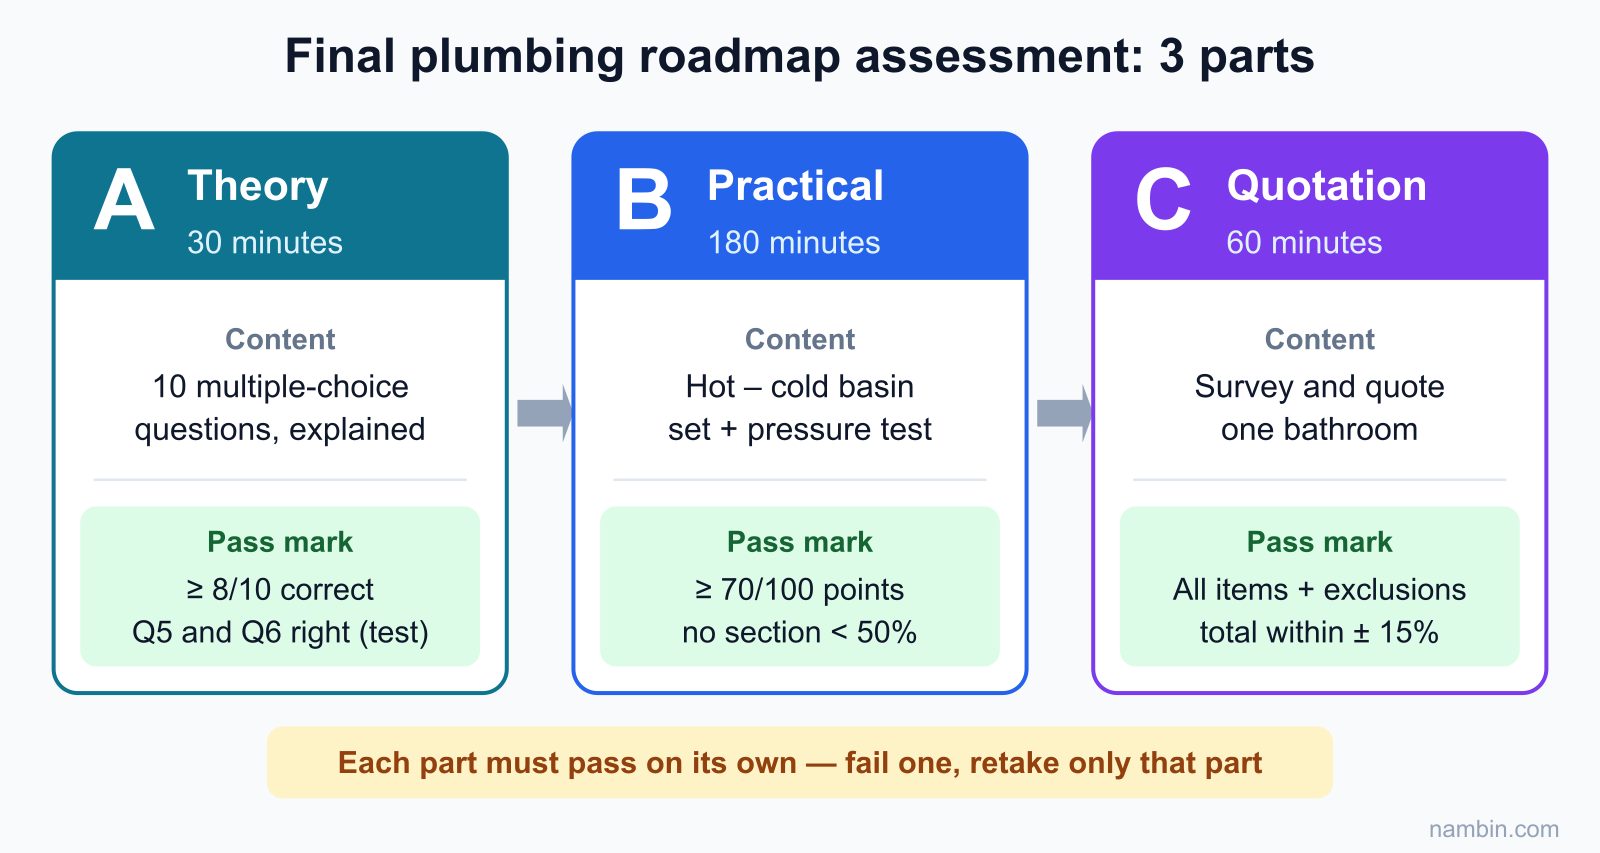
Clients trust a plumber for three things: understanding why the work is done a certain way, producing work that does not leak, and stating the price and the risks up front. The assessment is therefore split into three parts, each with its own pass mark.
| Part | Content | Time | Pass mark |
|---|---|---|---|
| A. Theory | 10 multiple-choice questions with explanations | 30 minutes | ≥ 8/10 correct, including questions 5 and 6 (pressure testing) |
| B. Practical | Fit a hot and cold basin set + pressure test | 180 minutes | ≥ 70/100 points, no section below 50%, no disqualifying fault |
| C. Quotation | Survey and quote for one bathroom | 60 minutes | All items present, exclusions stated, total within ± 15% of the model answer |
Why each part must pass on its own
If scores could be added together, strong theory could "carry" a leaking weld — but on site, the leak sits behind the tiles and the client does not care about your quiz score. So each part must pass by itself; if you fail one part, you retake only that part.
Part A: 10 technical self-check questions
Answer them all before looking at the answers, and read the explanations too, because examiners often follow up with "why?".
Materials and pipe welding
Question 1. Which PPR pipe should be used for the hot line from a storage water heater? A) PN10, because it is cheaper; B) PN20 or higher; C) Any type, because houses only have low pressure.
Answer B. PPR (polypropylene random copolymer) plastic softens when hot; at 60–70 °C and the same pressure, the pipe is under much more stress than with cold water. Thick-walled PN20 pipe (rated 20 bar at 20 °C) stays strong for the long term, and you must also clip it more closely and leave room for expansion.
Question 2. Which three factors decide whether a PPR socket weld is strong? A) Temperature, time, depth; B) Strong pressing force, fast welding, PTFE tape; C) The hotter the better.
Answer A. The heater head runs at about 260 °C; heat and join for the correct time for the pipe size, and push the pipe in to the depth mark. Too much heat burns the surface before the inner layer melts; pushing too deep creates a bead that narrows the bore.
Drainage and odour control
Question 3. A drain pipe is 3 m long with a 2% fall. How much lower is the far end than the near end? A) 2 cm; B) 6 cm; C) 20 cm.
Answer B. A 2% fall means 2 cm drop per metre, so 3 × 2 = 6 cm. Rest a 1 m spirit level with one end raised 2 cm; if the bubble is centred, the fall is correct.
Question 4. The basin already has a P-trap. Should you fit a second trap in the wall pipe? A) Yes, more traps mean less smell; B) No, two traps in series slow drainage and can siphon the trap water dry; C) Only with Ø110 pipe.
Answer B. One trap per fixture, with a water seal of about 50 mm or more; two traps in series create an air lock, drain slowly and gurgle.
Pressure and pressure testing
Question 5. A house has a booster pump set to cut out at 3 bar. What is a reasonable test pressure for the PPR supply lines? A) 3 bar; B) 4.5 bar; C) 6 bar.
Answer C. Test pressure is about 1.5 times working pressure: 1.5 × 3 = 4.5 bar, but common practice is never below 6 bar, so choose 6 bar. Check that the pipes, valves and gauge are all rated for that level.
Question 6. In the first 30 minutes of a test, the gauge drops from 6.0 to 5.7 bar and no water is visible. What do you do? A) Conclude there is a leak and break open the wall; B) Pump back up to 6 bar, treat this as the settling phase and only then start timing the check; C) Pass it, since the drop is under 0.5 bar.
Answer B. Plastic pipe swells and creeps slightly when first pressurised, so an early drop is normal. Only judge after the settling phase: a drop that slows down is good; a steady drop over time means a leak.
Question 7. The water surface in a roof tank is 15 m above the ground floor. A tap on the fourth floor is at 10.9 m. The pressure at the tap is about: A) 0.4 bar; B) 1.1 bar; C) 1.5 bar.
Answer A. The height difference is 15 − 10.9 ≈ 4 m, and every 10 m of water column ≈ 1 bar, so about 0.4 bar — weak, which is why upper floors often need a booster pump.
Sanitary fixtures and hot water
Question 8. The correct way to apply silicone around a toilet base is: A) Seal the full ring to be sure; B) Leave a small gap at the back; C) Skip silicone and use cement mortar instead.
Answer B. If the toilet outlet leaks, water shows at the back gap so you spot it early. A full ring traps the leak, which soaks into the floor and stains the ceiling below.
Question 9. A toilet cistern keeps trickling into the bowl. What do you check first? A) The water level relative to the overflow pipe; B) The house's overall pressure; C) Replace the toilet.
Answer A. The water level must sit about 2–3 cm below the top of the overflow. If the level is right, drip food colouring into the cistern and wait 15–20 minutes: colour in the bowl means the flush valve leaks.
Question 10. After installing a storage water heater, the correct order is: A) Switch on the power, then open the water; B) Fill with water, open the hot tap until air stops spitting out, check for leaks, then switch on; C) Power and water at the same time.
Answer B. If you switch on before the tank is full, the element burns out dry within minutes. The electrical connection and the RCD (residual current device, anti-shock breaker) are the electrician's job.
Self-scoring Part A
You pass with at least 8/10 correct, and questions 5 and 6 must both be right — one mistake in pressure testing can cost a whole tiled wall. For any wrong answer, re-read the principles in the matching lesson; do not just memorise the answers.
Part B: Practical exam — basin set and pressure test
The brief
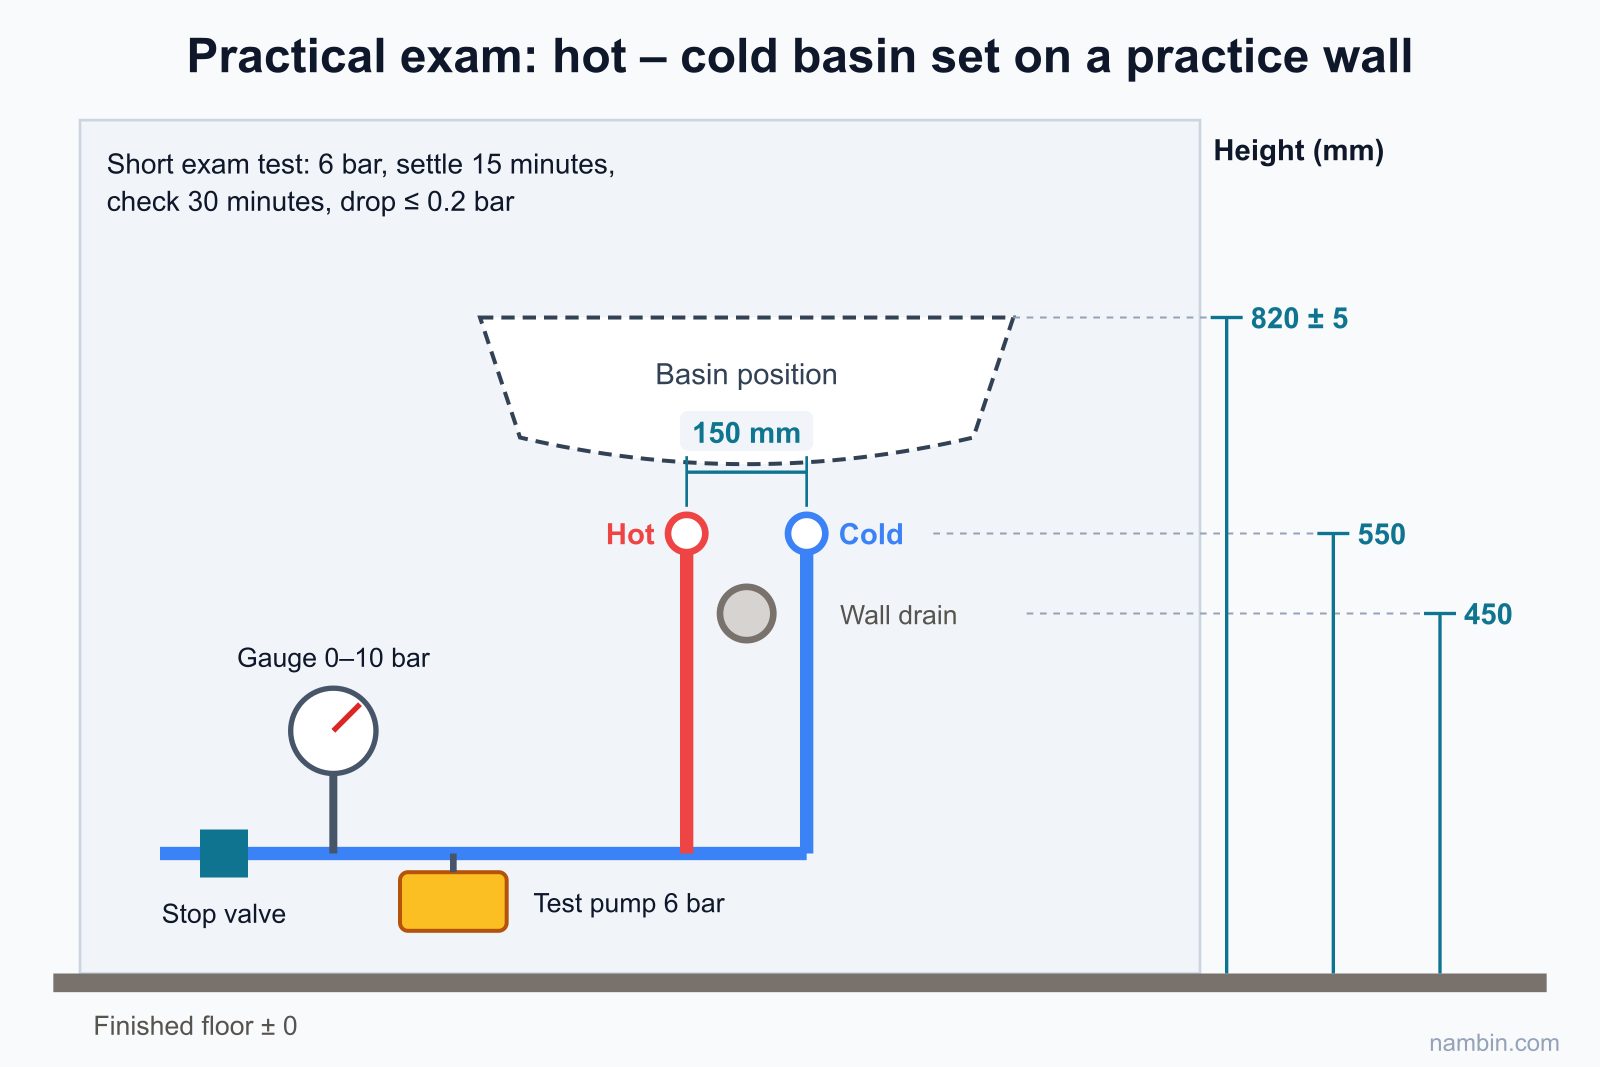
On a practice wall (a timber frame or a training brick wall), starting from a D20 supply point with a stop valve, run two D20 PPR branches, hot and cold, to two stub-outs for the basin; mount a wall-hung basin, a hot and cold mixer tap, a bottle or P-trap and angle valves; then pressure test and write up a test record. Required dimensions:
- Basin rim 820 mm ± 5 mm above the floor, level in both directions.
- The two supply stub-outs at 550 mm high, 150 mm apart; hot on the left, cold on the right (as seen by the user).
- Wall drain centre at 450 mm high, midway between the two stub-outs.
- Shortened exam pressure test: 6 bar, 15 minutes settling, 30 minutes check, drop no more than 0.2 bar and no damp marks.
The shortened figures are only to fit the exam time; on a real job you still settle for about 30 minutes and check for 1–2 hours.
Suggested sequence in 180 minutes
- 0–15 minutes: read the brief, check materials, mark out heights.
- 15–90 minutes: cut, weld, fix clips and set the stub-outs in position.
- 90–120 minutes: let the welds cool, fit the gauge and pump at the low point, fill with water, bleed air at the high point.
- 120–165 minutes: pressure test; while waiting, fit the tap and waste to the basin.
- 165–180 minutes: hang the basin, connect angle valves and trap, run water, clean up, fill in the test record.
Scoring rubric
| Section | Max points | Criteria |
|---|---|---|
| 1. Preparation and safety | 10 | Tools checked, welder on its stand, protective gear, tidy work area |
| 2. Measuring, marking out | 15 | Stub-out height ± 5 mm, spacing 150 mm ± 3 mm, stub-outs projecting evenly from the finished surface |
| 3. Cutting and PPR welding | 20 | Square cuts, full depth, even bead, no misalignment, clips at the correct spacing |
| 4. Basin and fittings | 20 | Rim 820 mm ± 5 mm, level, no wobble; all angle valves fitted; trap sealed; hot left, cold right |
| 5. Pressure test | 20 | All air bled, exactly 6 bar, log every 5 minutes, drop ≤ 0.2 bar over the 30-minute check |
| 6. Test record, clean-up, time | 15 | Complete record, clean area, finished within 180 minutes |
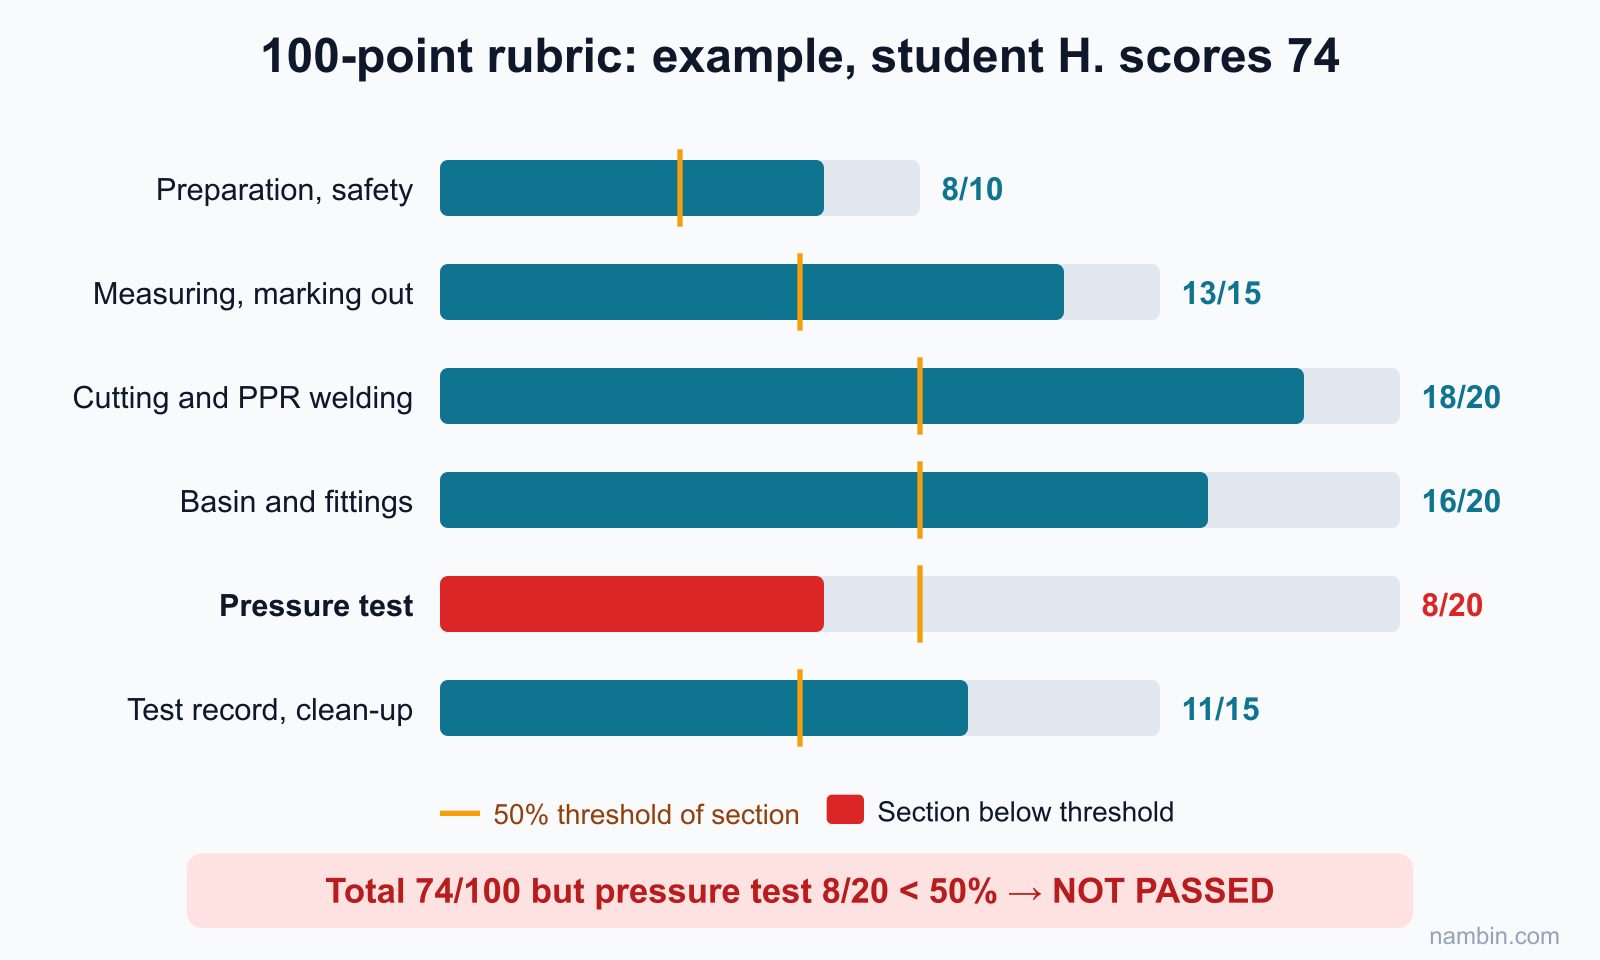
Pass when the total is ≥ 70/100 and no section scores below 50% of its points. Disqualifying faults (fail regardless of score): a visible leak during the test, missing angle valves, hot and cold swapped, or leaving the hot welder on the floor or next to a puddle.
Example: scoring one exam
Student H. produces neat pipework on time. Section scores: preparation 8/10, measuring 13/15, welding 18/20, basin fitting 16/20, pressure test 8/20, record 11/15 — a total of 74/100. But in the pressure test, H. did not bleed air at the high point, the pressure dropped 0.4 bar over the 30-minute check and the log had only two entries. The pressure test section scored 8/20, below 50%, so the result is not passed. On a retest after bleeding the air properly, the pressure dropped only 0.1 bar — the fault was in the test procedure, not the welds.
Part C: Surveying and quoting a plumbing job
The site survey
Wrong quotes usually start with a rushed survey. Bring a tape measure, a torch, your phone and a notebook, and work in this order:
- Ask about needs: new build or repair, who buys the fixtures, electric storage heater or solar water heater, expected budget, desired finish date.
- Measure what is there: room size, position of the soil stack and main supply pipe, floor level and how much the floor is recessed, distance to the stack.
- Check the supply: pressure on that floor (open a tap or fit a gauge), whether there is a booster pump, where the main valve is.
- Photograph every corner and mark difficult spots (beams, columns, places that cannot be chased); ask whether the ceiling below has ever had damp stains.
Reference unit prices for 2026
The prices below are reference ranges for 2026 in large Vietnamese cities, excluding VAT, in Vietnamese dong (VND; 1,000,000 VND is roughly 40 US dollars). Real prices vary with region, material brand, difficulty and timing.
| Item | Unit | Reference price range 2026 (VND) |
|---|---|---|
| PPR pipe D20 PN10 (cold water) | m | 25,000 – 40,000 |
| PPR pipe D20 PN20 (hot water) | m | 40,000 – 60,000 |
| uPVC D60 drain pipe | m | 35,000 – 55,000 |
| uPVC D110 toilet drain pipe | m | 80,000 – 120,000 |
| Angle valve + flexible hose | set | 130,000 – 250,000 |
| Labour: hot and cold supply pipes for one bathroom | room | 2,000,000 – 3,500,000 |
| Fitting a toilet | set | 300,000 – 500,000 |
| Fitting a basin + tap + trap | set | 250,000 – 450,000 |
| Fitting a shower set | set | 200,000 – 400,000 |
| Pressure test with written record | test | 200,000 – 400,000 |
Sample quote: 4 m² bathroom on the third floor of a tube house
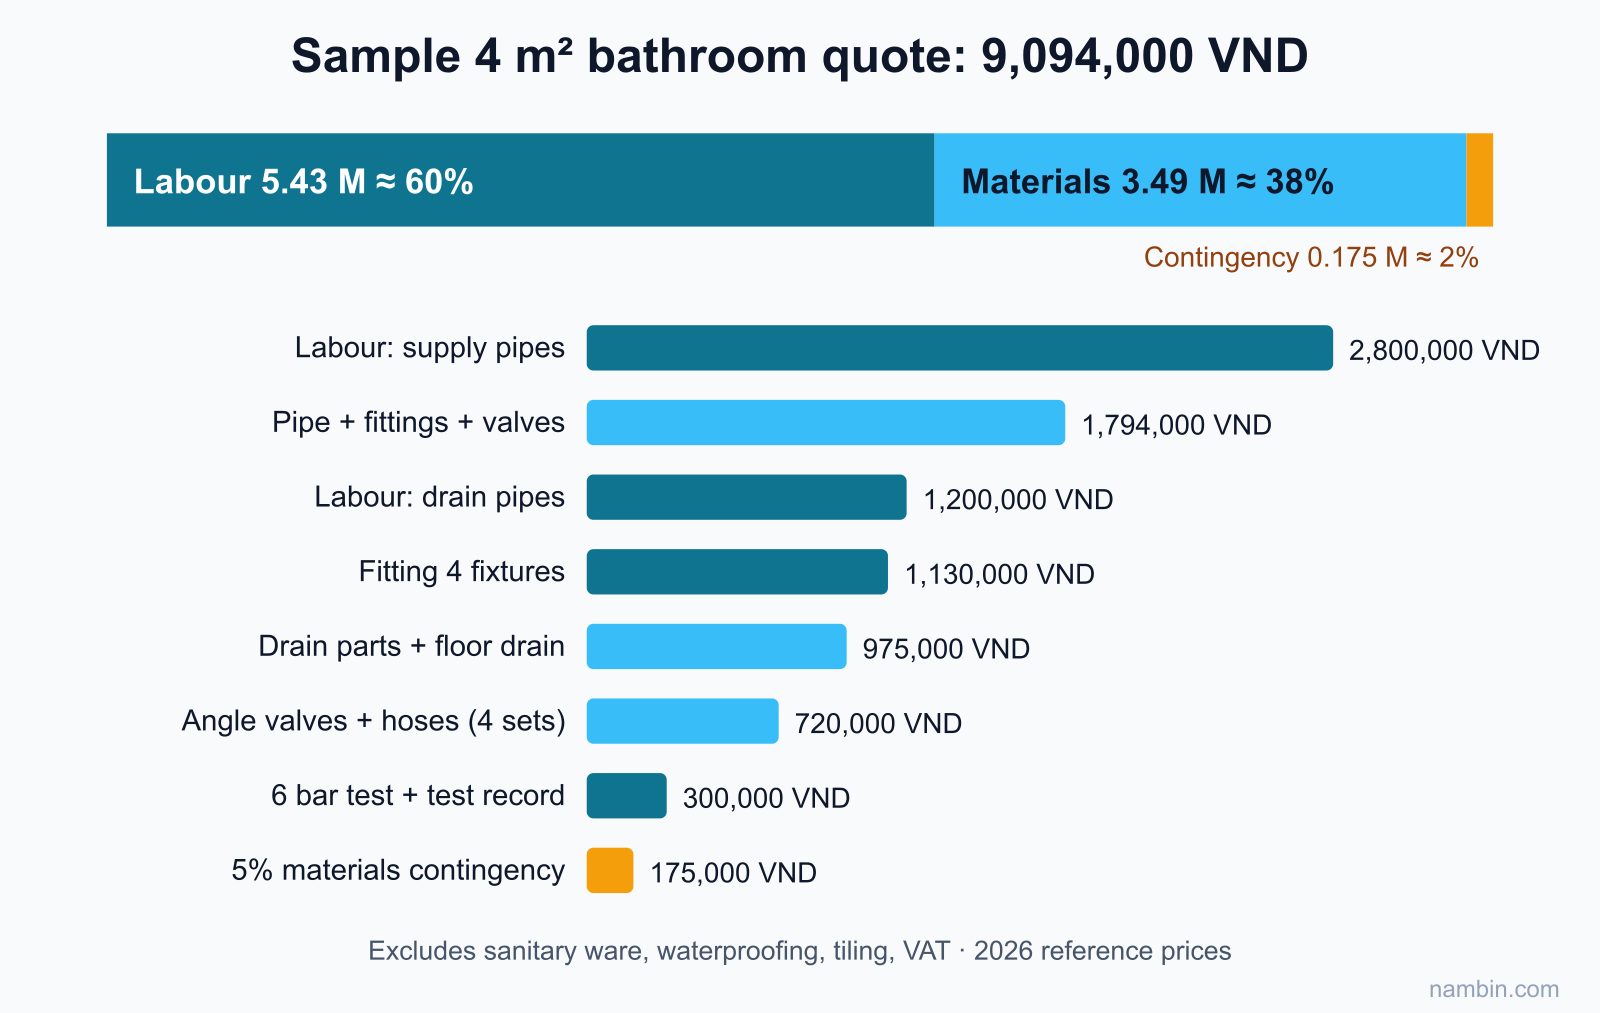
The client wants completely new supply and drainage for a bathroom with a basin, shower, toilet, bidet spray and one floor drain. A "tube house" is the narrow, deep townhouse typical of Vietnamese cities. The client buys the sanitary ware; waterproofing and tiling are done by another team.
| No. | Item | Quantity | Unit price (VND) | Amount (VND) |
|---|---|---|---|---|
| 1 | PPR pipe D20 PN10, cold | 12 m | 32,000 | 384,000 |
| 2 | PPR pipe D20 PN20, hot | 8 m | 50,000 | 400,000 |
| 3 | PPR fittings (elbows, tees, threaded adaptors, unions) | 1 lot | 650,000 | 650,000 |
| 4 | PPR D20 branch stop valve | 2 pcs | 180,000 | 360,000 |
| 5 | uPVC D60 + D110 pipe, fittings, solvent cement | 1 lot | 725,000 | 725,000 |
| 6 | Anti-odour floor drain | 1 pc | 250,000 | 250,000 |
| 7 | Angle valve + flexible hose | 4 sets | 180,000 | 720,000 |
| Materials subtotal | 3,489,000 | |||
| 8 | Labour: chasing, hot and cold supply pipes | 1 room | 2,800,000 | 2,800,000 |
| 9 | Labour: drain pipes, connection to the stack | 1 room | 1,200,000 | 1,200,000 |
| 10 | 6 bar pressure test, written record | 1 test | 300,000 | 300,000 |
| 11 | Fitting toilet, basin, shower, bidet spray | 1 room | 1,130,000 | 1,130,000 |
| Labour subtotal | 5,430,000 | |||
| 12 | 5% materials wastage contingency | 175,000 | ||
| Grand total (excl. VAT) | 9,094,000 |
Line 11 is made up of toilet 400,000, basin and tap 350,000, shower 300,000 and bidet spray 80,000. Write clearly under the table: excludes sanitary ware, waterproofing, tiling, and repairs to the ceiling below if old leaks are found; quote valid for 15 days.
Self-scoring Part C
You pass when your quote includes materials, labour, pressure test, contingency, exclusions and a validity period, and the total is within ± 15% of the model answer. Large differences usually come from forgetting fittings, angle valves or the floor drain.
Job intake, inspection and warranty process
From quote to signed job
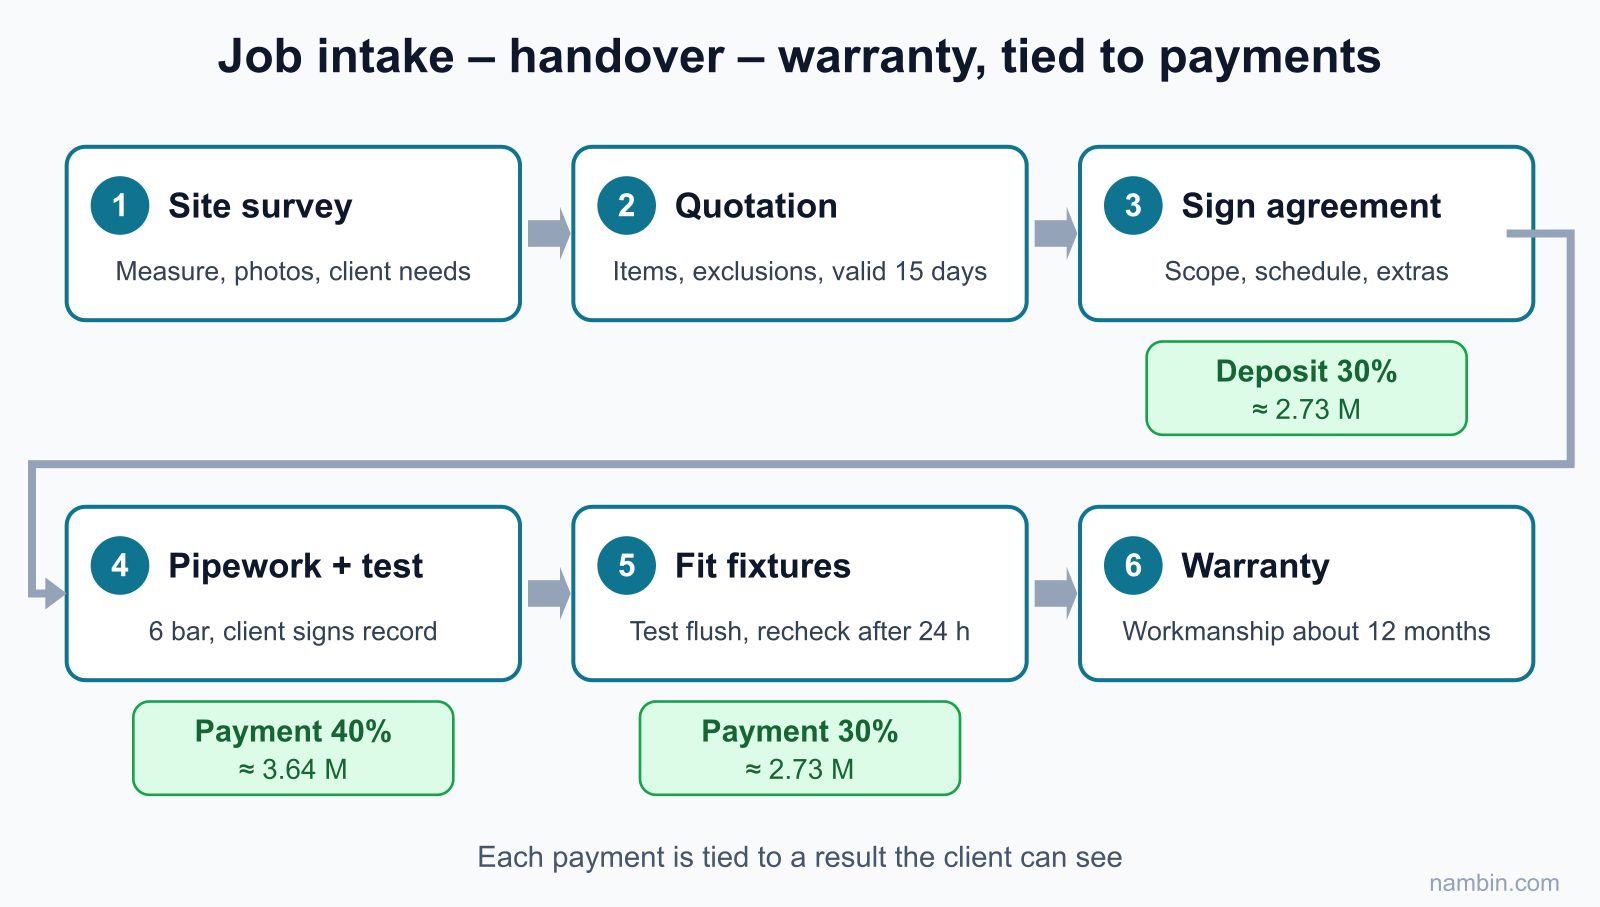
When the client agrees, write a short agreement (signed paper or a confirming text message) covering scope, work dates, payment milestones, how extras are handled and warranty. For the sample quote:
- 30% deposit (about 2.73 million VND) on signing, to buy materials.
- 40% (about 3.64 million VND) when the pressure test passes, before tiling — while the client can still see the pipes.
- The remaining 30% (about 2.73 million VND) when the fixtures are fitted and the job is inspected and handed over.
Inspection at each stage
- Concealed-work inspection: invite the client to watch the pressure test, sign the record and photograph the pipework with a tape measure in shot.
- Coordination: hand over to the waterproofing and tiling team, noting the stub-out heights.
- Final inspection: fit the fixtures, flush the toilet 10–15 times, run hot and cold water, place dry paper around fixture bases and arrange a recheck after 24 hours.
- Handover: pipework photos, a valve location sketch, the pressure test record, the warranty card and user instructions.
Warranty: write down what you promise
Common practice is a workmanship warranty (welds, joints, installation) of about 12 months, with fixtures covered by the manufacturer. State clearly what is not covered: blockages from rubbish, hair or grease; damage from impacts by the user; leaks caused by someone else drilling or chasing after handover. When a client reports a problem, arrange to visit within 24–48 hours and inspect before drawing conclusions; if the fault is yours, fix it free of charge.
Safety: When inspecting a water heater or pump, only handle the water side; the RCD and power cable are checked by an electrician. If you feel a tingle when touching a tap, cut the power immediately and stop the inspection. When testing hot water, open the cold first and mix in hot afterwards. Before chasing walls or floors, scan for electrical cables and old pipes, and wear safety glasses.
Communicating with clients
During the survey and quote
Keep it short and use examples the client understands: instead of "0.4 bar of pressure", say "the fourth-floor water is weak because the tank is only about 4 metres above the tap". Explain the pressure test line: "This step makes sure nothing in the wall leaks before the tiles go on." If the client compares your price with another plumber's, do not criticise the other person; point out which items their quote is missing.
When extras come up
Extras are normal: you open the floor and find a cracked old drain, or the client wants an extra washing machine tap. The rule: stop – photograph – send an additional quote – get the client's agreement by message – only then do the work. Never "do it now and sort out the price later".
When the client is unhappy
Listen to the end, repeat the problem in your own words and set a specific time to inspect. If the client says "the shower is weak", check the shower head filter, the branch valve and the pressure on that floor first; if the cause is low supply pressure, propose a booster pump as a new item with its own quote.
Common mistakes when quoting and taking on jobs
- Verbal quotes: the sign is that at the end of the job the two sides remember two different numbers. The cause: avoiding paperwork. The fix: always send the quotation table by message or on dated paper, with validity and exclusions.
- No concealed-work inspection: the sign is a leak after tiling with no way to prove where the fault lies. The cause: skipping the pressure test record. The fix: have the client sign the test record before handing over to the tiling team.
- Taking on work beyond your skills: the sign is accepting the electrical side of the water heater and pump as well. The cause: wanting a package deal. The fix: partner with an experienced electrician and state clearly who does which part.
Frequently asked questions
If I fail one part, do I have to retake all three?
No. You retake only the part you failed, after at least a few days of extra practice.
Can I quote a bathroom per square metre?
Only for a quick estimate over the phone; when you confirm, quote item by item, because two 4 m² bathrooms can differ a lot depending on the distance to the stack and the number of fixtures.
What if the client wants to skip the pressure test to save money?
Explain that a pressure test is the only way to know the pipes inside the wall are sealed before tiling. If the client still refuses, write in the agreement that the client did not request a pressure test and that the joint warranty will be limited.
End-of-roadmap checklist and next steps
Ready-to-work checklist
- Passed Part A with ≥ 8/10, both pressure test questions right.
- Passed Part B with ≥ 70/100, no section below 50%, no disqualifying fault.
- Have your own quotation template with unit prices updated this quarter, plus contingency, exclusions and validity.
- Have templates for the pressure test record, inspection record and warranty card.
- Have a full tool kit: PPR welder, pressure test pump, 0–10 bar gauge, 1 m spirit level, cable and pipe detector.
- Know an electrician you can work with on pumps and water heaters.
Self-assessment exercises
- Redo Part A after one week without looking at the lesson, and time yourself. Pass: at least 8/10 including questions 5 and 6.
- Prepare a quote for your own bathroom or a friend's using the sample table, and compare the total with market prices from two shops. Pass: every line from the sample table is covered and your total is within ± 15% of the market check.
This is the final step of the residential plumbing roadmap. Once you pass, start with small jobs — fixing taps, replacing traps, fitting shower sets — to build regular clients and photos of real work, and only then take on complete bathrooms. To coordinate better around pumps and water heaters, you can also study the residential electrician roadmap on nambin.