The client's complaint is simple: "The toilet doesn't flush properly." The water runs and the bowl swirls, but paper stays behind, or the waste only half goes and they have to wait for the cistern to refill and flush again. Nothing is overflowing and nothing is dripping, so it is easy to treat it as a nuisance. For the household, though, a weak flush means wasted water, an embarrassing toilet for guests and, sooner or later, a real blockage.
A weak flush is rarely random. A flush is a short burst of energy: a set volume of water must reach the bowl fast enough to start a siphon in the trap and carry the contents down the drain. Anything that reduces the volume, slows the water or spoils the siphon weakens it. The skill is to find which one it is, in a logical order, instead of guessing and replacing parts.
Scope of this guide. This article is for trainee and working residential plumbers and covers gravity toilets with close-coupled or separate cisterns, lever-and-flapper or dual-flush push-button mechanisms, including concealed cisterns reached through the flush plate. It deals with diagnosing and correcting a weak or incomplete flush. A cistern that keeps running, a fully blocked toilet that needs a plunger or closet auger, and a toilet leaking at the base are covered in our separate guides. Numbers marked for reference are typical values or worked examples; always follow the toilet manufacturer's water-line mark and instructions.
How a good flush works
The flush valve (a flapper, or the seal at the bottom of a tower-type dual-flush valve) lifts off its seat.
Water drops from the cistern into the bowl. Part goes through the rim holes to wash the bowl; on many bowls part goes through a siphon jet, a hole low in the bowl that shoots water into the trap inlet.
The trap cast into the ceramic runs full of water, a siphon starts and pulls the bowl contents over the trap weir into the drain – the "whoosh".
Air enters, the siphon breaks with a gurgle, and the bowl refill tube tops up the water in the bowl to restore the trap seal.
The fill valve refills the cistern to its set level and shuts off.
Washdown bowls rely more on the force of the falling water than on a strong siphon, but the principle is the same: enough water, delivered fast enough, through clear passages, into a drain that can accept it and is properly vented. A weak flush means at least one of these conditions is not met.
Before you start
Ask a few questions first; they often point straight at the cause:
When did it start? Suddenly (after something was dropped, after a repair or new parts) or gradually over months (scale, worn parts)?
Every flush, or only sometimes? Only the half flush? Only when flushing twice quickly?
Do other fixtures behave strangely? Gurgling basins or showers, or slow drains elsewhere, point away from the toilet itself.
Has anything been replaced? A cistern, valve kit, bowl, drain or roof work.
Bring gloves and eye protection, a torch and small inspection mirror, a bucket, a ruler, a stiff bent wire or small plastic pick, an old toothbrush, towels, screwdrivers, and spare chain, flapper and button rods for the valves you meet most often.
Step 1: Watch a complete flush
Take off the cistern lid (or the flush plate on a concealed cistern) and lay it flat on a towel; ceramic lids break easily and are hard to match. Flush and watch both the cistern and the bowl:
Does the cistern empty almost completely, or does the valve close with much of the water still inside?
Does water come evenly from all round the rim, and is there a strong stream from the jet?
Does the bowl water rise higher than normal before going down? That suggests a restriction downstream.
Is there a clear whoosh and gurgle, or does the water just swirl and fade?
Afterwards, do the bowl and cistern refill to their normal levels?
Step 2: The bucket test – cistern side or bowl and drain side?
This is the most useful single test for a weak flush. Without using the cistern, pour a bucket of water (for reference, roughly the volume of one full flush or a little more) smoothly but quickly into the centre of the bowl.
The bowl clears well with a strong siphon: the bowl, trap, drain and vent can handle a flush. The fault is in how the cistern delivers its water – volume, valve lift, or blocked rim and jet. Go to Steps 3 to 5.
The bowl fills up and empties slowly: the fault is downstream – a partial blockage or a venting problem. Go to Steps 6 and 7. Stop pouring if the water rises near the rim.
The test is not perfect, because a bucket does not use the siphon jet, but in practice it quickly splits the job in two.
Step 3: Check the cistern water level
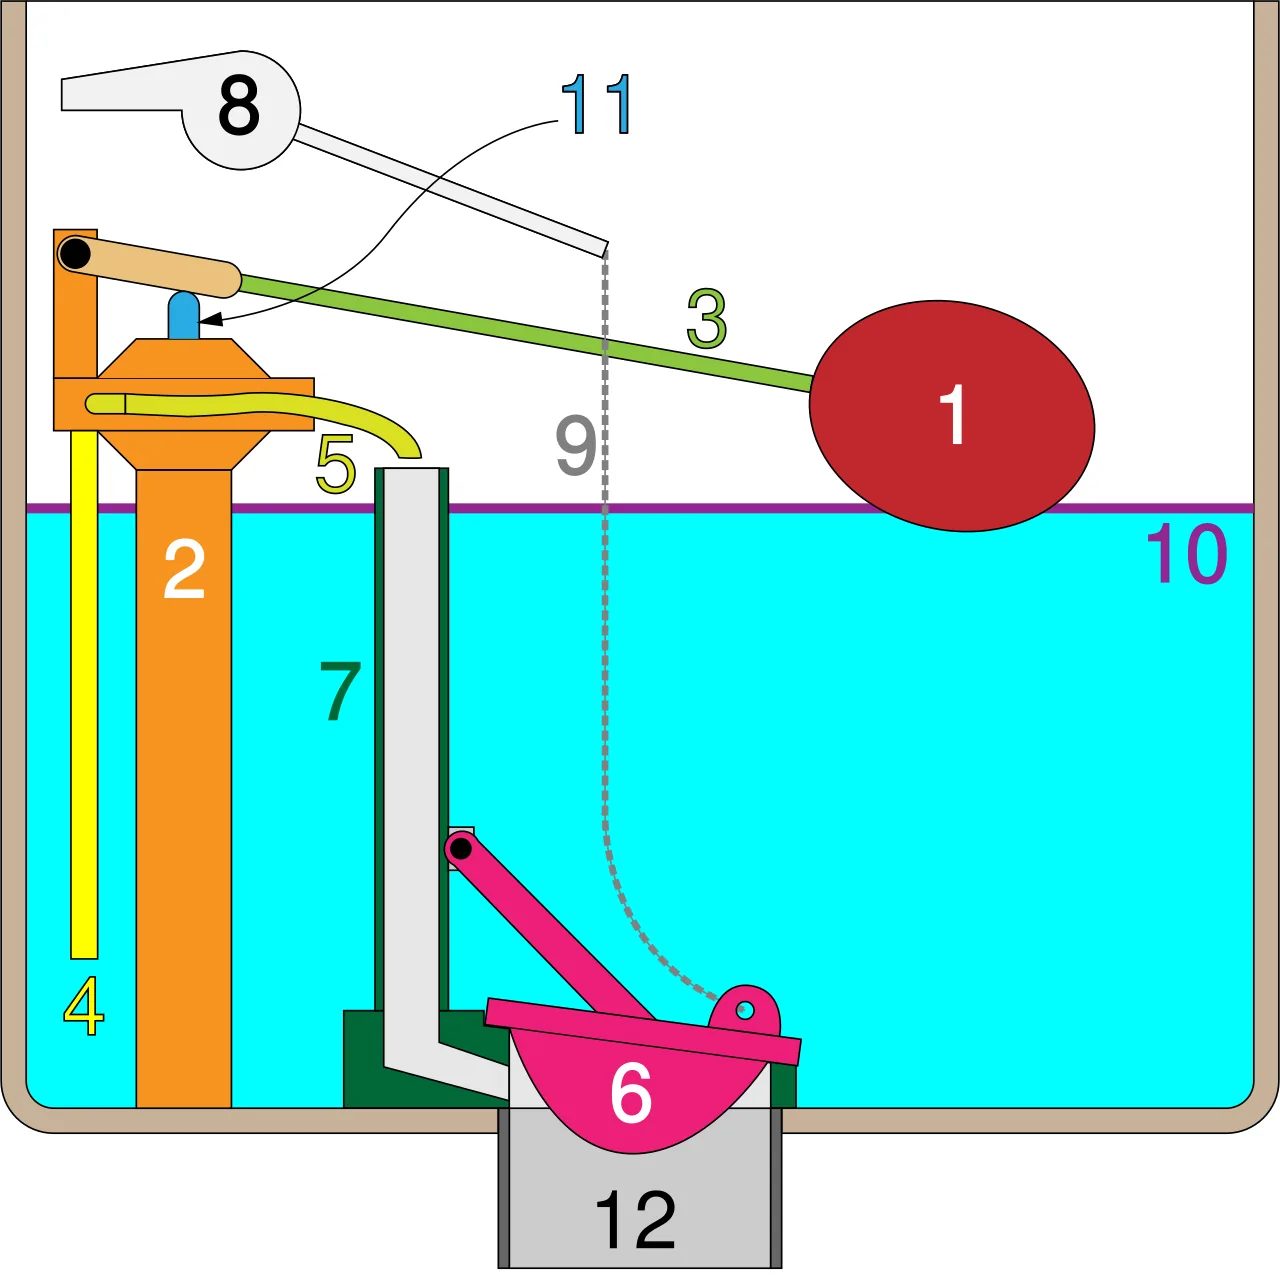
Figure 1. A traditional gravity cistern at the end of a flush. The float (1) on its arm (3) operates the fill valve (2); the fill tube (4) refills the cistern and the bowl fill tube (5) tops up the bowl through the overflow tube (7). The flush handle (8) lifts the flapper (6) with the chain (9), and water leaves through the flush tube (12). The purple line (10) is the fill line: if the water stops below it, every flush is short of water. (Diagram: Klork, Wikimedia Commons, CC BY-SA 3.0)
The flush volume depends mainly on how much water sits in the cistern above the flush valve seat. A low water level is one of the most common causes of a weak flush and one of the easiest to fix.
Find the water-line mark – usually a line, "WL" or an arrow on the inside of the cistern, or a mark on the overflow tube or flush valve – and compare it with the level after the fill valve has shut off. If there is no mark, a common rule for reference is that the water stops roughly 2–3 cm below the top of the overflow, but the manufacturer's information always comes first.
Why the level may be low
Float set too low, often by someone trying to stop a running cistern or "save water". Float-cup valves are adjusted with a threaded rod or clip, or by changing the height of the valve body; float-arm valves with an adjusting screw (bend only old brass arms, never plastic ones).
Float sticking against the cistern wall or the flush valve, or waterlogged, so the valve closes early.
Slow refill. A partly closed angle valve, a blocked inlet filter or very low pressure means users flush before the cistern is full. In many Vietnamese houses fed from a rooftop tank, top-floor toilets get very little pressure; a fill valve suited to low pressure helps, but the real fix may be in the supply.
Water leaking out through the flush valve as fast as it enters. Fix that first using the running-toilet guide.
Adjust in small steps, let the cistern refill completely and check again. The aim is to reach the mark, never to get close to the top of the overflow, or the cistern will run continuously.
Step 4: Check the flush valve lift
With the right amount of water in the cistern, the flush is still weak if the valve does not open fully or closes too early.
Lever and flapper: chain slack and flapper type
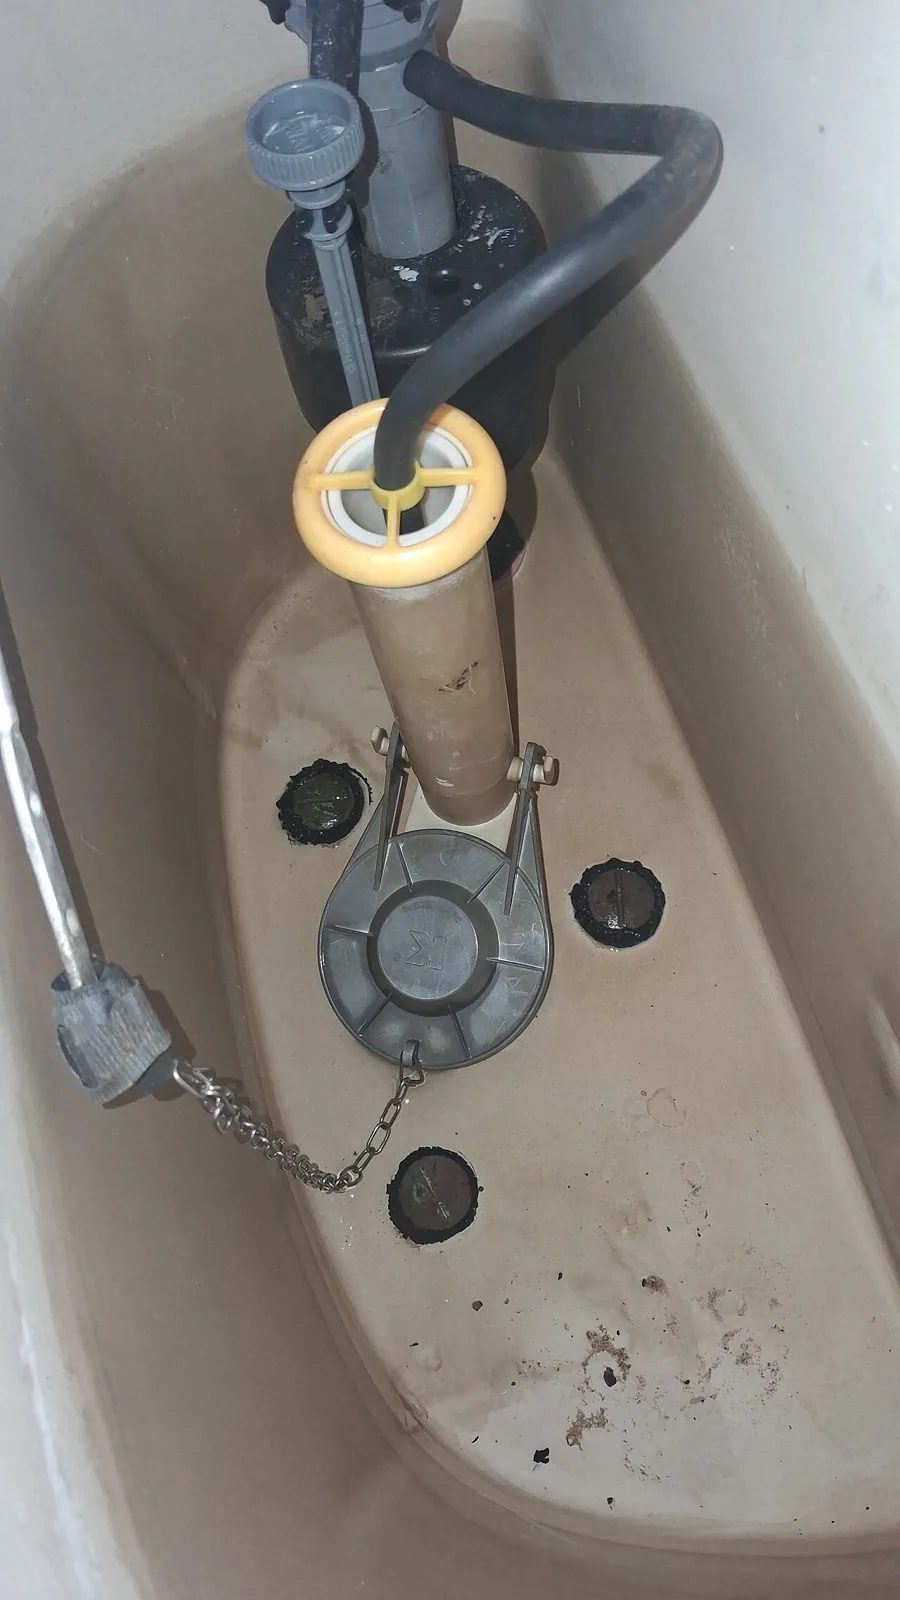
Figure 2. Inside a lever-operated cistern with the water drained: the grey flapper seated on the flush valve outlet, the metal ball chain running up to the lever arm on the left, the overflow tube in the middle with the bowl refill hose clipped on top, and the fill valve behind. The chain needs just a little slack: too much and the flapper only lifts a short way, too little and it cannot seal. (Photo: Ranch9613, Wikimedia Commons, CC0)
Too much chain slack. The lever uses up its travel taking in slack, the flapper lifts only a little and drops back at once. Shorten the chain to a small slack when the flapper is closed (for reference one or two links, about 1 cm), and make sure the loose end cannot get trapped under the flapper.
Too little slack holds the flapper slightly open and the cistern runs – a common result of over-correcting a weak flush.
Wrong hole in the lever arm. A hole close to the pivot gives less lift; use the one roughly above the flapper so the pull is vertical.
Wrong or worn flapper. Some flappers have an adjustable float or dial that sets how long they stay open; set to minimum, or replaced by a generic flapper, they can give less water than the bowl needs. A waterlogged flapper also closes early. Match the replacement to the valve size and, where possible, the manufacturer's part.
Loose handle nut or cracked lever arm, so the handle moves without lifting the flapper fully.
Dual-flush push buttons: rods and settings
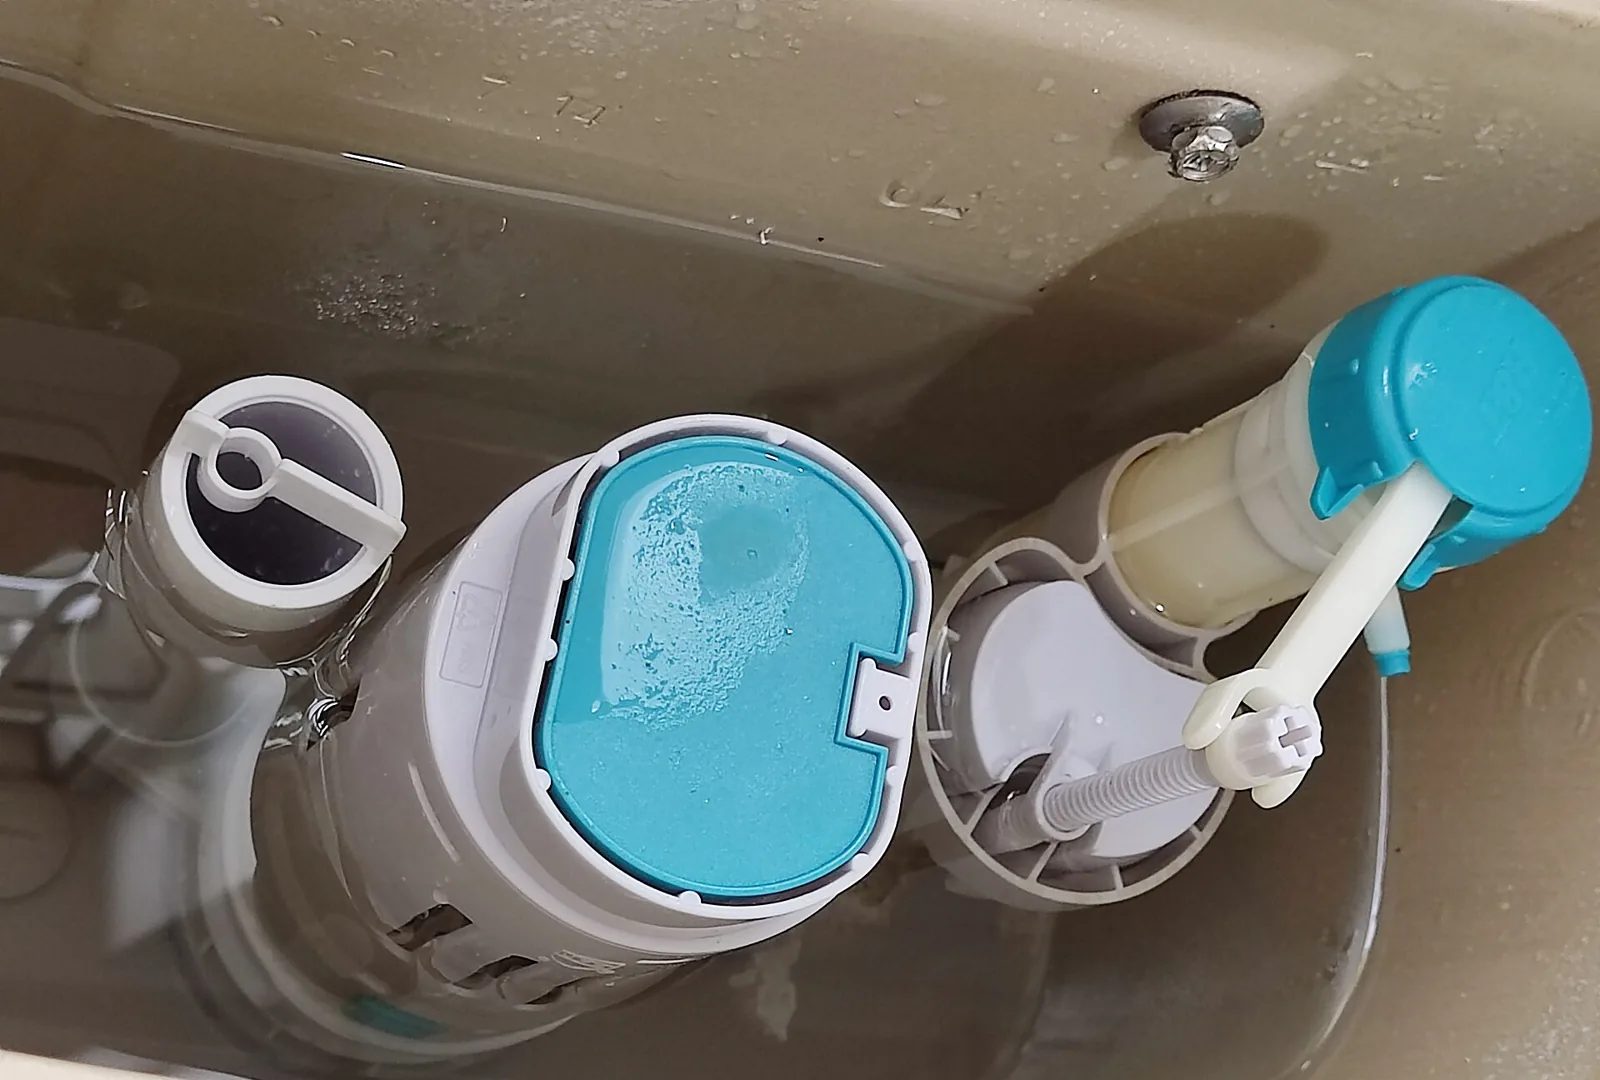
Figure 3. Inside a dual-flush cistern: the large tower-type flush valve in the centre with its blue top cap, where the button rods press for the half and full flush, and the fill valve on the right with its float cup and threaded adjustment rod. The water line and some residue can be seen on the cistern wall. (Photo: BaINSCHAUW Lamidou, Wikimedia Commons, CC BY-SA 4.0)
Push-button cisterns are very common in Vietnamese homes. The button pushes rods onto the top of the flush valve: one part gives a half flush, the other a full flush. Dual-flush volumes are often quoted as about 3 L / 6 L or 3 L / 4.5 L for reference; the real values depend on the toilet and its documentation.
Rods too short or slipped – very common after the lid or valve has been changed. The button bottoms out before the valve is fully lifted, so the flush starts and then stops short. Rods are usually screwed in or out, or snapped off at marked lengths (cut too much and you need a new rod). Adjust with the lid in place and test both buttons.
Rods too long press on the valve all the time, so it may not seal. A small free gap with the lid on is normal; follow the valve maker's setting.
Half flush weak, full flush fine: check the half-flush float or stop, which decides when the half flush ends, and adjust within the valve's range. Also check that the rods have not been swapped.
Concealed cisterns: remove the flush plate as the manufacturer describes. If the plate was refitted after tiling, the actuating rods may no longer suit the finished wall thickness.
A cracked tower, a jammed cage or a hard, brittle seal will not lift cleanly; replacing the valve with the correct kit is often quicker than repairing it.
Step 5: Clear the rim holes and the siphon jet
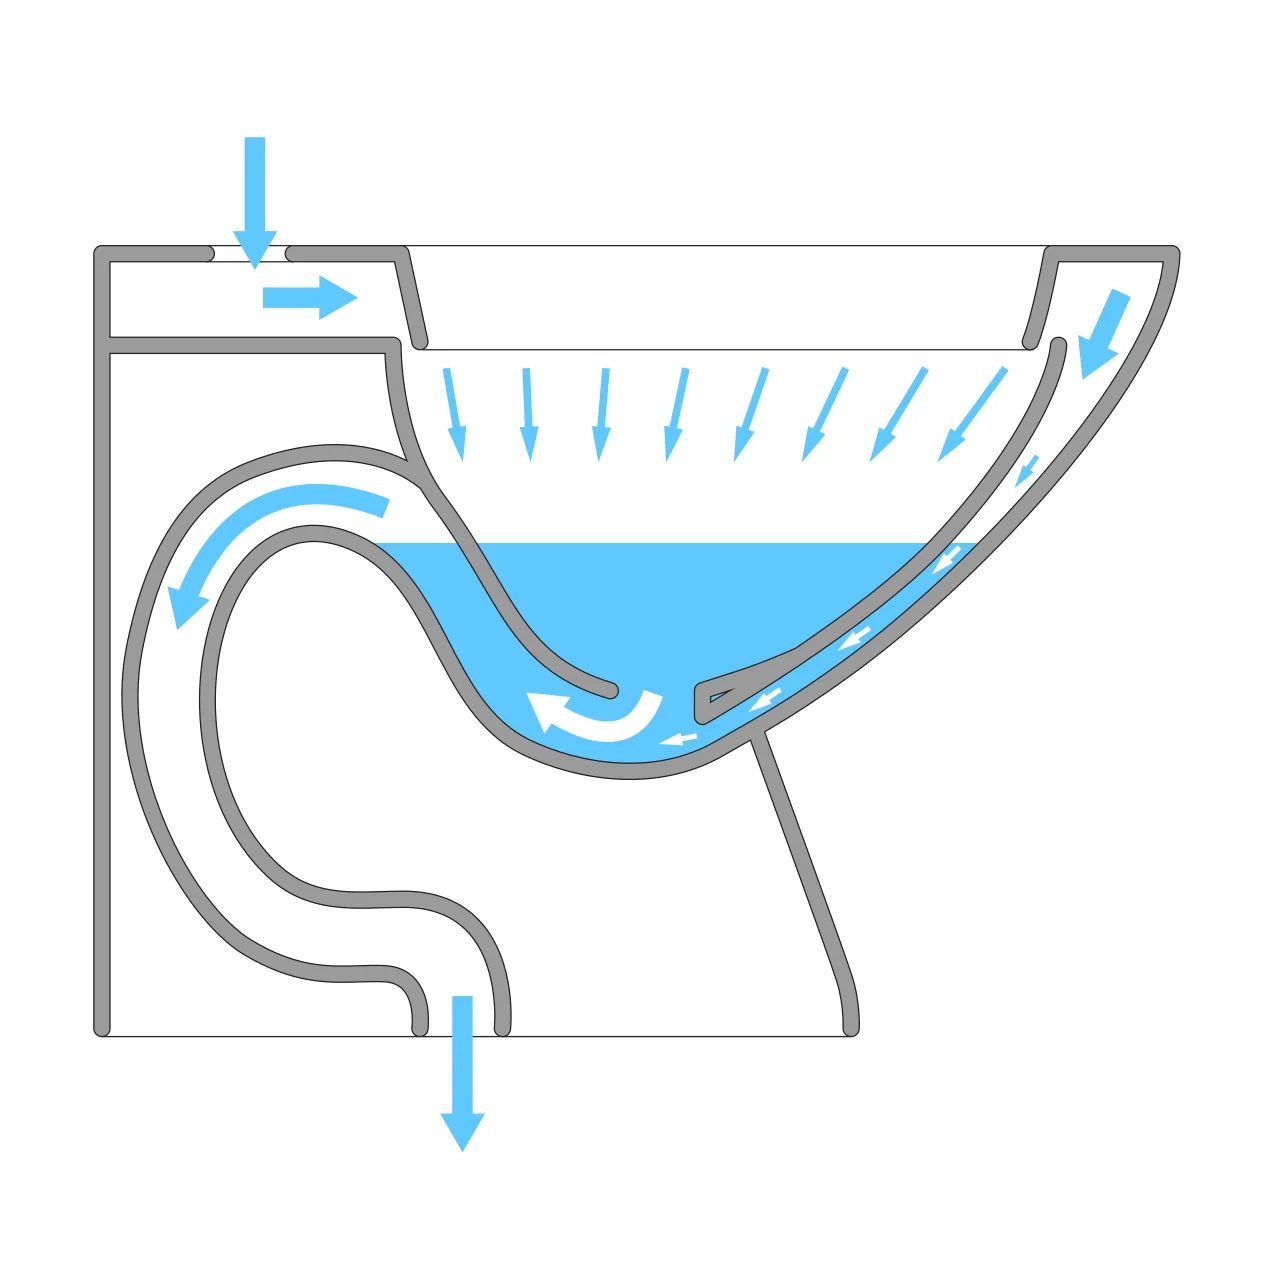
Figure 4. Simplified cross-section of a jet-siphonic bowl. Water from the cistern enters at the back, runs round the rim and sprays down the sides of the bowl, while part travels through a passage in the ceramic to a jet near the bottom that shoots into the trap and helps start the siphon. Scale in the rim holes or the jet weakens both. (Diagram: SouthHamsian, Wikimedia Commons, CC BY-SA 4.0)
If the cistern delivers its full volume quickly but the siphon is slow to catch, look at where water enters the bowl. Water in many parts of Vietnam is hard or carries sediment, especially from wells or old supply pipes, and limescale builds up in the rim holes and the jet. The water then trickles in instead of rushing in.
Inspect: with a mirror and torch, look up under the rim for holes closed with white or brown crust and for streaks running down from only some holes. During a flush, note dry areas or weak flow. Find the jet opening near the bottom of the bowl and check for a strong stream and for crust round it. On rimless bowls, check the single spreader outlet.
Clean mechanically first: with gloves, clear each hole and the jet with a bent wire, plastic pick or toothbrush. Work gently; glaze can chip.
Descale heavy deposits with a product made for toilets, following its label – for example, lower the bowl water, apply the product so it stays on the scale, then scrub and flush. Only pour a product into the overflow to reach the rim channel if its label allows it.
Never mix descaler with bleach or other cleaners, and do not put strong acids or chlorine tablets in the cistern; they can damage rubber seals and plastic parts.
Step 6: Look for a partial blockage in the trap or outlet
If the bucket test was slow, something is restricting the flow even though the toilet is not fully blocked. Typical causes:
A solid object lodged in the trap – a toothbrush, toy, cap or hair clip – catching paper and waste.
Wipes, sanitary items or cotton buds building up at the trap weir or outlet.
Thick scale narrowing the trapway after years of hard water.
Problems just beyond the toilet: a partly blocked pan connector or flange, a gasket pushed into the bore, or renovation debris such as tile adhesive or cement in the drain.
A partly blocked branch or main drain, especially if other fixtures are slow too.
Look into the trap with a torch and mirror, then use the plunger or closet auger methods from our blocked-toilet guide. An object that will not move may mean removing the toilet and pushing it out from the outlet end. Cement that has set inside a trapway cannot be dissolved with ordinary cleaners; the bowl may have to be replaced.
Step 7: Check the venting
When a large volume of water runs down the stack, air must enter behind it. If the vent is blocked or missing, the moving water pulls air through the traps instead, and the toilet's siphon becomes weak and slow. Signs include gurgling in the toilet when other fixtures drain, bowl water that bubbles or moves, slow flushing on several toilets on the same stack with no blockage found, and sewer smells.
In Vietnamese tube houses (nhà ống) the vent often ends on the roof terrace. Check that it is open and not blocked by a closed cap, leaves or a bird's nest, and that it was not cut off when an extra floor was added. A stuck air admittance valve acts like no vent at all. Roof work needs a safe access route and fall protection; if the vent cannot be reached safely, do not improvise.
Step 8: Check the water level in the bowl
The water left in the bowl is the trap seal and also helps the next flush. If it is lower than normal:
Bowl refill tube (Figure 1, part 5) has fallen off, is kinked or has lost its clip. Clip it back so its end sits above the top of the overflow, not in the water.
Venting problem pulling water out of the trap (Step 7).
Paper or fibre hanging over the trap weir slowly wicking water out.
A crack in the ceramic – rare, but if the level drops while the toilet is unused, look for damp at the base. A cracked bowl must be replaced.
Step 9: Check that cistern and bowl belong together
A flush that has been weak since installation or since a part was changed is often a matching problem. Bowls are designed for a certain flush volume and flow from a certain valve. A low-volume cistern or valve kit on an older bowl designed for a larger flush, a replacement flush valve with a smaller outlet, or a generic cistern that lines up badly with the bowl inlet can all weaken the flush. Check the model numbers (often on the back of the bowl or inside the cistern) against the manufacturer's documentation. The honest fix is the correct cistern or kit, or a matched toilet; raising the water above the mark is not a fix.
Worked examples
Example 1: Weak flush after a "repair"
A toilet has needed two flushes since a neighbour "fixed" a running cistern. The bucket test is fine. The water stops about 4 cm below the water-line mark (example data): the float had been lowered to stop the running, but the real cause was a worn flapper. You fit a matching flapper, raise the float to the mark, set one link of chain slack and test several flushes. Strong flush, no running.
Example 2: Half flush weak, full flush fine
In a house in Hanoi, the half button gives only a trickle. Pressing the half-flush part of the valve by hand gives a good half flush, so the valve works; with the lid on, the half rod stops short of it. You reset the rod length to the valve instructions and both buttons now work properly.
Example 3: Scale and a blocked vent
In a townhouse supplied from a well, the flush has weakened over two years and the bucket test is slightly slow. Half the rim holes are crusted and the jet is narrowed. Cleaning and descaling help, but the shower still gurgles when the toilet is flushed. On the roof terrace the vent is full of leaves and a nest. Once it is cleared the flush is strong again – two faults were combining.
Reference table: symptom, likely cause, check and fix
Symptom | Likely cause | Check | Fix |
|---|---|---|---|
Flush always weak, bucket test good | Cistern water level too low | Compare level with manufacturer's water-line mark | Raise float or valve to the mark; never near overflow top |
Flapper drops back almost at once | Too much chain slack, wrong lever hole, waterlogged or wrong flapper | Watch flapper lift while holding lever down | Small chain slack; correct hole; matching flapper |
Push-button flush starts then stops short | Button rods too short or slipped | Press valve by hand, then with button and lid on | Set rod length per valve instructions; replace damaged rods |
Half flush weak, full flush fine | Half-flush float or stop set low; rods swapped | Inspect half-flush setting and rods | Adjust within valve range; correct rods |
Weak flow from some rim holes; white or brown crust | Limescale in rim holes (hard water) | Mirror and torch under rim; watch flush pattern | Clear holes; toilet descaler per label |
Siphon starts late on jet-siphon bowl | Jet partly blocked with scale or debris | Look at jet opening and its flow during flush | Clean and descale jet |
Bowl rises high and drains slowly; bucket test slow | Partial blockage in trap, outlet or drain | Mirror in trap; test other fixtures | Plunger or closet auger; remove toilet for stuck object; clear drain |
Gurgling; bowl water moves when other fixtures drain | Blocked or missing vent, stuck air admittance valve | Check vent outlet; check other fixtures | Clear vent safely; correct venting |
Bowl water low after flush | Refill tube off, vent problem, wicking, crack | Refill tube and clip; trap; damp at base | Re-clip tube; clear trap; fix vent; replace cracked bowl |
Weak since installation or parts change | Cistern, valve and bowl not matched | Compare model numbers with documentation | Correct kit or cistern, or a matched toilet |
Cistern slow to refill; users flush early | Partly closed angle valve, blocked filter, low pressure | Time the refill; inspect inlet filter | Open valve; clean filter; low-pressure fill valve; check supply |
Safety and hygiene checklist
Wear waterproof gloves and eye protection when working in the bowl, trap or drain; cover cuts and wash hands and forearms afterwards.
Ask whether any drain cleaner or descaler has already been used. If so, treat the bowl water as a chemical hazard: avoid splashing, do not plunge, and remove or flush it carefully first.
Never mix drain cleaners, acids or descalers with bleach or other products – some combinations release toxic gas. Use one product at a time, flush between products and keep the room ventilated.
Follow every product label. Do not let acid descalers sit on marble or other natural stone, grout, or chrome and metal fittings, and keep strong chemicals out of the cistern.
Ceramic is fragile and breaks into sharp edges: lay the lid flat on a towel, never over-tighten nuts or bolts on ceramic, and handle cracked parts with care.
Turn off the angle valve and flush to empty the cistern before removing valves or the cistern; reopen slowly and check for leaks.
Isolate the power to electric toilet seats or pumps before working on them, and keep power tools away from standing water.
Use safe access and fall protection for roof vents; never work on wet or steep roofs or near unprotected edges.
Clean and disinfect tools after use and leave the bathroom clean and dry. Show the client what you found and ask them to test a few flushes before you leave.
Frequently Asked Questions
Can I just raise the water level to get a stronger flush?
Only up to the manufacturer's water-line mark. Below the mark, raising it is the correct fix. Above it, the cistern may run continuously, and the bowl is not designed for the extra volume anyway.
Why does my toilet flush well with a bucket but not with the button?
Because the bowl and drain are fine. The problem is how the cistern delivers its water: low level, a valve that does not lift fully or closes early, or blocked rim holes and jet.
Is a weak flush normal on a low-flow toilet?
No. A well-designed low-flow toilet that is set up correctly should clear the bowl in one flush. Problems are more likely when a low-volume cistern or kit has been fitted to a bowl not designed for it.
Can I use vinegar instead of a commercial descaler?
Vinegar is a weak acid and can soften light scale with enough contact time, but it is slow on heavy deposits. The same rules apply as for any acid: never mix it with bleach and keep it off natural stone.
The flush is weak and the shower gurgles at the same time. Is the toilet faulty?
Probably not. Gurgling in other fixtures when the toilet is flushed usually points to a partly blocked drain or a vent problem. Check those before replacing toilet parts.
When should the whole toilet be replaced?
When the bowl is cracked, the trapway is badly scaled or contains set cement, or the cistern and bowl cannot be properly matched. Most weak flushes are fixed by adjustment, cleaning or a correct valve kit.
Practice Exercises
Find the water line. On three toilets, find the water-line mark, measure how far the water level is from it, and note how each fill valve's height is adjusted.
Chain slack experiment. On a lever-and-flapper cistern, set the chain too slack, too tight and correct. Describe the flapper lift, the flush and whether the cistern runs afterwards in each case.
Bucket test. Do the bucket test on a good toilet and one with a weak flush. Record what you see and which half of the system you would investigate next.
Dual-flush rods. On a push-button cistern, identify the half and full rods and their adjustment, set them correctly, and explain what happens if each is too long or too short.
Diagnosis plan. A top-floor toilet in a four-storey tube house flushes weakly, the bowl water is low and the basin gurgles when the toilet is flushed. Write your step-by-step visit plan in order of likely causes, including safety precautions for checking the roof vent.
A good flush needs the right amount of water, a valve that opens fully, clean passages into the bowl, a clear trap and a drain that can breathe. Work through them in order, test after every change, and the client will only need to press the button once.