
Steaming milk for latte art comes down to three things: start with very cold milk, stretch it for the first few seconds to build fine foam, then sink the steam tip a little deeper so the milk rolls in a whirlpool until it reaches about 55–65°C (never above 70°C). Properly steamed milk looks like wet paint, shows no visible bubbles and pours in one smooth stream. This lesson takes you from choosing milk, holding the pitcher and placing the steam tip to pouring a heart, a tulip and a rosetta, with a troubleshooting table and a costed 7-day practice plan.
By the end of this lesson, you will be able to:
- Steam a pitcher of milk for a latte to 55–65°C with roughly 1 cm of foam and no bubbles visible to the eye.
- Adjust foam thickness for a flat white, a latte and a cappuccino by changing the stretching time.
- Pour a balanced heart in 7 out of 10 cups, and start practising the tulip and the rosetta.
- Recognise and fix the four most common faults: big bubbles, scorched milk, separated milk and a blurry pattern.
- Purge and wipe the steam wand correctly after every pitcher without getting burned.
Learning the barista trade? See the 8-step Barista roadmap on NAMBIN: milk steaming and latte art is step 4, right after pulling espresso and before phin coffee and cold brew.
What milk steaming is and why it makes or breaks a latte
Steaming means using the steam wand of an espresso machine to blow hot water vapour into milk, heating it and foaming it at the same time. Good foam is called microfoam: millions of tiny air bubbles, too small to see, blended into the milk as one glossy, silky mass. This microfoam floats on the espresso and is what lets you draw a latte art pattern.
Two stages: stretching and rolling
Stretching is the first few seconds, when the tip sits just under the surface, draws in air and makes the milk expand. Rolling (also called texturing) is the next stage, when you sink the tip deeper so the milk turns in a whirlpool, breaking large bubbles into fine ones and heating evenly. Stretching decides the amount of foam; rolling decides its quality.
Why temperature matters
The lactose in milk tastes sweetest at about 55–65°C. Above 70°C, the milk proteins break down, the foam collapses, the milk takes on a cooked, boiled-milk smell and loses its sweetness. Milk that is too hot can also burn a customer's mouth and cannot be drunk straight away. Milk below 50°C cools quickly and the foam has not had time to become fine.
Good milk makes espresso taste better
A well-pulled shot, as described in our lesson on how to pull an espresso shot, is only about 15% of a latte; the rest is milk. If the milk is badly steamed, the drink tastes flat however good the coffee is, and the foam is as airy as soap suds.
Preparing the milk and equipment
Most steaming mistakes happen before the steam valve is even opened: the milk is not cold enough, the pitcher is too big or it is overfilled. Getting the setup right gives you more rolling time before the milk hits its target temperature.
Choosing milk
- Fresh whole milk (about 3.2–3.8% fat), pasteurised, straight from a fridge at 2–5°C. This is the easiest milk to learn with: glossy foam, sweet taste, and patterns that hold.
- Low-fat or skimmed milk foams a lot, but the foam is dry, breaks quickly and is hard to draw with. Use it only when a customer asks.
- "Barista edition" plant milks (oat, almond or soy with added foam stabilisers). Oat milk is the easiest. Steam it slightly cooler, around 55–60°C, because plant milks separate more easily when overheated.
- Never re-steam milk that has already been steamed: the proteins are already broken down and it will not foam.
The milk pitcher
A stainless steel pitcher with a pointed spout is your main tool. A 350 ml pitcher is right for one 240 ml latte; a 600 ml pitcher serves two cups or one large one. Fill milk to just below the bottom of the spout (about one third of the pitcher's height) to leave room for the milk to expand. The pitcher should be cold and dry; many cafes keep pitchers in the fridge.
Other tools
- A separate damp cloth used only for the steam wand (a different colour from the counter cloth).
- A clip-on pitcher thermometer for beginners, used for the first 1–2 weeks to "train" your hand to judge heat.
- Ceramic cups: 240 ml for a latte, 180 ml for a cappuccino, 150–160 ml for a flat white.
Step-by-step milk steaming
Follow the same order every time. On a commercial machine, steaming 200 ml of milk usually takes about 20–30 seconds; a weaker home machine may take 45–60 seconds.
- Purge the steam wand for 1–2 seconds into a cloth or the drip tray to push out condensed water, which would thin the milk.
- Pour cold milk into the pitcher up to just below the spout.
- Place the tip about one third of the radius away from the centre of the pitcher, about 1 cm below the surface, with the wand angled across the pitcher wall.
- Open the steam valve fully. A half-open valve makes milk spit and will not create a whirlpool.
- Stretch: lower the pitcher slowly so the tip sits right at the surface and you hear a soft hiss, like paper tearing. Hold it until the milk has expanded enough (see the table in the next section) and the hand under the pitcher feels it warm to body temperature, about 37°C.
- Roll: raise the pitcher 1–2 cm so the tip sinks deeper and the hissing stops. The milk turns in an even whirlpool.
- Stop the steam when the base of the pitcher is so hot you can only hold it for 1–2 seconds (about 60°C), or when the thermometer reads 55–60°C (the temperature rises a few more degrees after you stop).
- Close the valve first, then remove the pitcher. Pulling the pitcher away with the valve still open sprays milk everywhere.
- Wipe the wand immediately with its own damp cloth, then purge for 1–2 seconds to blow out any milk sucked back inside the wand.
- Tap and swirl: tap the pitcher on the counter once or twice to pop any remaining large bubbles, then swirl it so the milk turns glossy again, ready to pour.
Use your ears to locate the tip
An even, gentle hiss means you are stretching correctly. A loud gurgling or screeching with spitting foam means the tip is too high and you are blowing big bubbles. Total silence from the start means the tip is too deep: the milk heats but does not expand. After a few dozen pitchers, you will steam more by ear than by eye.
Judge heat with your hand
Keep your palm on the base of the pitcher throughout. Warm to the touch means about 37°C, the end of stretching. Hot enough that you want to pull your hand away means about 60°C, time to stop. Use a thermometer to check yourself during the first week, then drop it.
Safety warning: steam from the wand is over 100°C and can cause worse burns than boiling water. Never point the wand at anyone, and never open the valve with your hand near the tip. Always close the valve before removing the pitcher. The wand body gets very hot: hold the insulated part and wipe it with a thickly folded cloth. If milk overflows the pitcher, close the valve immediately rather than trying to save it. For a burn, run clean cool water over it for 15–20 minutes and do not apply toothpaste or fish sauce (common home remedies in Vietnam); for large burns or big blisters, go to a medical facility.
Foam thickness for a latte, a cappuccino and a flat white
With the same technique, you only change the stretching time to get different foam thicknesses. The table below gives reference figures for a 350 ml pitcher and fresh whole milk.
| Drink | Cup | Cold milk in pitcher | Milk expansion | Foam layer in the cup | Temperature |
|---|---|---|---|---|---|
| Flat white | 150–160 ml | 150 ml | ~10–15% | ~0.5 cm, very thin | 55–60°C |
| Latte | 240 ml | 200 ml | ~20–30% | ~1 cm | 55–65°C |
| Cappuccino | 180 ml | 150 ml | ~40–50% | ~1.5–2 cm | 55–65°C |
How is cappuccino milk different from latte milk?
For a cappuccino, you stretch almost twice as long as for a latte so the milk expands by 40–50%, but you still roll it until the foam is fine and glossy. The old-style "dry" cappuccino, with stiff foam spooned on top, is rare in cafes today; a modern cappuccino can still carry a pattern, just a thicker and rounder one.
A flat white needs the least foam
For a flat white you stretch for only 1–2 seconds, so the milk barely expands. The thin foam layer lets the coffee flavour come through. Figure 1 shows a flat white with a thin foam layer and a tulip pattern.

Photo: Maxstein5 / Wikimedia Commons, CC BY-SA 4.0
Reading the milk in the pitcher
Well-steamed milk looks like wet white paint, glossy with no visible bubbles. When you tilt the pitcher, it moves as one body rather than splitting into thin milk underneath and stiff foam on top. Figure 2 shows milk just steamed on a machine: the surface is smooth, but you can see a few bubbles at the edge, which tapping and swirling will remove.
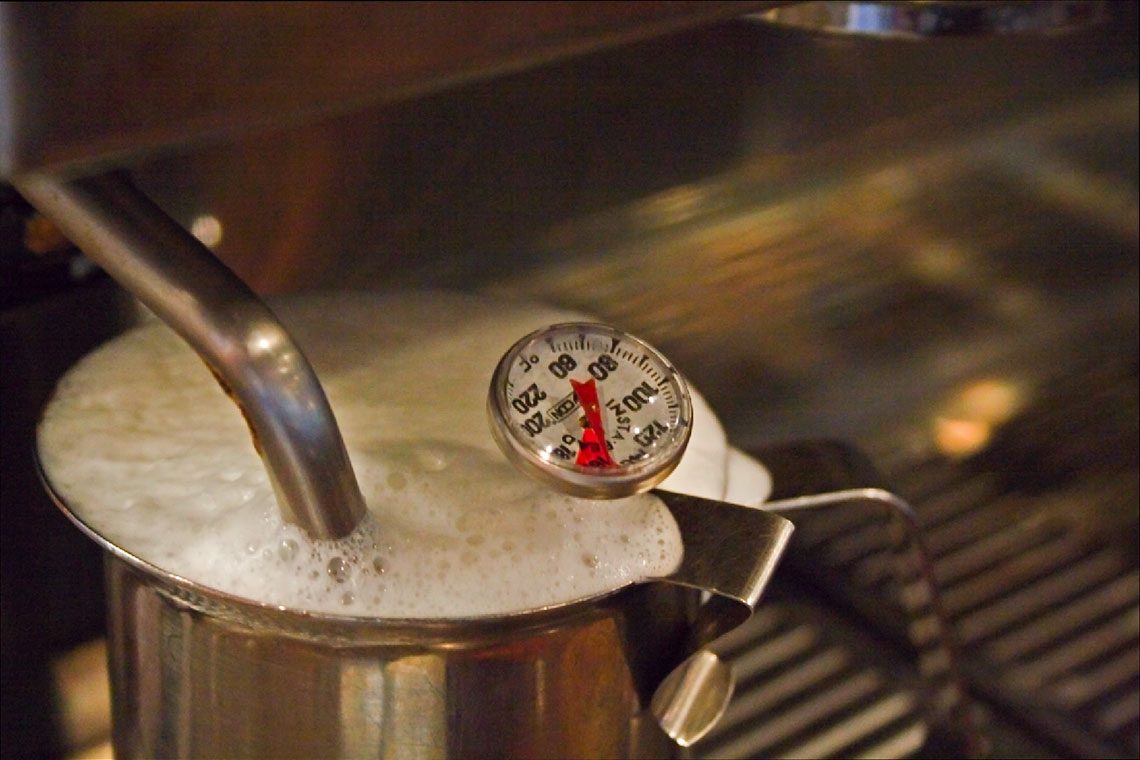
Photo: Original uploader was Tijuana Brass at en.wikipedia / Wikimedia Commons, CC BY-SA 3.0
Pouring latte art: heart, tulip, rosetta
Latte art relies on two principles: pour from high and the milk sinks under the crema; pour from low and the foam rises to the surface and draws the pattern. Every pattern starts with a "base" (pouring high to mix) and finishes with "drawing" (bringing the spout down to the surface).
A latte art heart for beginners
- Hold the cup tilted about 30° towards the pitcher. Pour a thin stream from 8–10 cm into the middle of the cup so the milk sinks and mixes with the espresso until the cup is about half full.
- Bring the spout right down to the coffee surface (almost touching) and increase the flow. A round white dot appears and spreads.
- Slowly level the cup while holding the pitcher in place, letting the white dot grow to about two thirds of the surface.
- Lift the pitcher 3–4 cm, narrow the stream and pull a straight line through the middle of the dot towards the far side. This line creates the point of the heart, as in Figure 3.

Photo: Shixart1985 / Wikimedia Commons, CC BY 2.0
Tulip
A tulip is several "dots" stacked together. Pour the first dot and stop; push a second dot in behind it so it presses the first into an arc; repeat for 2–4 layers, then pull a line through all of them as with the heart. The key is cutting the stream cleanly between layers.
Rosetta
The rosetta (a fern-leaf pattern) needs the silkiest milk. With the spout close to the surface, wiggle your wrist side to side at a steady rhythm while slowly moving the pitcher back towards the rear of the cup, creating ripples. At the edge, lift the pitcher and pull a straight line back up through the middle. Figure 4 shows a finished rosetta with even ripples.

Photo: Chris Olszewski / Wikimedia Commons, CC BY-SA 4.0
Worked example: one 240 ml latte from start to finish
Lan is a new barista on the afternoon shift at a cafe in Can Tho, in the Mekong Delta. Her first order is a hot 240 ml latte, made to the house recipe: a 36 g double espresso plus about 200 ml of fresh whole milk.
What Lan does
- 0–30 seconds: pulls an 18 g → 36 g shot into a pre-warmed ceramic cup. While it runs, she pours 200 ml of 4°C milk into a 350 ml pitcher.
- 30–32 seconds: purges the steam wand for 1–2 seconds.
- 32–38 seconds: stretches for 6 seconds; the milk rises from the 200 ml mark to about 250 ml (25% expansion, within the 20–30% range for a latte). The base of the pitcher feels warm.
- 38–55 seconds: raises the pitcher and rolls for 17 seconds until the base feels hot; the thermometer reads 58°C and she closes the valve. Five seconds later the milk is at 61°C.
- 55–62 seconds: wipes and purges the wand, taps the pitcher twice and swirls until the milk is glossy.
- 62–75 seconds: pours the base from 8 cm to half full, lowers the pitcher to draw a heart and pulls the line through.
Checking the result
The heart leans slightly to the left but has a round edge and no big bubbles: a pass. The drink reaches the customer after about 75 seconds, and the shot waited only about 45 seconds — within the time the crema stays good. Lan notes in her log: "stretch 6 s, roll 17 s, stop at 58°C" so she can repeat it for the next cups.
When the order is for two cups
Lan uses a 600 ml pitcher with 400 ml of milk, stretches about 4–5 seconds longer, then splits the milk between two cups, swirling the pitcher between pours so the foam does not separate.
Common steaming and pouring faults
The table below summarises the four faults beginners meet most often, in the order sign → cause → fix.
| Fault | Sign | Cause | Fix |
|---|---|---|---|
| Big bubbles | Airy foam, visible bubbles, gurgling noise | Tip too high, stretching too long, milk not cold enough | Lower the pitcher more slowly and keep the tip just at the surface; stretch for less time; use milk at 2–5°C |
| Scorched milk | Cooked-milk smell, flat taste, pitcher too hot to hold | Steamed above 70°C | Stop at 55–60°C and check with a thermometer; pour it away, do not serve it |
| Separated milk | Thin milk at the bottom, stiff foam on top | Not enough rolling, milk left standing too long after steaming | Roll longer with the tip off-centre; swirl right before pouring; pour within 30 seconds |
| Blurry pattern | Smudged shape with no outline, milk sinks | Foam too thin, pitcher held too high while drawing, base poured too full | Stretch 1–2 seconds longer; bring the spout down to the surface to draw; start drawing when the cup is about half full |
The pattern drifts to one side
This usually happens when the cup is not levelled evenly while drawing, or the pitcher is not centred over the cup. Practise pouring with water mixed with a few drops of washing-up liquid (for practice only, then pour it away) to learn the movement without wasting milk.
Big bubbles appear after steaming
If a freshly steamed pitcher has a few big bubbles at the edge, tap it once or twice and swirl. If the whole surface is covered in big bubbles, it cannot be saved: steam a fresh pitcher instead of skimming off the foam and serving it.
Cleaning the steam wand after every use
Milk left on the steam wand dries within minutes, builds up deposits and becomes a breeding ground for bacteria. A dirty wand also gives the next pitcher a burnt smell.
After every pitcher
- Wipe the wand immediately with its own damp cloth, from the body down to the tip.
- Purge for 1–2 seconds into the drip tray to blow out milk sucked back into the tip holes.
- Rinse the pitcher and turn it upside down to dry; never leave leftover milk in it.
At the end of the day
Soak the wand tip in a pitcher of warm water with a milk-system cleaner, following the machine maker's instructions, for about 10–15 minutes, then purge and wipe clean. If the tip holes are blocked, switch the machine off, let it cool, remove the tip and clear it with a proper cleaning pin. Change the wand cloth every shift.
Storing milk
Take out only as much milk as you will use in 1–2 hours and keep the rest in the fridge. Leftover steamed milk is thrown away, never poured back into the carton.
A 7-day practice plan and the cost of practice milk
You can practise pouring with soapy water, but stretching and judging heat must be practised with real milk. Fresh whole milk costs about 36,000 VND per litre (~US$1.40; 2026 reference price, varies by brand and region).
| Day | Focus | Pitchers × milk | Milk | Cost |
|---|---|---|---|---|
| 1 | Purging, hearing the stretch, judging heat by hand + thermometer | 4 × 150 ml | 0.6 L | 21,600 VND |
| 2 | Latte: stretch 20–30%, roll to 60°C | 6 × 150 ml | 0.9 L | 32,400 VND |
| 3 | Pouring the base + a round dot | 6 × 200 ml | 1.2 L | 43,200 VND |
| 4 | Heart | 8 × 200 ml | 1.6 L | 57,600 VND |
| 5 | Heart + cappuccino and flat white | 8 × 200 ml | 1.6 L | 57,600 VND |
| 6 | Tulip with 2–3 layers, first rosettas | 8 × 250 ml | 2.0 L | 72,000 VND |
| 7 | Self-test: 6 cups against the criteria below | 6 × 250 ml | 1.5 L | 54,000 VND |
| Total | 9.4 L | 338,400 VND | ||
Money-saving tip: in a cafe, once you are consistent, practise on real customer orders; at home, drink the steamed milk or use it for yoghurt or baking instead of pouring it away.
Pass / not yet criteria
- Pass: all 6 pitchers on day 7 land between 55 and 65°C, with no big bubbles after tapping and swirling.
- Pass: a balanced heart with a clear outline in at least 4 of 6 cups; you can tell latte foam from cappuccino foam.
- Pass: the wand is wiped and purged after every single pitcher.
- Not yet: any pitcher above 70°C, removing the pitcher with the valve open, or forgetting to wipe the wand.
Frequently asked questions
Why does my steamed milk have big bubbles?
Almost always because the tip sits too high above the surface or you stretch for too long. Lower the pitcher slowly, keep the hiss gentle and move to rolling sooner. Milk that is not cold enough also causes big bubbles, because it leaves you less time to roll.
How much foam does cappuccino milk need?
The milk should expand by about 40–50%, giving a 1.5–2 cm foam layer in the cup: clearly thicker than a latte, but still fine and glossy.
How long does it take a beginner to pour a latte art heart?
If you follow the 7-day plan above, most learners pour a recognisable heart within the first week; a neat, consistent heart usually takes another 2–4 weeks behind the bar.
Can oat milk be used for latte art?
Yes, if you use a "barista edition" with foam stabilisers. Steam it to about 55–60°C and stretch slightly less than dairy milk, because oat milk expands quickly.
How can I tell the temperature without a thermometer?
Use your hand on the base of the pitcher: warm means stretching is done; so hot you can only hold it for 1–2 seconds means stop the steam. Check against a thermometer for your first few dozen pitchers until your hand learns.
The next step on the roadmap
Once you can steam milk consistently and pour a heart, you are ready for step 5 of the roadmap: Phin coffee, white coffee, cold brew & pour over. Start with our guide to Vietnamese phin coffee. To see how latte art skills affect your pay, read barista salary in Vietnam 2026.
Keep learning the barista trade: see all 8 steps, from bar hygiene to the skills test and job applications, on the Barista roadmap on NAMBIN.